This week we take a break from our Tana Search Series and get back to basics. Today we deconstruct the openings screen of Tana, its features, and its options. There is more here than you might realize.
Thank you for your continued support. I'm on a mission to help the less tech-savvy community enjoy Tana's power. Your questions are always welcome. Whether you're a free subscriber or paid (thank you very much for your support!), don't hesitate to post your questions in SLACK (here’s a Slack invite) in our exclusive Substack subscribers-only Chat (including free subscribers) or DM me in SLACK or Twitter.
TABLE OF CONTENTS for
2023.08.01.#7 web.207.0.0
Opening Tana
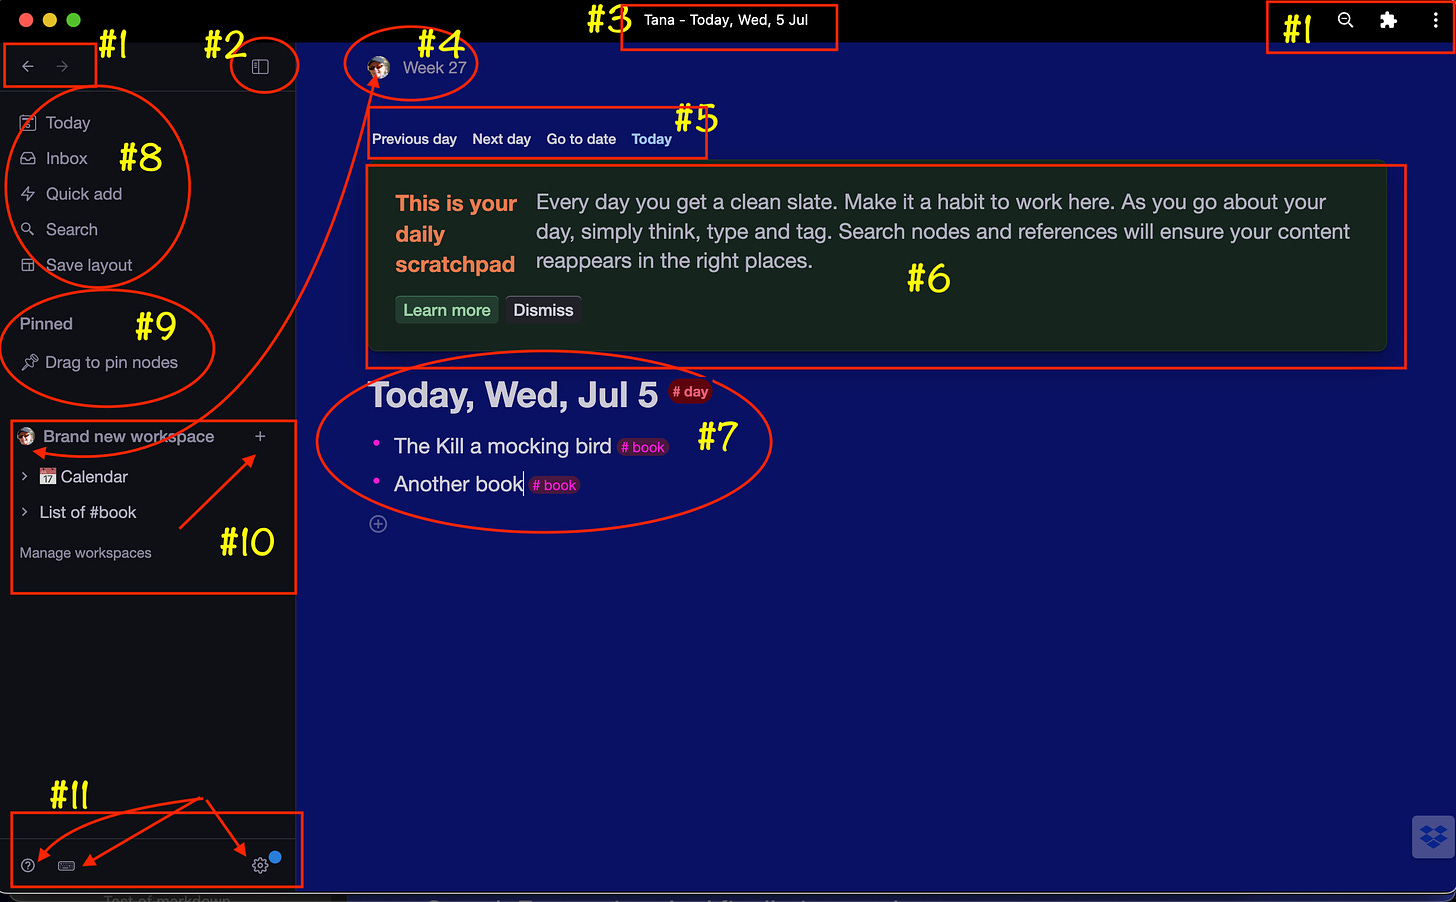
(1) Browser back and forth arrows
(2) Sidebar toggle
(3) Current Day Node
(4) Current Week number
(5) Day node navigator menu
(6) Help center onboarding guidance
(7) Day Node
(8) Quick Menu
(9) Pinned Area
(10) Workspaces and Home Node
(11) Settings, Help Center & Keyboard shortcuts
Tana Announcements
Tana Resources
Opening Tana
When you open TANA for the first time, you are greeted with the Tana automated onboarding walkthrough. It’s short but helpful, so consider completing it.
Your screen will look similar to the screen below. However, yours likely will have either black letters on a white background or white letters on a black background, depending on what you choose during the onboarding. I used CSS to modify the screen colors to stand out more distinctively in my articles and align with Tana Deconstructed’s brand. But other than that, this is what you’ll see:
Following the numbers in the above image, we will deconstruct each section below.
(1) Browser back and forth arrows
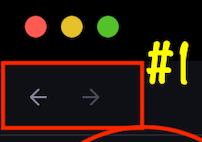
These two arrows act like your browser's left and right arrows, taking you back to the previous screen or forward to the prior screen. When you reach the point where you’re opening up more than one pane, you’ll see this is pane dependent. This means each pane has its own history you can scroll back and forth in.
(2) Sidebar toggle
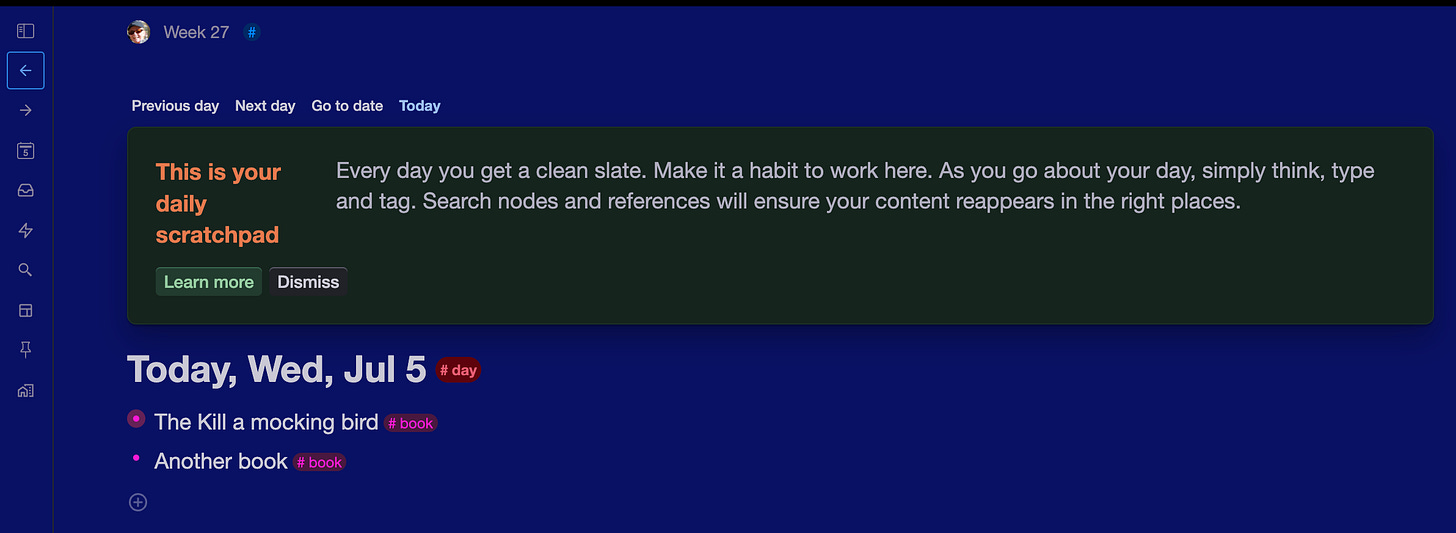
Clicking this icon toggles the sidebar open (as shown above) and closed (as shown below.
With the sidebar closed, the Quick Menu (see #8 Quick Menu below) is visible as icons only for easy access without expanding the sidebar.
Let’s cover a couple of common sidebar questions:
How do I edit the items in my side bar?
You’ll quickly see that you can’t edit your sidebar—in the sidebar. You need to click on your Root workspace (your name by default), and your workspace node appears in the main pane. This node is the same as the expanded version of your ROOT node in the sidebar - and any edit made here will appear on your sidebar.
How do I add things to the side bar?
There are two common ways to add things to your sidebar.
Drag an item from a pane to your sidebar
Click on the Root workspace name, and edit in the main pane
Why would I add things to my side bar? and what types of things would I add?
You can add anything you want, but generally, sidebar items represent:
Anything you want fast and easy access to.
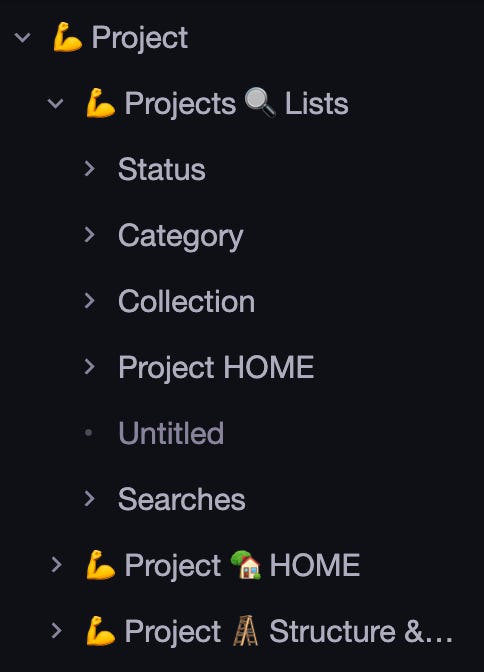
A group of things you want together. This is similar to a “folder” or “hierarchy” concept. Below is my expanded Project Sidebar item, which includes all my project searches and lists.
Searches. Dragging a search to your sidebar gives you easy retrieval of your data.
(3) Current Day Node
This represents the last day node you were on. Note: this is NOT necessarily today’s date.
If you’re working from your DAY NODE for today, this will be today’s date. However, if you moved to a previous date and then zoom in on a node - this date will reflect the day node from which you came (the previous date - not today’s date).
(4) Current Week number
As with DATE above, this is not necessarily today’s week number but the week number of whatever date is shown.
As shown below, you might see an arrow to the left of the week number (or date). This is the same as discussed in #1 above about the backward and forward buttons, but this is how it appears when your sidebar (#2 above) is closed.
(5) Day node navigator menu
These menu tabs let you navigate through your calendar or switch calendars if you have a calendar set up on another workspace (see more on workspaces below).
(6) Help center onboarding guidance
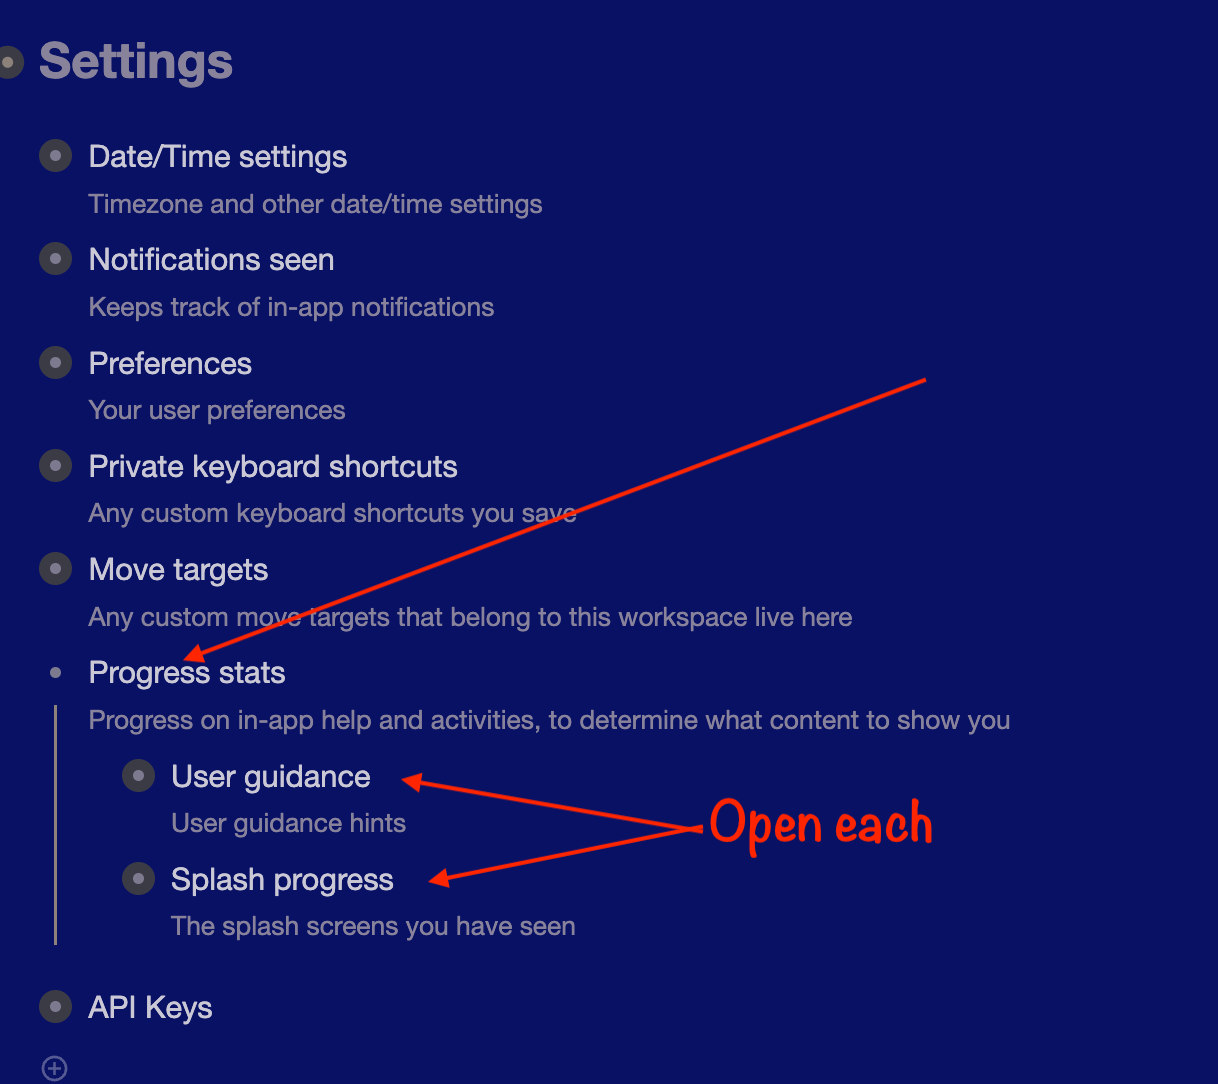
You can dismiss the onboarding guidance at any time. You can also turn off this in-app help and other in-app tutorials in SETTINGS.
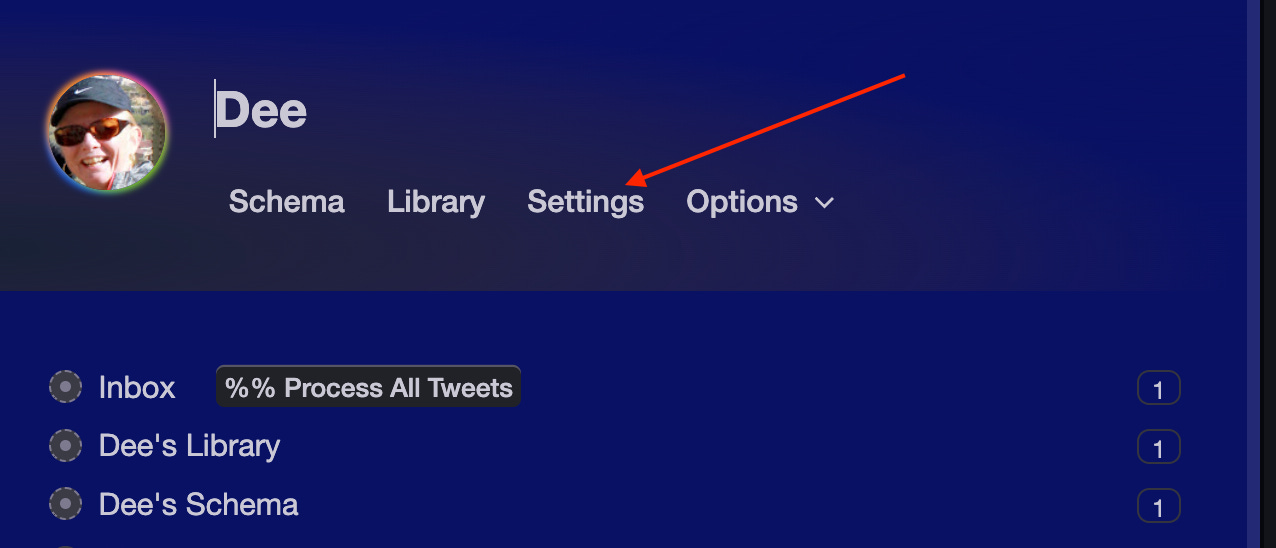
SETTINGS is found by clicking on your workspace name from the sidebar, selecting SETTINGS from the menu tabs towards the top of the screen, and selecting PROGRESS stats.
Within PROGRESS STATS, open both the User Guidance and Splash Progress and click on or off the items of your choice.
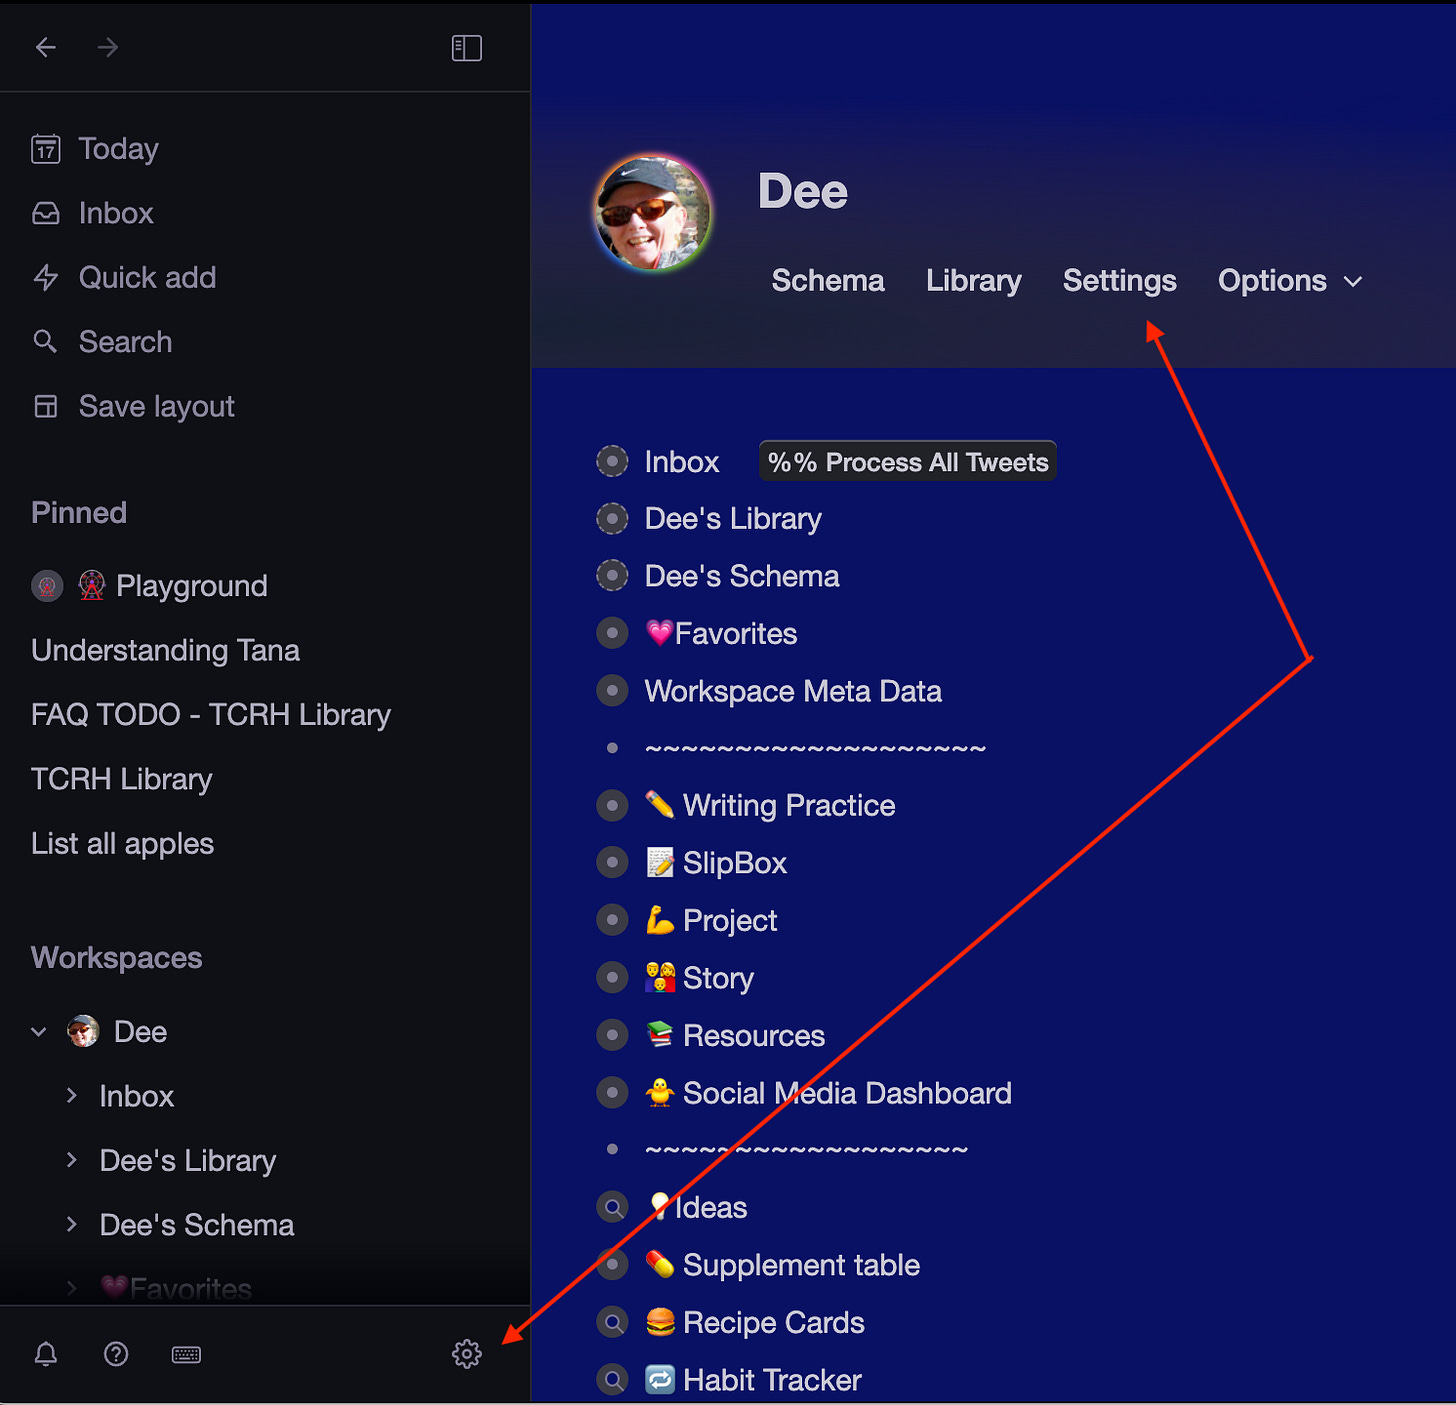
📝 Beginner’s note: There are two SETTINGS (see #11 Settings and keyboard shortcuts below).
(7) Day Node
If you’re new to knowledge graphs, the DAY NODE and its use might be foreign to you. Think of this as your daily journal, activity log, information launch pad—your everything.
You can create a node anywhere in your graph. But using your day node for almost every new node you create gives you a daily log of what you’ve done in your graph. Using the Day Node for everything can be hard to get used to at first, especially if you’re used to documents, files, and folders. But once you get in the habit of putting everything here, you’ll experience the freedom of not having to think about “where” something goes. Just type, tag, and move on to the next thing. Live Search queries will enable you to “recall” the information when needed.
Note the #day tag (shown in red above). This special DAY tag integrates a template-like approach to your day node. We will deconstruct the Day Tag in another issue soon but don’t worry about it for now. Just start writing.
(8) Quick Menu
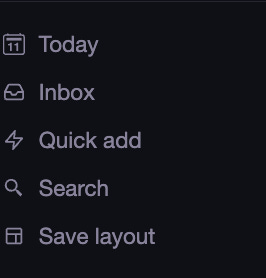
You see the Quick Menu (Today, Inbox, Quick Add, Search, and Layout) when your sidebar is open (shown above) or closed (shown below). The menu selection switches to icons when closed for easy access.
This area cannot be collapsed, moved, or modified at this time. Let’s deconstruct each option.
Quick Menu: TODAY
Today brings you back to TODAY’s day node. The keyboard shortcut is CTRL SHIFT D (on a Mac).
Note that when you first open Tana, it does NOT necessarily open Tana to TODAY’s day node. It opens to the last opened DAY NODE. This may change, but as of version web205.0.0, this is how it works. So using this TODAY icon (or keyboard shortcut) becomes important.
Quick Menu: INBOX
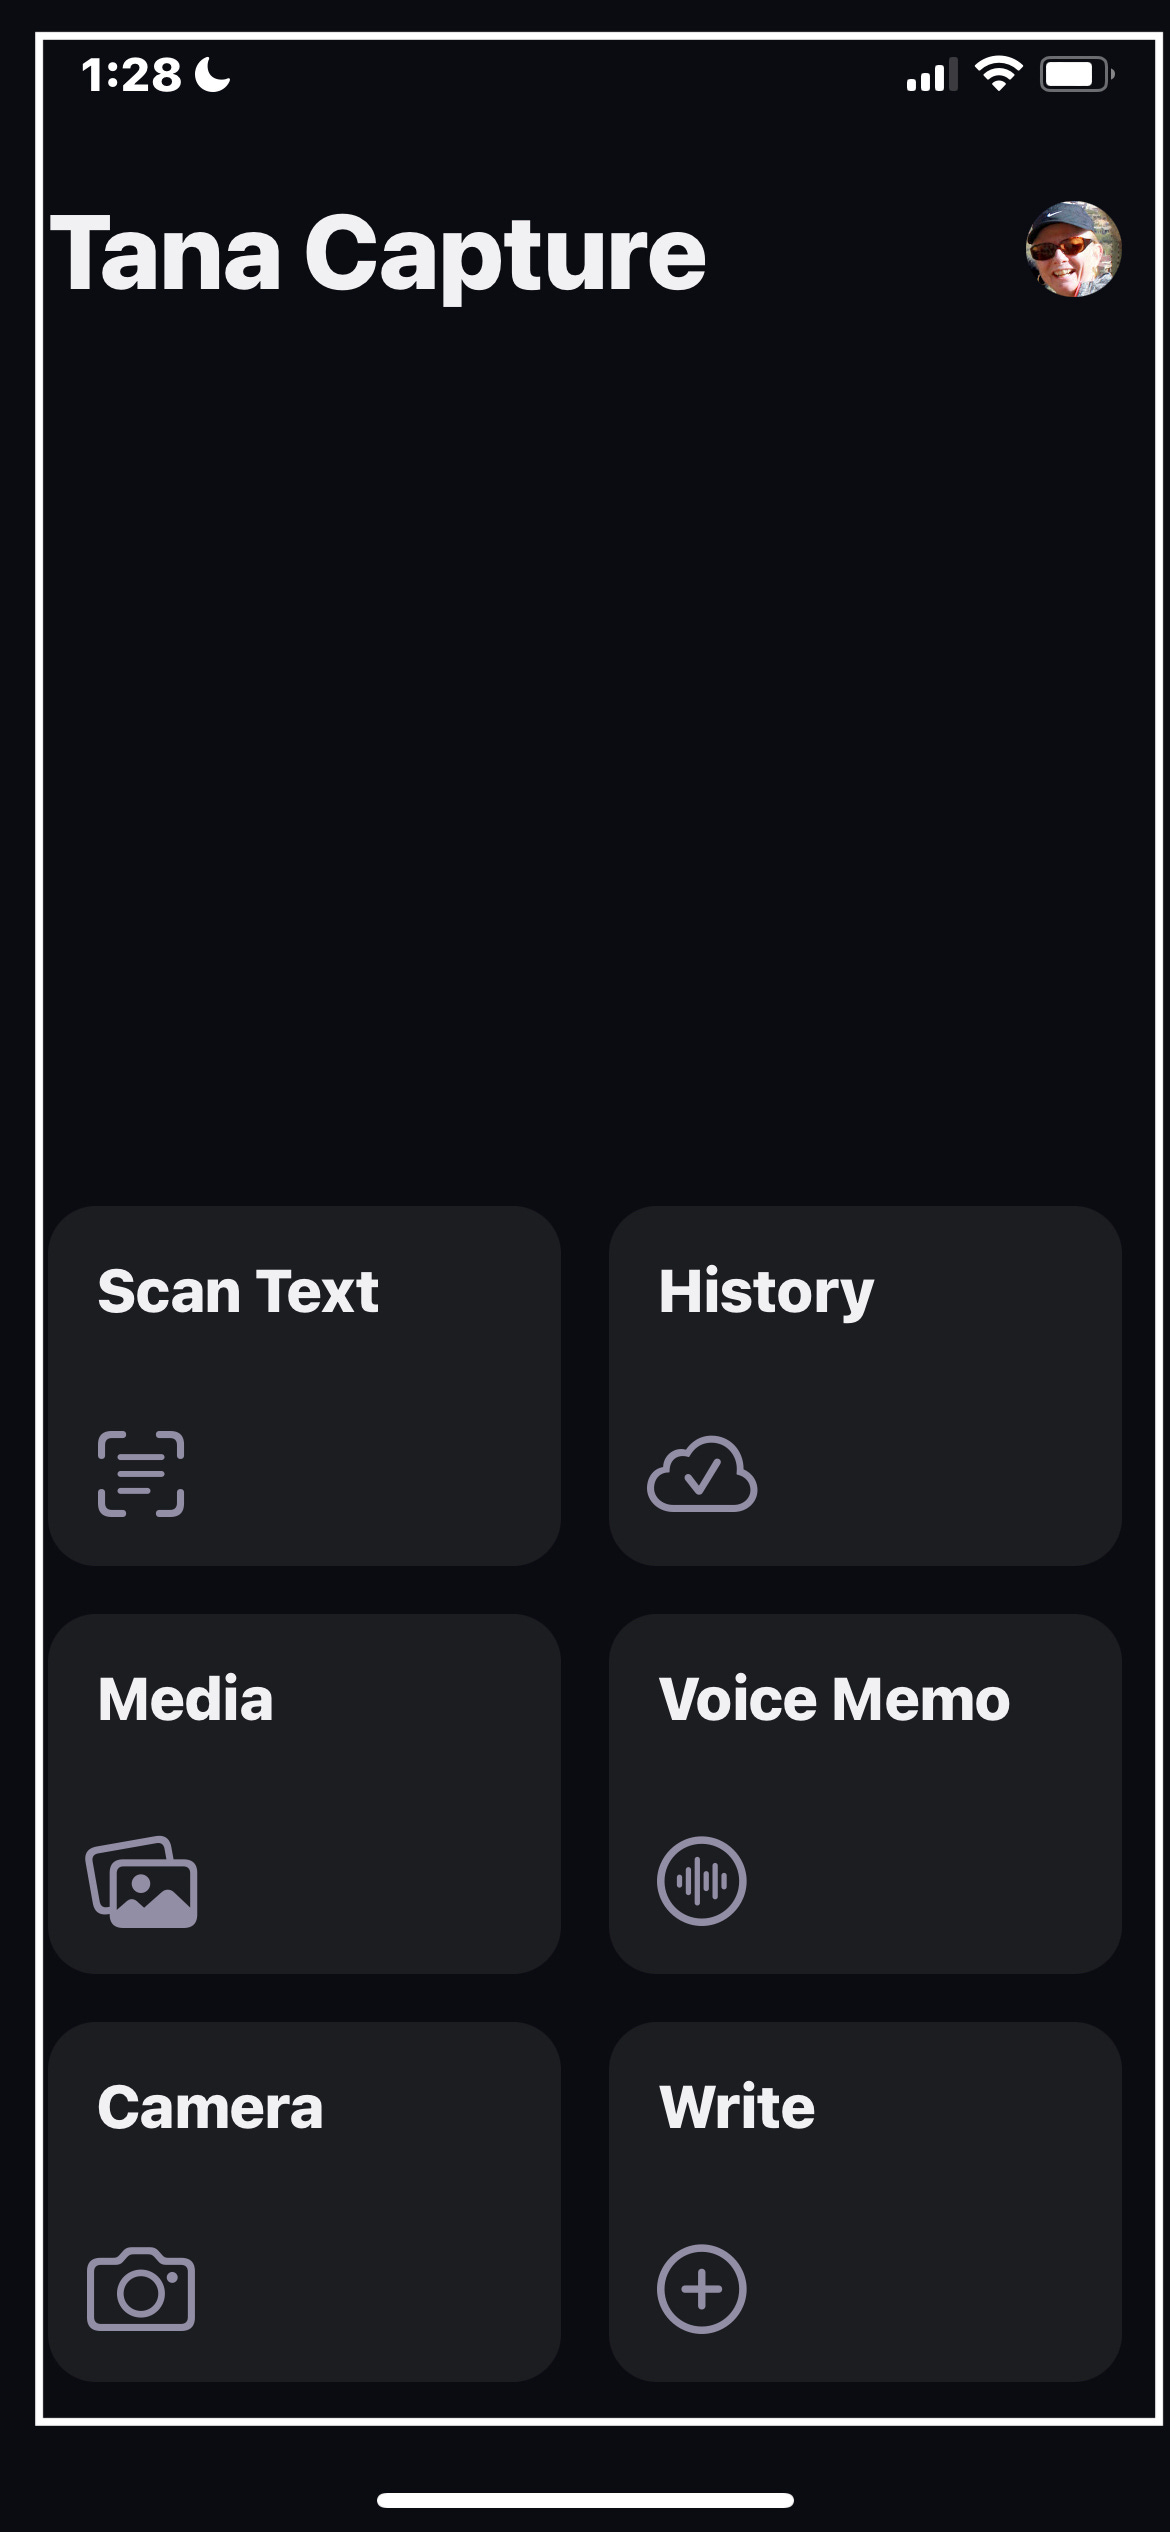
Inbox is the recipient of anything sent from your mobile TANA Capture App. This includes scans, pictures, text, audio, and other media. TANA Capture currently only runs on IOS and can be found in your Apple App Store. An Android version is expected.
Quick Menu: QUICK ADD
Quick Add is a feature that enables you to capture a thought on the fly while you’re in Tana.
At any time, from anywhere in your graph, click QUICK ADD from the Quick menu or use the keyboard equivalent CMD E (Mac) to type and tag. You can even fill out your supertag here or wait to later so you don’t interrupt your workflow.
Everything entered using QUICK ADD currently goes to the bottom of your TODAY day node.
📝 Beginner’s note: Since everything entered via Quick Add gets put at the bottom, these items can easily be overlooked as they mingle into your daily activities. Consider adding a tag such as “Quick-add” to easily pull these items out and finish your processing if needed.
Quick Menu: SEARCH
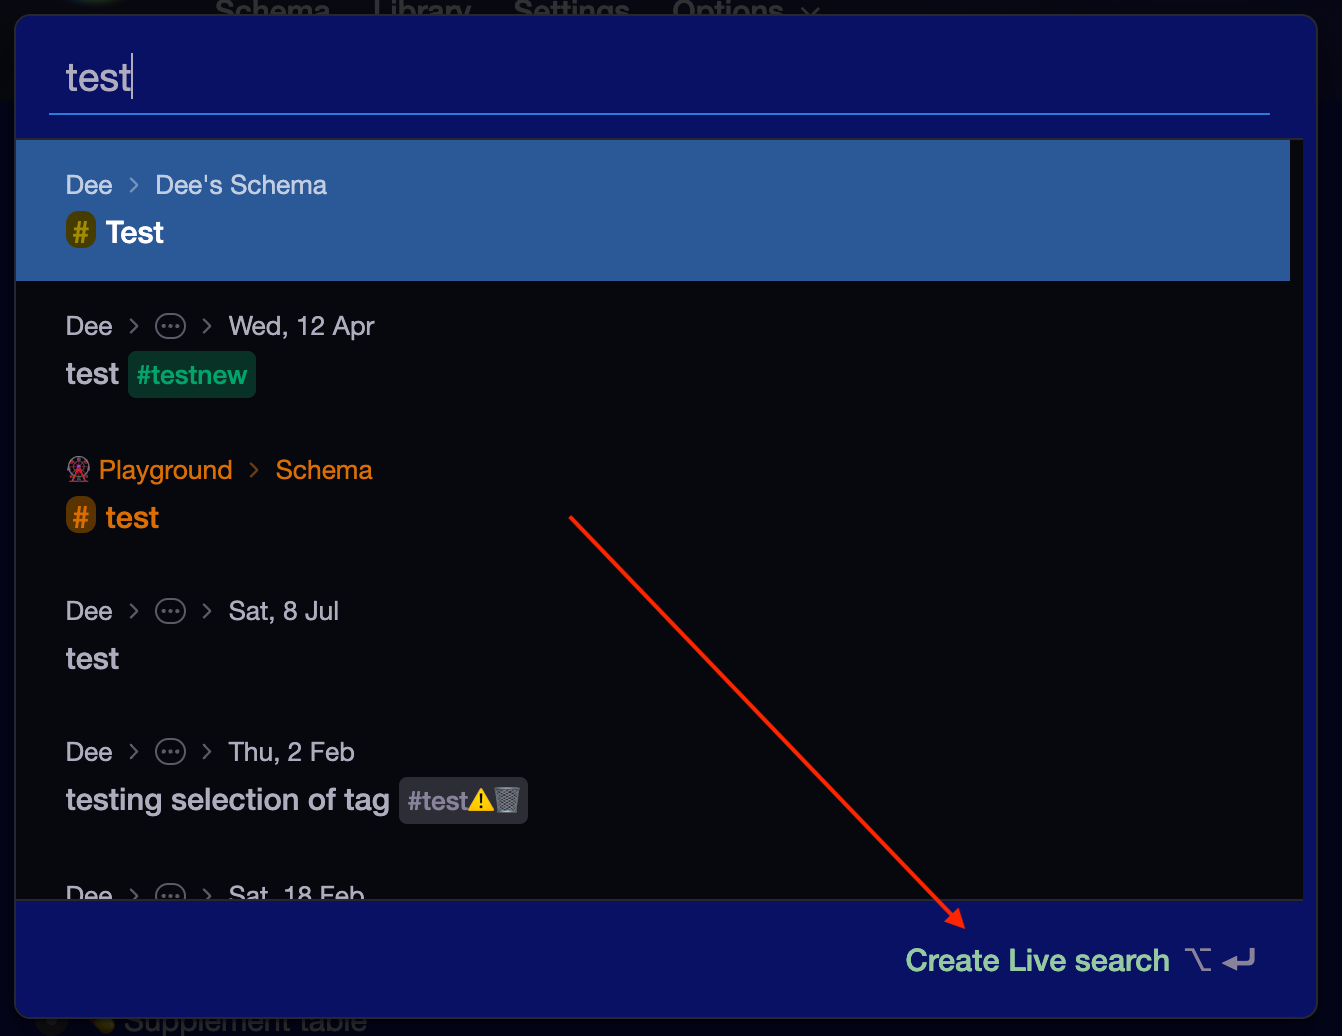
Search does what you’d expect; it searches your graph for whatever you enter (in whole or part). After you enter at least three characters, Tana will begin to suggest nodes. You can choose the node you want by clicking on it or arrowing down and pressing enter.
Important to note: It searches all your workspaces regardless of whether you “ALLOW data from“ (see #10 WORKSPACES below).
Your search results are limited (I believe it’s limited to 30).
📝 Beginner’s note: you can turn the results into a search node to save it or see 100% of the results.
Quick Menu: LAYOUT
In another edition, we will cover LAYOUT in more detail when we cover Docks and Panes. For now, know that you can save one or more of your screen layouts and give them a name.
Quick Menu: PIN
Note that the PIN icon only appears when the sidebar is closed and is not listed in the Quick Menu when it’s open. That’s because the PIN section of the sidebar is visible when the sidebar is open. We discuss the PIN section in section #9 Pinned Area, below.
Quick Menu: HOME
Like the PIN icons, this HOME icon only appears when the sidebar is closed, as the HOME node is visible when the sidebar is open. Selecting this icon pops out your sidebar without actually opening it, giving you easy access with fewer keystrokes. To close the pop-out, either select something in the pop-out or click outside of the pop-out.
(9) Pinned Area
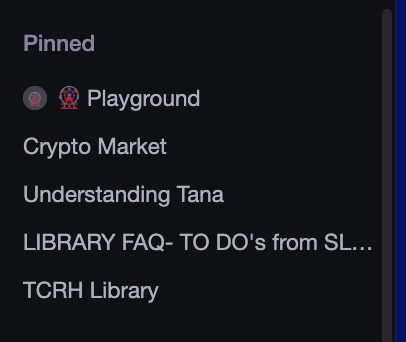
What’s in the pinned area will be unique to you. Think of this area as you might FAVORITES or BOOKMARKS. You drag and drop specific nodes in your pinned area for easy access. Pinned items can be from different workspaces.
The number of items you can PIN is limited to five. But remember, you can add unlimited items to your sidebar under your ROOT node.
To remove an item from your PINNED area, hover over the item, and an “x” will appear to the right of the item. Click on the “x” to remove the item.
This removes the item from your PINNED area but does not delete the item from your workspace.
(10) Workspaces and Home Node
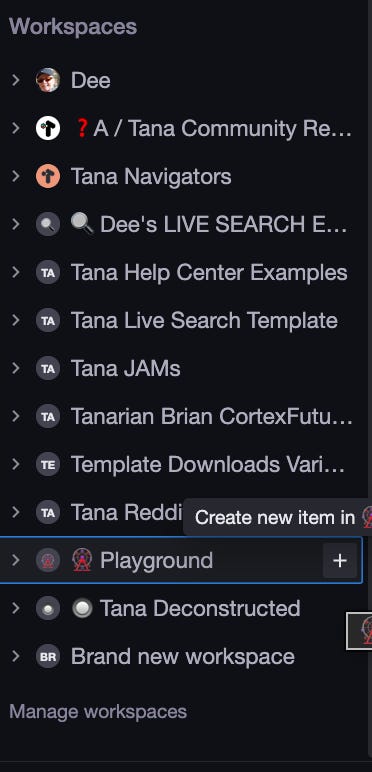
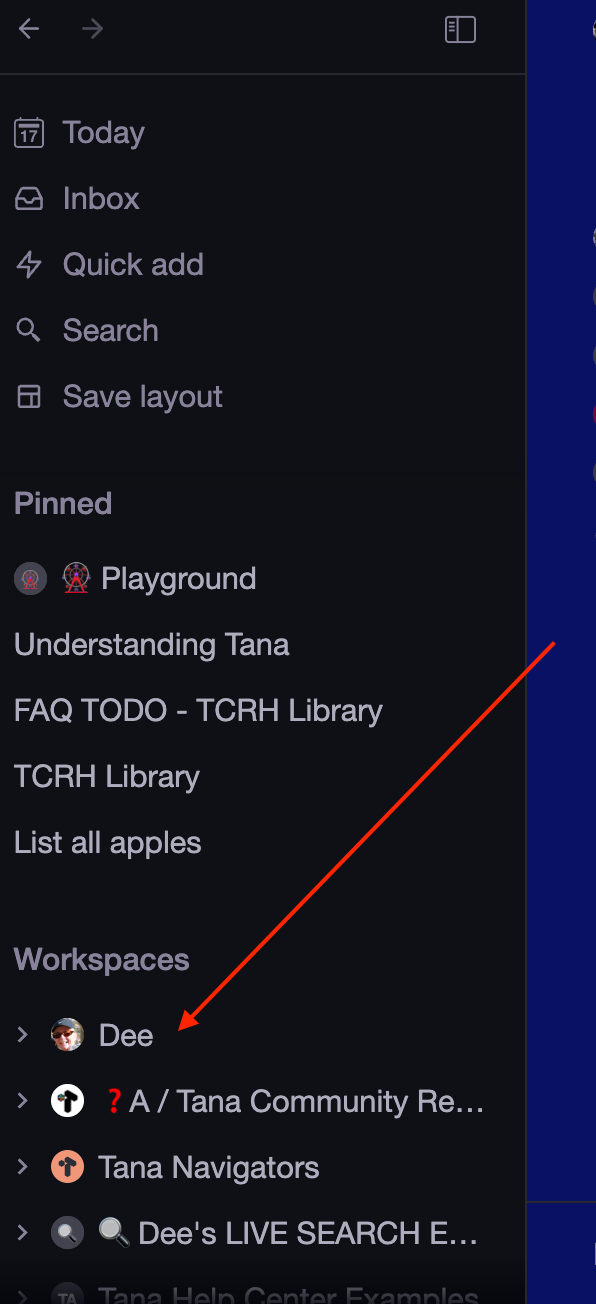
Your workspaces are listed here, including your ROOT / HOME NODE workspace. Let’s cover the basics.
Your Home Node or ROOT workspace (also referred to as your primary, main, or personal workspace) is the workspace with your name in it (by default).
Everything in your graph is in this ROOT node.
You can change the name of your ROOT workspace by clicking on it and changing the name at the top of the node.
Clicking on the “>” symbol next to the workspace name in your sidebar expands the node (remember, everything is a node!) to reveal the nodes within that workspace.
When you hover over a workspace, a “+” sign appears to the right (See Playground workspace above). This enables you to jump to a blank node in that workspace.
Or you can click on the workspace name, which takes you to the workspace’s HOME NODE.
Did you catch that?
Each workspace has its own home node. Thus, your main workspace, HOME NODE, is also called your ROOT node. Regardless of how many workspaces you have, you only have one ROOT node, but you have many HOME nodes (one for each workspace).
Manage Workspaces
Not all your workspaces have to be displayed in this workspace area. You can hide some if you choose. You do this via the “Manage Workspaces” option at the bottom.
If you click on MANAGE WORKSPACES, it will list ALL your workspaces, and you can ADD or REMOVE workspaces from your sidebar. Removing them from your sidebar does not delete the workspace; it just hides it.
If you can’t “find” a workspace in your sidebar, the Manage Workspaces button can help you.
Manage Workspaces is also where you can add a new workspace. Click CREATE WORKSPACE and then give it a name.
Calendar and Day Tags in a new workspace
📝 Beginner’s note: new workspaces do NOT automatically come with a new calendar setup or Day Tag.
Depending on what your workspaces are for, you may want only one calendar, but for some, you may want a separate calendar in that workspace and a separate and unique day tag. If that’s the case, there’s a command for that -
CMD k > Set up day tag for this space.
If your extra workspace is for your use only, you likely won’t want a calendar set up in that workspace.
If your extra workspace is shared with others, you may want a calendar set up in that workspace as a calendar for those members, separate from your personal calendar.
📝 Beginner’s note: When you click the TODAY icon, regardless of which workspace you’re in - it will go to the calendar in your ROOT node. If you have a calendar set up in another workspace, you must use the “SWITCH CALENDAR” button to go to your other calendar.
This SWITCH CALENDAR tab does not appear if you don’t have a calendar(s) set up in another workspace.
Other workspace tips:
Sharing:
Only you can see or work in another workspace UNLESS you Publish it.
To Publish a workspace - CMD k > Publish (read-only) workspace. But that alone does not give someone access. They must have the link to access that public workspace, and (at this time) they must have a Tana Account to use that link.
But where do I find a link ?
CMD k > Get Link to Node copies a link to the node into your clipboard. From there, you can paste the link to your destination (Slack post, email, text…), providing it to your recipient
Anyone with this link can access this read-only workspace
There is no limit as to how many people can use this link to access the read-only workspace
Remember, EVERY node has its own link, so if you want them to access the whole workspace, give them the link to the Home Node of that workspace.
You cannot publish your root workspace.
But what if I want others to edit the graph?
You can also INVITE others to a published workspace from the MEMBERS tab on the Home Node of the workspace you want to share
Invited members can EDIT that shared workspace
You must have the invitee’s email they use to open Tana
The Members tab does not exist on your Root Home Node because you can never share, publish or invite others to your ROOT Home Node
Even after you invite others via the Members tab, the invitee doesn’t get an email
After their email is added via the Member Tab, the invitee mysteriously sees the workspace in their sidebar with an indication they have been invited. From there, they can “accept” the invitation. It’s easy to miss.
At this time, invites are limited to approximately 20 people (I think 🤷♀️ - might be more)
You can invite members to published workspaces only
Invites are a way to control access, as invited members cannot share a node’s link as they can with just a published workspace
Swapping Workspaces
You can swap another workspace with your ROOT home node through Options (on Home Node) > Set as a new workspace.
Why would I swap workspaces?
Say you imported data from another graph. It automatically will import into a new workspace. But you really want that in your root home node. You can swap your current Root Home node and your imported workspace, which makes your imported workspace your new primary (ROOT) node, and your prior ROOT node is just another workspace listed in the WORKSPACE area. This is a good way to “start all over” without losing what you’ve done as a reference.
You cannot swap a workspace to be your Root Home node IF that workspace has other members (remember, your Root Home node can NEVER have other members).
After you swap, your prior Root Home node - is now listed as another workspace in the workspace section. Thus, you don’t lose anything. And, if desired, you can delete it later.
Working with multiple workspaces
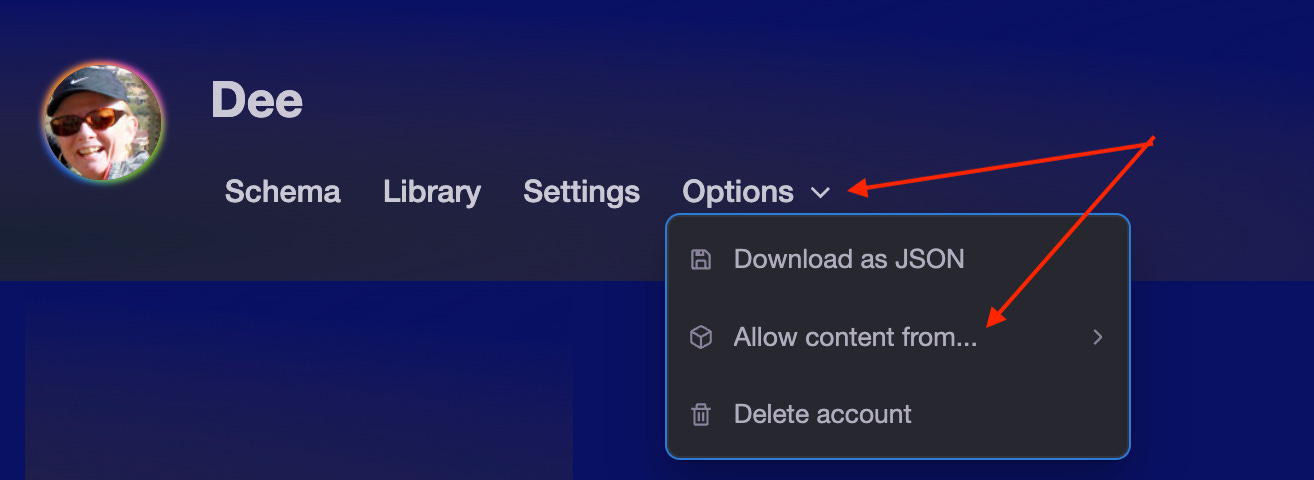
From the OPTIONS menu of a workspace’s HOME node, there is an option to “ALLOW CONTENT FROM,” and you can select other workspaces.
This works only one way. If you have workspaces “A” and “B.” If you set “A” to allow content from “B,” - that does not mean you can see “A FROM “B.” You can see “B” while in “A.” If you want it to flow both ways, you must set them both to ALLOW CONTENT FROM.
ALLOW CONTENT from isn’t exactly as it seems. It only limits what you see when using references via the “@” symbol or the results in live searches. If you use the SEARCH from your quick menu or the keyboard shortcut equivalent CMD S, you will see results from all your workspaces regardless of this setting
You can still limit what you see from SEARCH or CMD S in a couple of ways:
by prefacing your search with your workspace name and the “>” symbol. If I’m searching for all nodes with “TEST” in it, and I only want to see results from my root home node, my search would look like this: DEE>test
Or by using the command line
CMD k > Search within
the system will automatically insert the nodes ID and a “>” symbol, after which you can enter your search requirements.
Interesting fact: this SEARCH WITHIN works from any node, not just your home node!)
ALLOW CONTENT FROM also limits which tags you’ll see. If you ALLOW content from another workspace.
If both of your workspaces are NOT shared, you can
create a tag in either workspace and use them in both workspaces
modify the tag configuration from either workspace
delete the tag from either workspace
But if one workspace is shared:
If you create a tag in your ROOT workspace, it will NOT be seen in the shared workspace
Thus create tags you want to share in the SHARED workspace
Suppose you add child nodes to an existing node from the SHARE workspace while in your root node; only you will see it. Tana will prompt you and ask if you want to move the nodes added to the shared workspace. Saying yes, will move the node and leave a reference in your root node. After the move, it’s visible to everyone.
If you delete an original node that is referenced in your other workspace, it will delete the original node and place a trash can in your other workspace on the instance of that node.
(11) Settings, Help Center & Keyboard shortcuts
The four icons in the lower right corner of your Tana screen from left to right are:
— Notifications
— Help Center
— Keyboard shortcuts
— Settings
Here’s each option in detail.
Notifications
Notifications are not currently used. But just being there gives us hope for cool functionality in the future!
Help Center
The HELP icon opens the official Tana documentation page in a new browser window.
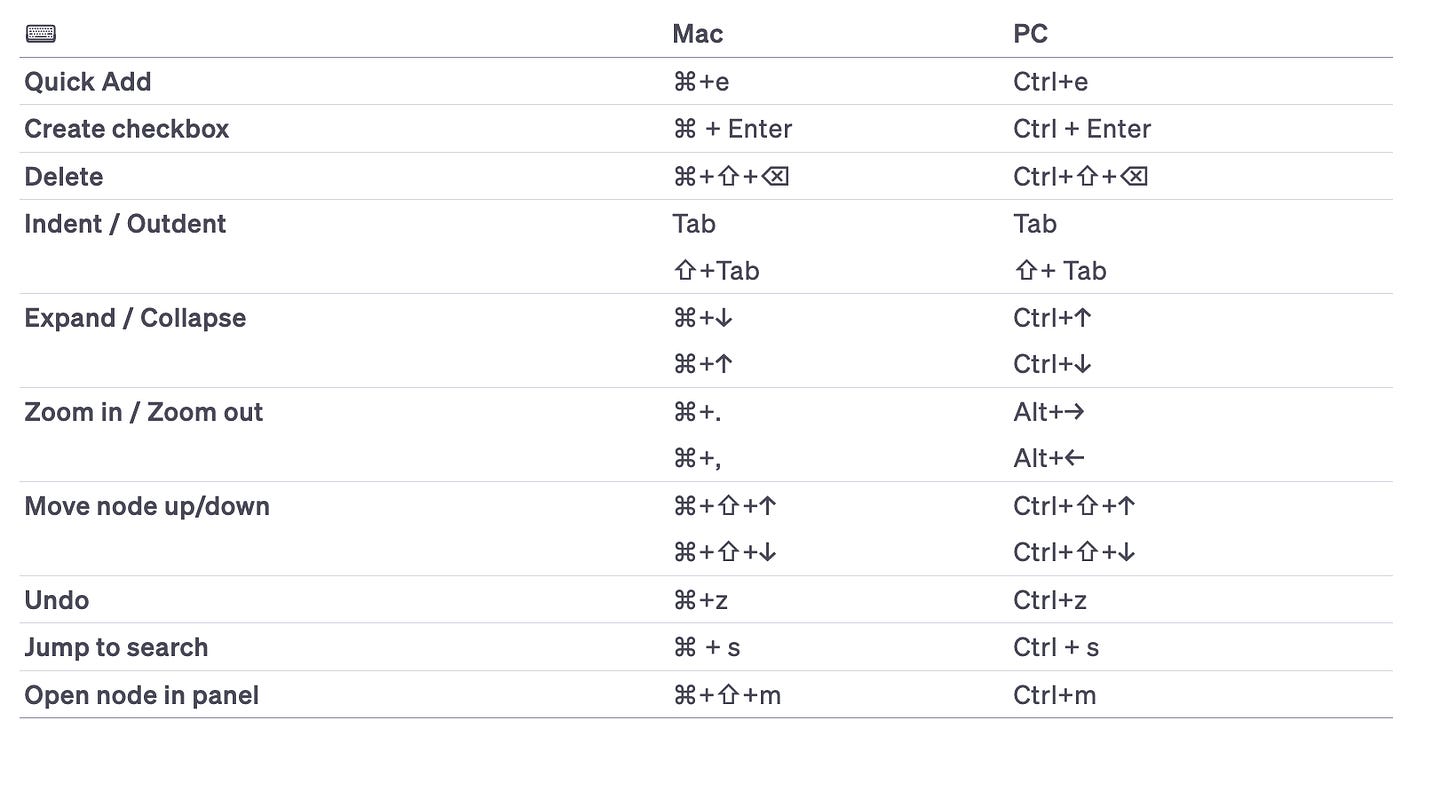
Keyboard Shortcuts
This handy sidebar pops out a list of frequently used keyboard shortcuts. If you’re a beginner, you might consider keeping this open and “forcing” yourself to use the keyboard shortcuts until you get familiar with them. You won’t regret it!
Some additional shortcuts (most not listed in the sidebar) are:
Settings
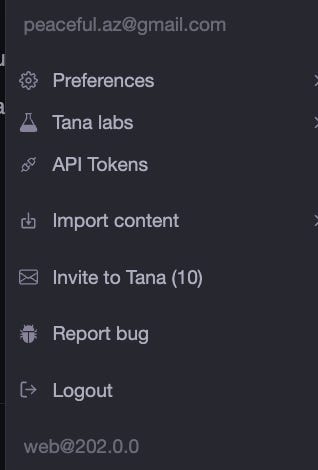
Note that two places reference “Settings.” Here in these icons and on the home node main menu > settings. Some items, such as API Token and some Preferences, are listed in both settings nodes. Some options are unique to their setting node, such as “Report bug,” which can only be found here and not in the home node main menu > settings.
Setting: PREFERENCES
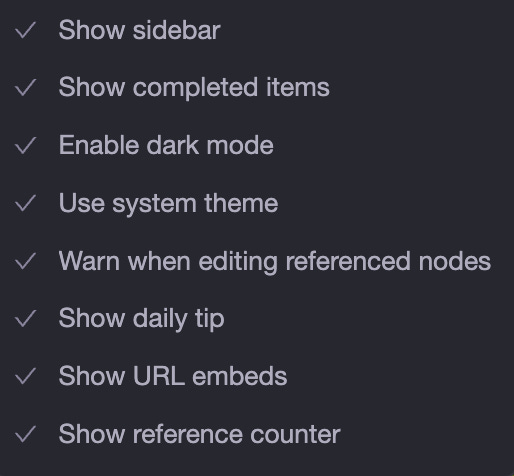
In PREFERENCES, you can choose how you want certain things to look or act.
Each is fairly self-explanatory. As you can see from above, I have them all turned on. But that’s my personal preference. You do you. You can turn them on and off at will.
Setting: TANA LABS
The TANA LABS menu Is where the Tana Team puts newer features before rolling them out in an official version. You can turn these new features on (or off). As the feature matures and is rolled out, it will be removed from the Tana Labs area and incorporated as a native feature.
Setting: API TOKEN
When you start to use AI, you’ll need an API token. Tana will prompt you for it when needed and store your input here. If you ever generate a new API token, update it here.
See this article from TfTHacker about what an API token is and how to get one. He references Obsidian in the article, but it applies to TANA.
Setting: IMPORT CONTENT
Here you will find the developer’s documentation around importing data into Tana. There are also predefined imports for ROAM and Workflowy/OPML. Each works to varying degrees of success, depending on the state of your data being imported. If you’re importing from ROAM, I highly recommend this article before you start.
There is also a Tana Paste option. Tana Paste is a predefined syntax of plain text that can be pasted into Tana. Not generally something a beginner needs to be concerned with. That said, if you’re interested, you can find more here.
Setting: INVITES TO TANA
Every once in a while, the Tana Team allocates Tana early access invites to share with friends, coworkers, or family. You can see if you have invites to share here.
Setting: BUG REPORT
This is where you officially report a bug. It flows into the Tana Teams graph to be reviewed and worked. The Tana Team generally gets back to you via email with additional questions or outcomes.
A best practice is to post your bug in the #BUG-Chat channel in Slack before entering a bug report. This allows you to confirm it’s a bug and see if there are temporary workarounds or other options. Then when you’re sure it’s a bug, report it here.
⚠️ You must report a bug in the BUG REPORT in-app feature for it to be official. Just listing it in the bug-chat channel does not ensure it’s on the TANA Teams’ radar.
Setting: LOGOUT
Probably needs no explanation. 😉
Setting: VERSION NUMBER
The lighter grey area at the bottom that says something like “web@207.0.0” is the TANA version you are running. You’ll want to include this information when you file a bug report, along with what operating system version and browser you’re running Tana on.
WRAP UP
We’ve deconstructed the opening Tana Screen. I hope you’ve learned at least one new thing.
Since the last edition, Tana has made the following announcements. Here’s what’s in it for you:
Tana has been laser-focused on eliminating bugs. I won’t list them all, but there are two bugs/enhancements worth pointing out:
Filtering and grouping options should now appear in the original order
Drop-down lists in VIEW MODE for Sort and Group-by can now be scrolled. You no longer have to zoom into your screen to see all the options. YEAH 👏
You can now configure your week start day- Sunday or Monday
This brings us to the end of this issue. New resources are listed below.
NEW TANA Resources
(since the last edition):
Boolean Logic Resources: In the last issue, we discussed Boolean Logic in LIVE SEARCHES. Ryan Barrett posted these resources that I thought were great for those who want to know more:
Some videos recently released:
Trip Planning with Tana and Tana AI - see what is possible with the amazing Tana.inc App from Ed Nico
Copying Texts with the help of AI Commands from kerem ozan bayraktar
Using Tana As A Neurodivergent Adult With Adam Dobay | Tana Tours Ep 004
Tana a new notetaking app from DPA
A group of Videos from RJ Nestor using AI and command about tasks, recurring tasks, emails, and more
Building a FairyTaleGPT in Tana from Brage
Concepts in Tana: Supertags and templates from Stian Håklev
Mastering Task in Tana with three commands by Ev Chapman
How I Use a Daily Agenda in Tana to Stop over Scheduling and Build a Realistic Plan for my day by Ev Chapman
Official Reddit AMA with the Tana Exec Team It was great to hear directly from the Tana Exec team on what’s happening now and what’s expected in the future.
I'm not an expert at Tana, nor do I work for them.
As a passionate volunteer and avid user,
I research these deconstructions to help me learn,
but I write them to help you learn from my mistakes.
I've done my utmost to ensure the accuracy of this information,
including extensive testing and review
by other Tana users more experienced than I am.
That said, I'm human.
I sometimes get it wrong
(please don't tell my husband I admitted that ☺️).
If you find an error or have questions- please comment below,
use my private Substack subscribers-only Chat (including free subscribers),
or DM me on SLACK or Twitter
If you don’t have access yet to Tana, you can sign up for Early Access on the Tana.inc site, then pop over to the Slack “Introduce Yourself” channel, and well, eh, introduce yourself. The Tana Team will DM you an invite.
Tana development has so far catered to the tech-savvy, early adopters, but I’m here to change that. Please do not be intimidated by Slack posts. I fear many newcomers are not asking beginner questions because the technical wizards are geeking out about the newest features and complex workflows, and maybe some of you find that intimidating! (I know I did!) Also check out the new BEGINNERS Channel in Slack.


