


#1 Tana Live Search Series: Search Expression Box Deconstructed for Beginners
Basic Search Concepts Series: #1 Search Expression Box Deconstruction

Welcome back. Thank you for subscribing to Tana Deconstructed, where we break down TANA node by node. As mentioned in the INTRODUCTION of this Live Search Expression Series, this article covers the first fundamental concept: The Live Search Expression Box and What it Tells You. We will deconstruct the Tana Search Expression box component by component. There’s more here than meets the eye.
This article assumes that as a beginner, you’re familiar with the use of, what I call, the Query Builder. The Query Builder is invoked using Tana’s command line and the keyboard shortcut CMD/CTRL + k.
After a while, though, you want to know more about searches. That is where this article begins. It’s time to open the Search Expression Box (also called the Query Box) and dig into what the search box tells you, your options, how to use them, and what can go wrong.
The numbers in the image below provide a visual Table of Contents for this article.
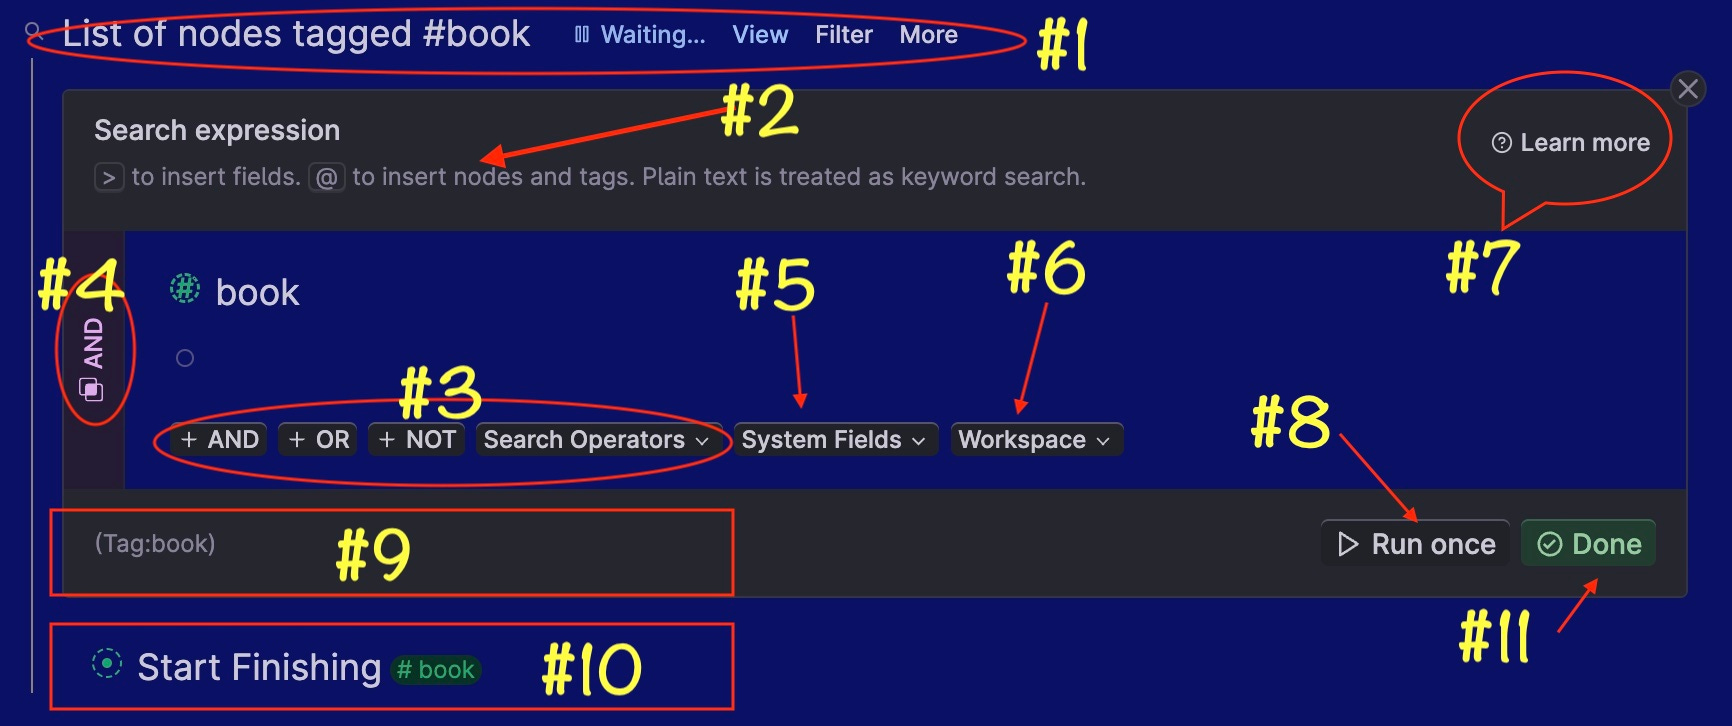
This article is best read as a reference manual might be. There is a detailed index at the end for future use.
Table of Contents:
Emoji conventions used in this article:
👀 The “eyes” emoji highlights additional information, something interesting, or another application you might not have considered.
⚠️ The “warning” emoji, wait for it… warns you of things that many beginners can get wrong.
Let’s deconstruct!
0. Creating a Search Node
There are several ways to create a search node:
CMD/CTRL + k Find Nodes… 👈 Use the command line to create a search node with the Query Builder
? + right arrow + enter 👈 Use the question mark to tell Tana you want a search node. You must
enter a question mark “?”
right-arrow over to or click on “create a search node,” and press enter
for the Query box to pop up.
⚠️ If you enter a space after the “?” it will not work.
CMD/ CTRL + k select > CREATE A SEARCH NODE + enter 👈 Use the command line and select the option “Create a search node” and press enter
CMD / CTRL + k select > Duplicate node + enter 👈 With your cursor in an existing search node, use the command line to select “Duplicate node.” The new node can be edited without impacting the original search node.
@ reference another search node, then CMD/CTRL k select > Clone Reference.
Back to Table of Contents
1. The Search node name and tabs

Search NODE NAME:
Depending on the method you use to create the search node, the default name for the search node will either:
represent options you selected as you clicked through the builder or defined in the Query box
default to “Unnamed search node“
default to the name of the node duplicated or referenced
Regardless, the default names are ugly. And who wants to look at ugly? You can delete the default name and type something meaningful to you.
⚠️ Don't delete the node by mistake. You only want to delete the title - so highlight just the words in the title and press delete or backspace through the title.
SEARCH TABS:
The Query menu shows four tabs:
We'll deconstruct each one below.
WAITING tab
Search Node Tab
When your QUERY is open, it's "WAITING" for you to hit DONE or RUN ONCE.
When your QUERY is closed (meaning you've hit DONE), “WAITING” changes to "LIVE SEARCH," and if you click LIVE SEARCH, it reopens the QUERY box.
VIEW tab
Search Node Tab
VIEW tab options are:
List
Table
Cards
Tabs
Calendar
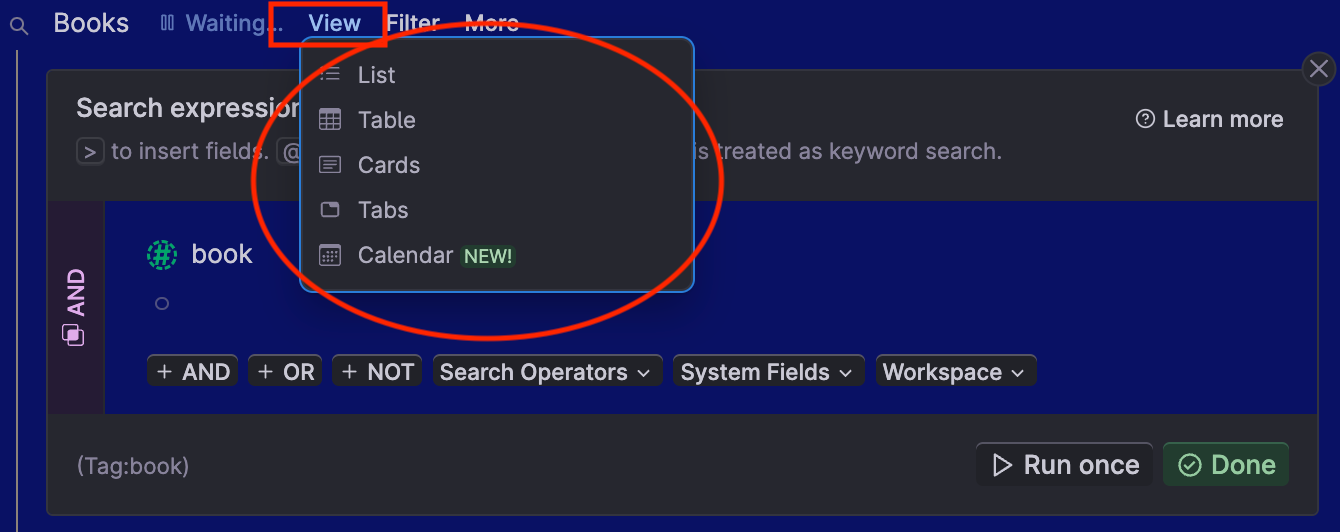

These options enable different views of your data and are some of my favorite features of TANA. With no plugins or coding, you can instantly have a TABLE, Calendar view, or use TABS to set up a Kanban board with CARDS.
Each option has its uses, but that's for a different deconstruction. For now, try them out - you can switch views at will; you won't hurt anything, and it may open up a whole new view of your data for you.
👀 Via the Command Line (CMD/CTRL + k), you can SHOW VIEW OPTIONS on ANY node. It's not just for search nodes! CMD/CTRL + k can also invoke individual view options > VIEW AS TABLE, VIEW AS LIST , VIEW AS CARDS, or VIEW AS TABS.
FILTER tab
Search Node Tab
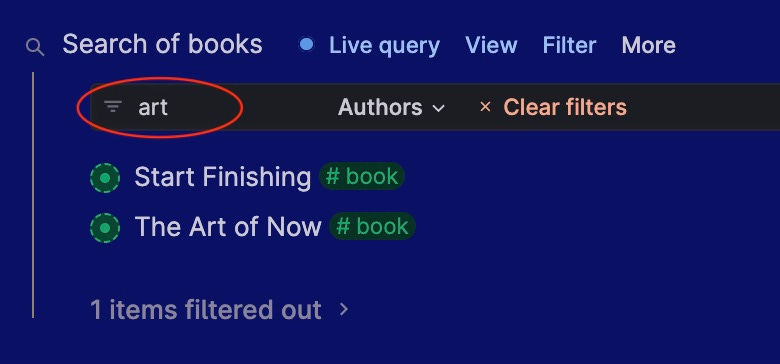
When you need to find specific nodes within your search results, use the filter box. A search within a search, you might say.
When you click on Filter, a box appears.
Enter all or part of the node name you're looking for.
For example, you have a list of all your books. You don't want to look through all of them to find one with the word "finish" in it. Entering "finish" in the filter box narrows your search to only those nodes with "finish" in the node name.
👀 You can get the same results by putting the FILTER criteria in the QUERY itself, but sometimes using the FILTER is quicker.
Notice, however, that the FILTER searches for that string of characters anywhere in the node name. In the example below, using the filter word "ART," the expected results might be the book "The Art of Now," but the results also include "Start Finishing" because Tana finds "art" within the word "start."
⚠️ Be aware that if your Query is open, you might not see the FILTER box as it shows up BELOW the Query and above your results, as shown below.
When the QUERY box is open:

When Query is closed:

MORE tab
Search Node Tab
The MORE tab sub-options are:
GROUP tab
Search Node Tab
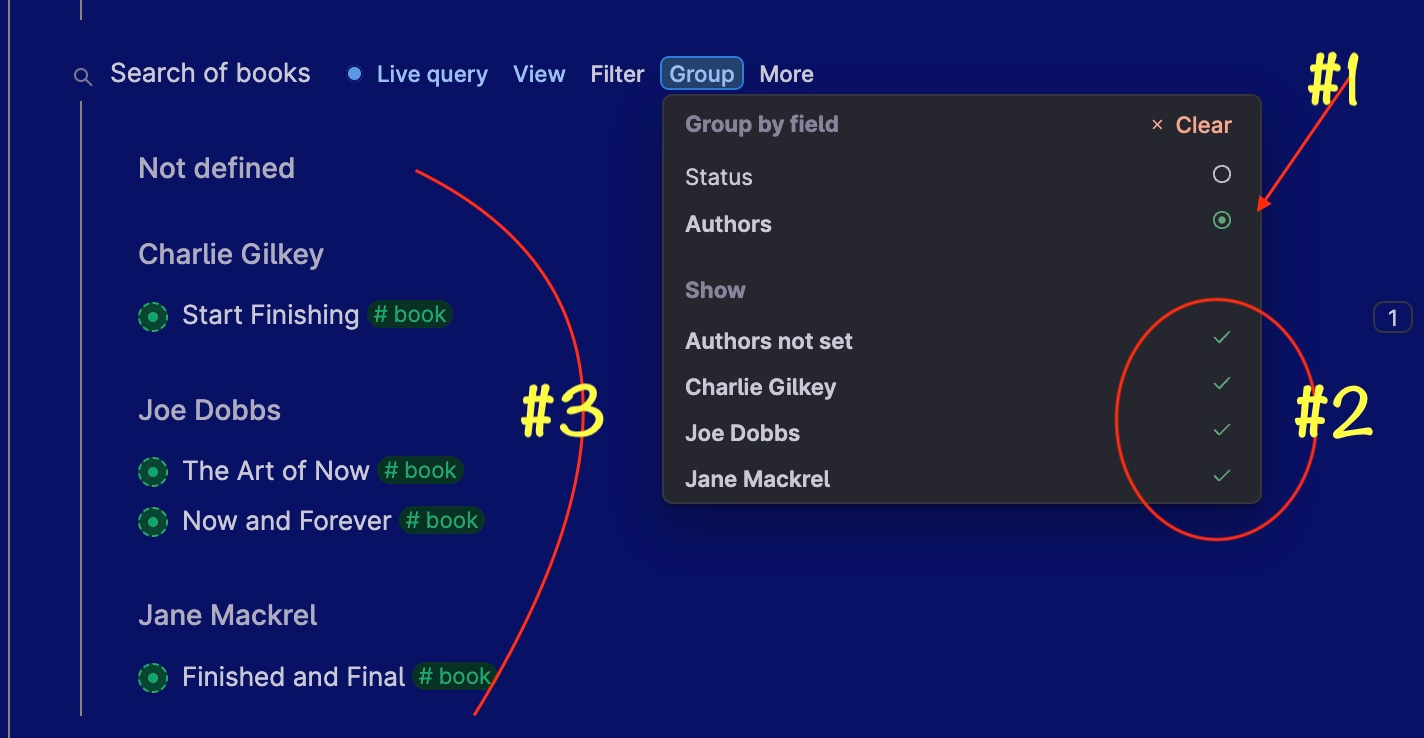
When using this option, think GROUP-BY. When selecting GROUP, it includes a list of fields (see #1 below). The “ShOW” list below that are the instances for that field. In this example, it is a list of all authors. The first time you use this GROUP feature for a specific field, the SHOW options will all be selected by default.
⚠️ Be aware if you add a new author (in this example), you must manually update your Group-by selections.
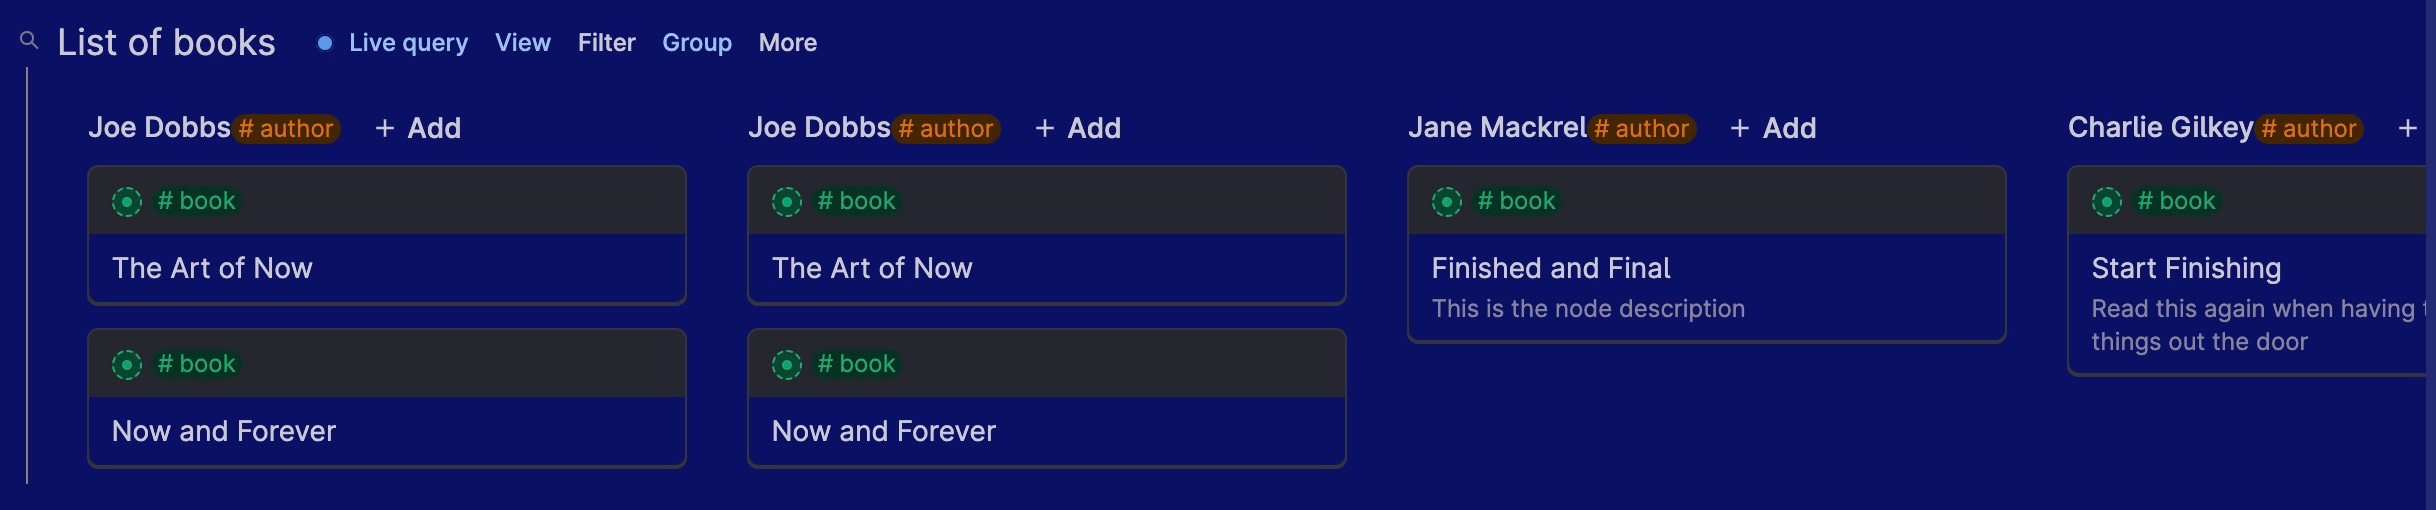
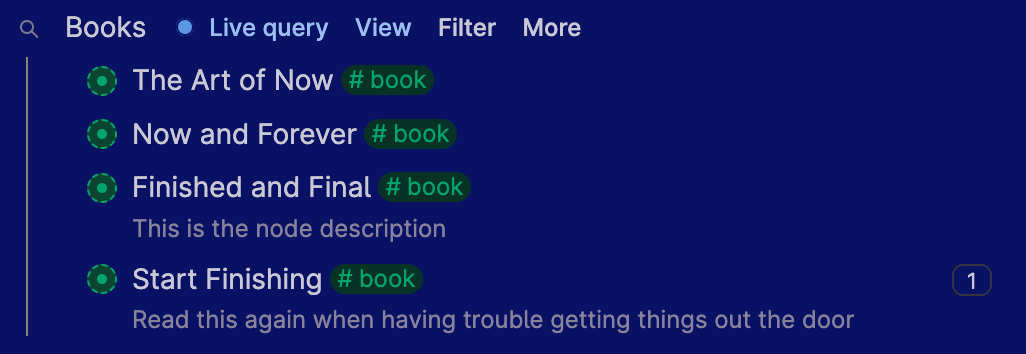
⚠️ Be aware if you have multiple entries in your group-by field, the node will only appear in the group shown as the first entry. In the example below, the book “Now and Forever” is written by Joe Dobbs, and Jane Mackrell. However, when the search is grouped-by AUTHOR, the book only appears under Joe Dobbs, as he is listed first in the Author field. As of 4/10/23, a feature request was entered to enable the item to appear under both groups.

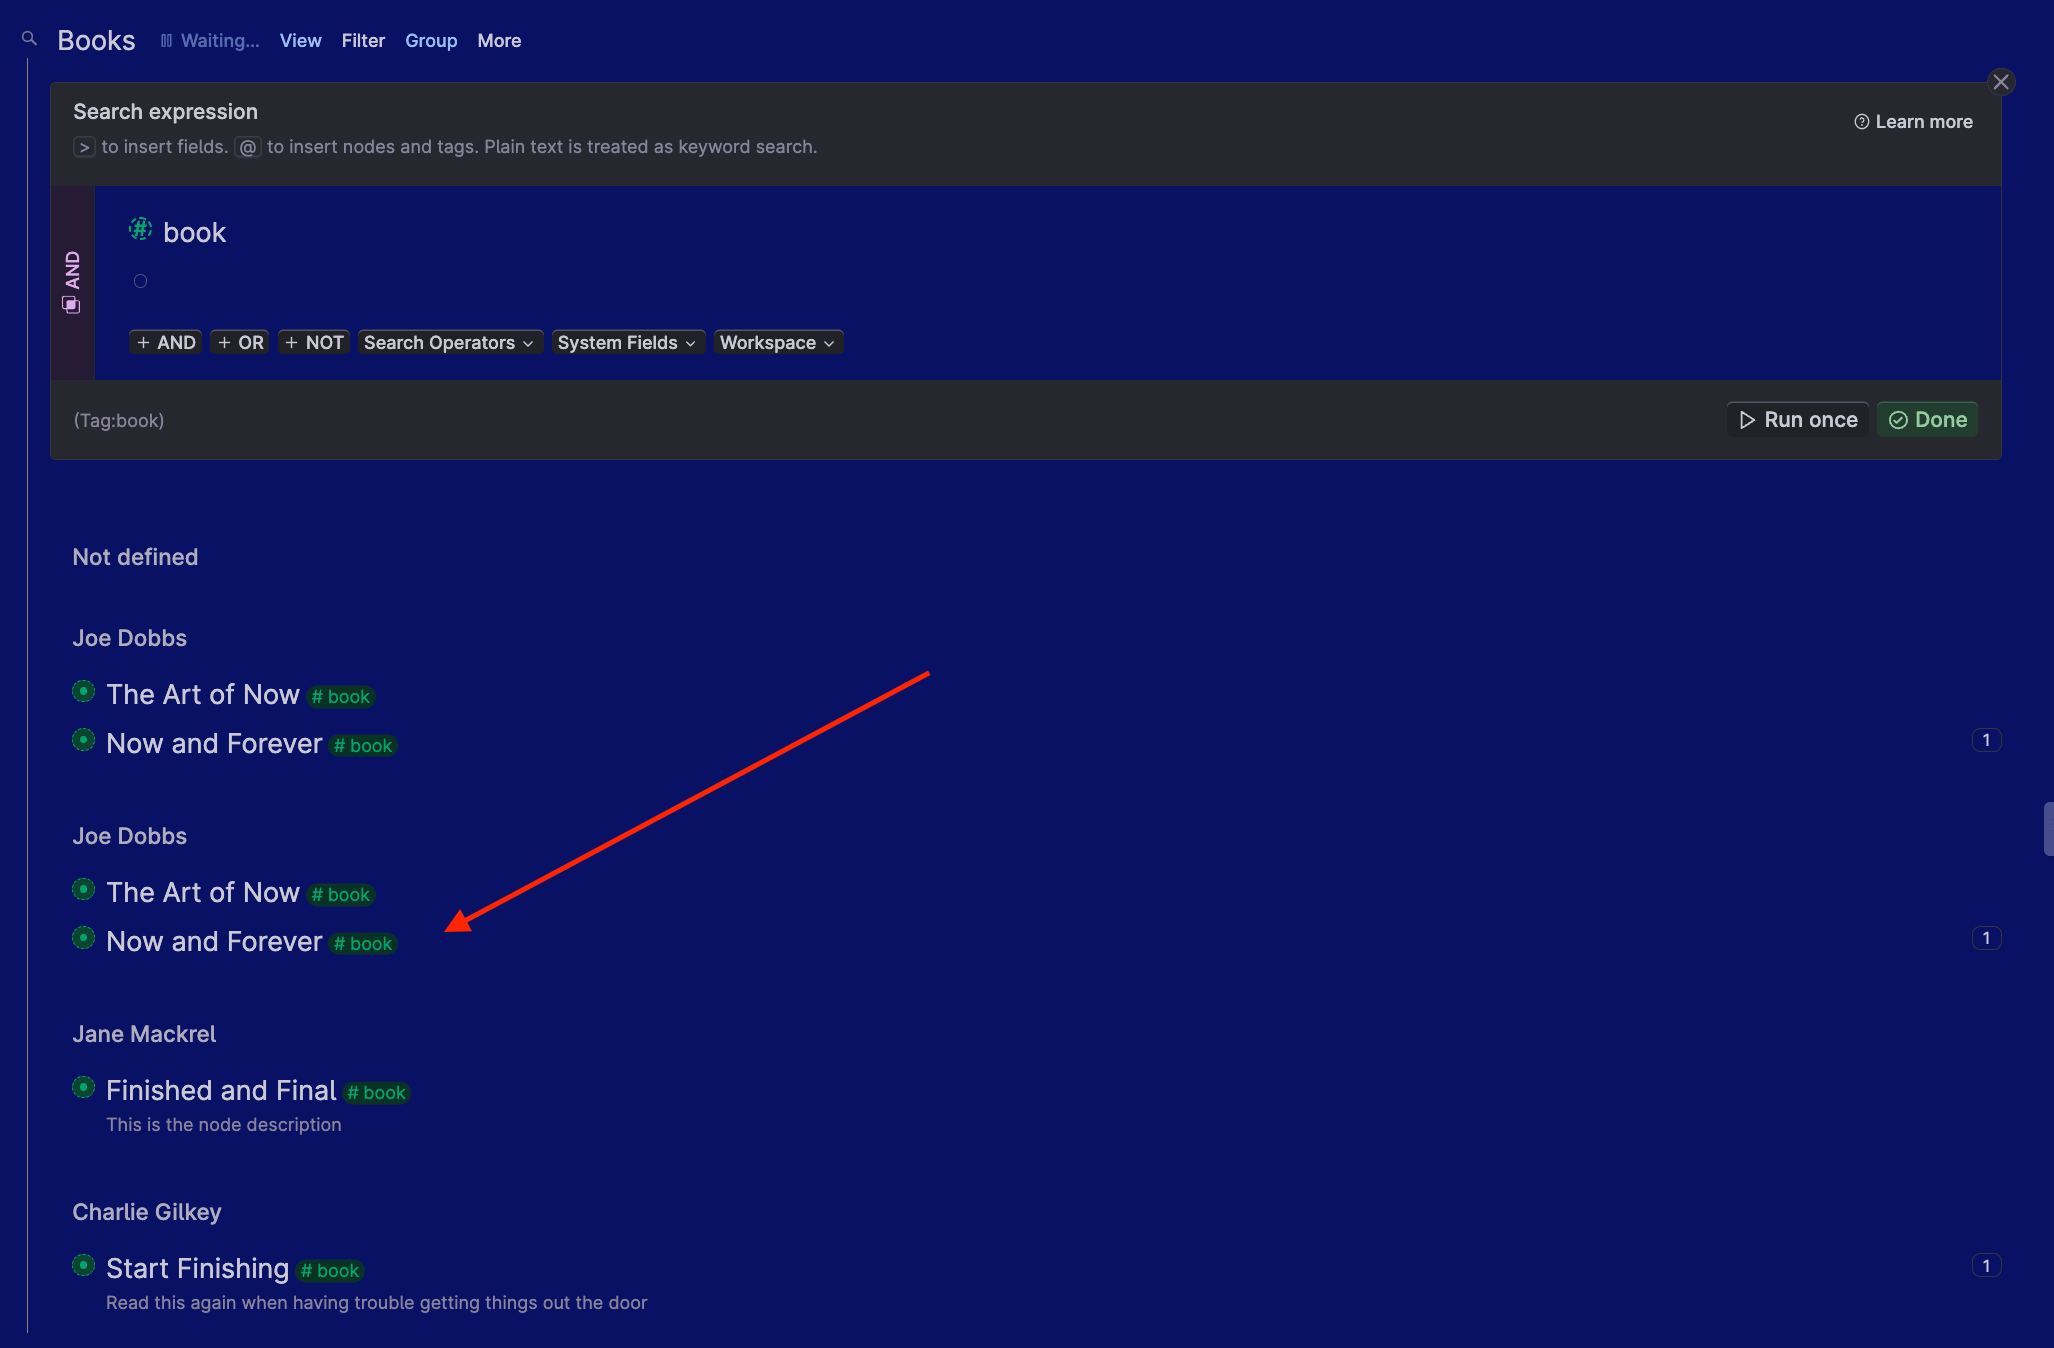
Depending on your view, the results will appear differently. #3 illustrates the GROUP option used in a LIST VIEW.
Results of Group by with CARD VIEW:
👀 The GROUP option works only in LIST view and CARD view. The GROUP option won't be available in TABLE, TAB, or Calendar views.
SORT tab
Search Node Tab
When you select SORT - another box appears:
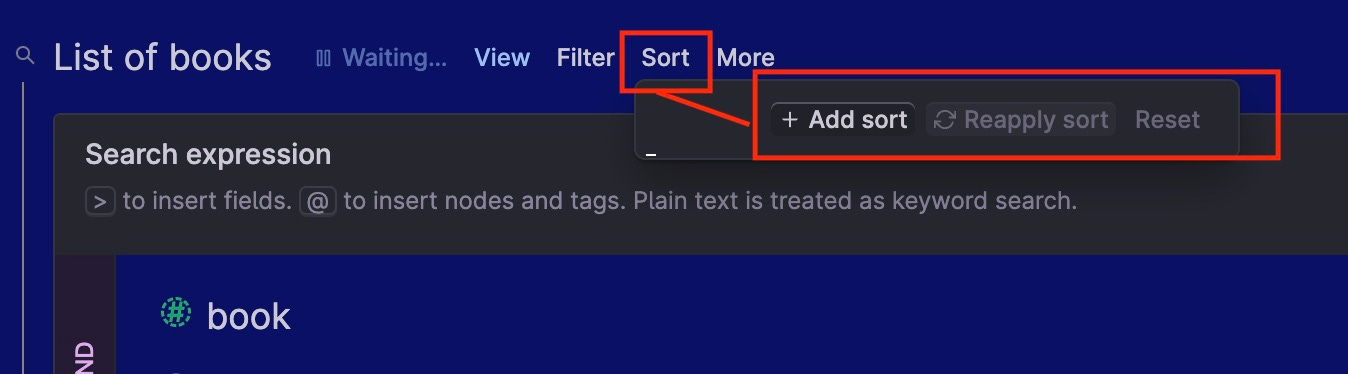
When you select “ADD SORT,” you can accept the default - sort by the node's NAME, or click on NAME to get a list of user-defined and system-defined fields to choose from.
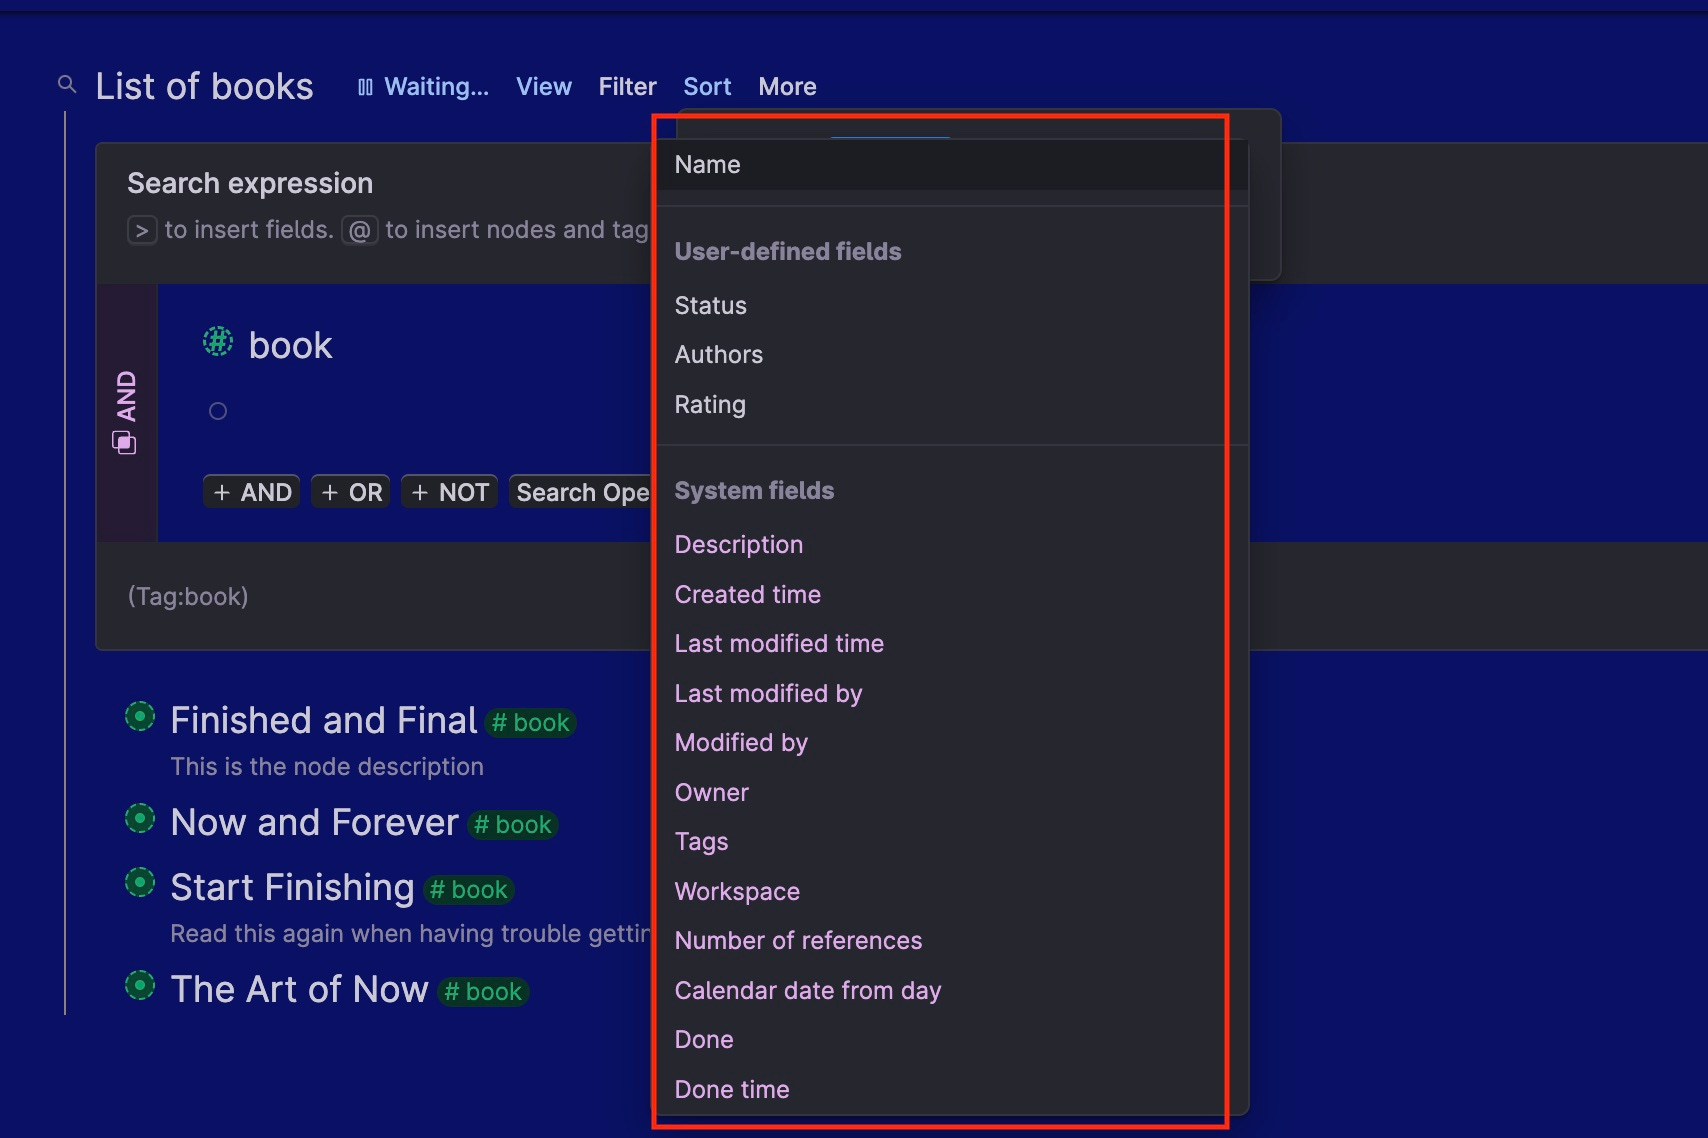
⚠️ As of 4/6/23, there is a bug in this sort-by-field list drop down. If your list is too long, you won’t be able to scroll to the bottom. The only workaround, at this date, is to zoom in on your screen (on a MAC, use CTRL - “minus sign”) until you can see the whole list. This may mean it’s now tiny for very long lists, but you can usually still figure out which field(s) you want to select. As of the summer of 2023 - this bug has been fixed
⚠️ As of 4/6/23, if you add a node from the search results, the sort will not automatically update. This may be an error, or by design; regardless, to fix it close the search and reopen for it to reset the sort. Or select the “Sort” tab again and select “Reapply sort.”
DISPLAY tab
Search Node Tab
The DISPLAY option allows you to select the information you want to be shown in addition to the node name. From the DISPLAY dropdown, select which fields you want to show :
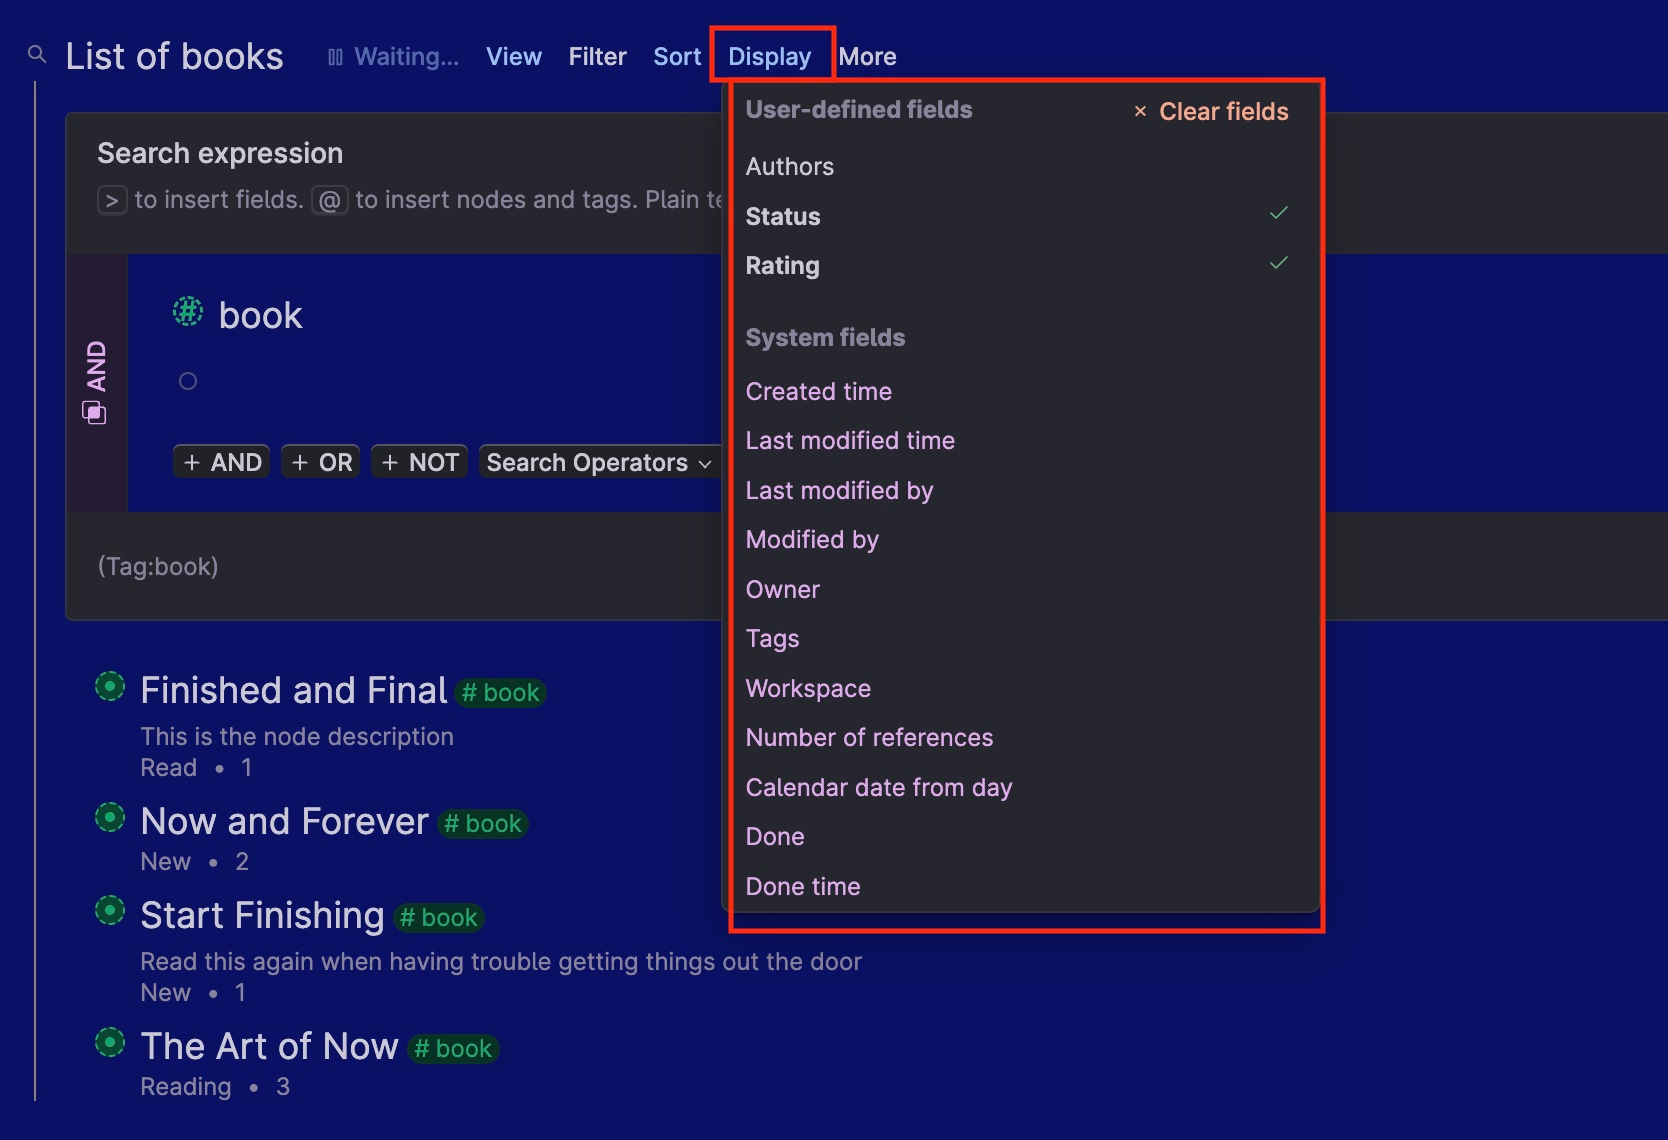
⚠️ As of 4/6/23, this dropdown has a bug that does not let you scroll down. It will let you scroll the entire screen, which can show more options, but you cannot scroll within the dropdown. The only workaround, at this date, is to zoom in on your screen (on a MAC, use CTRL - “minus sign”) until you can see the whole list. This may mean it’s now tiny for very long lists, but you can usually figure out which field(s) you want to select. As of summer 2023 this bug has been fixed.
The results render differently based on your view.
Back to Table of Contents
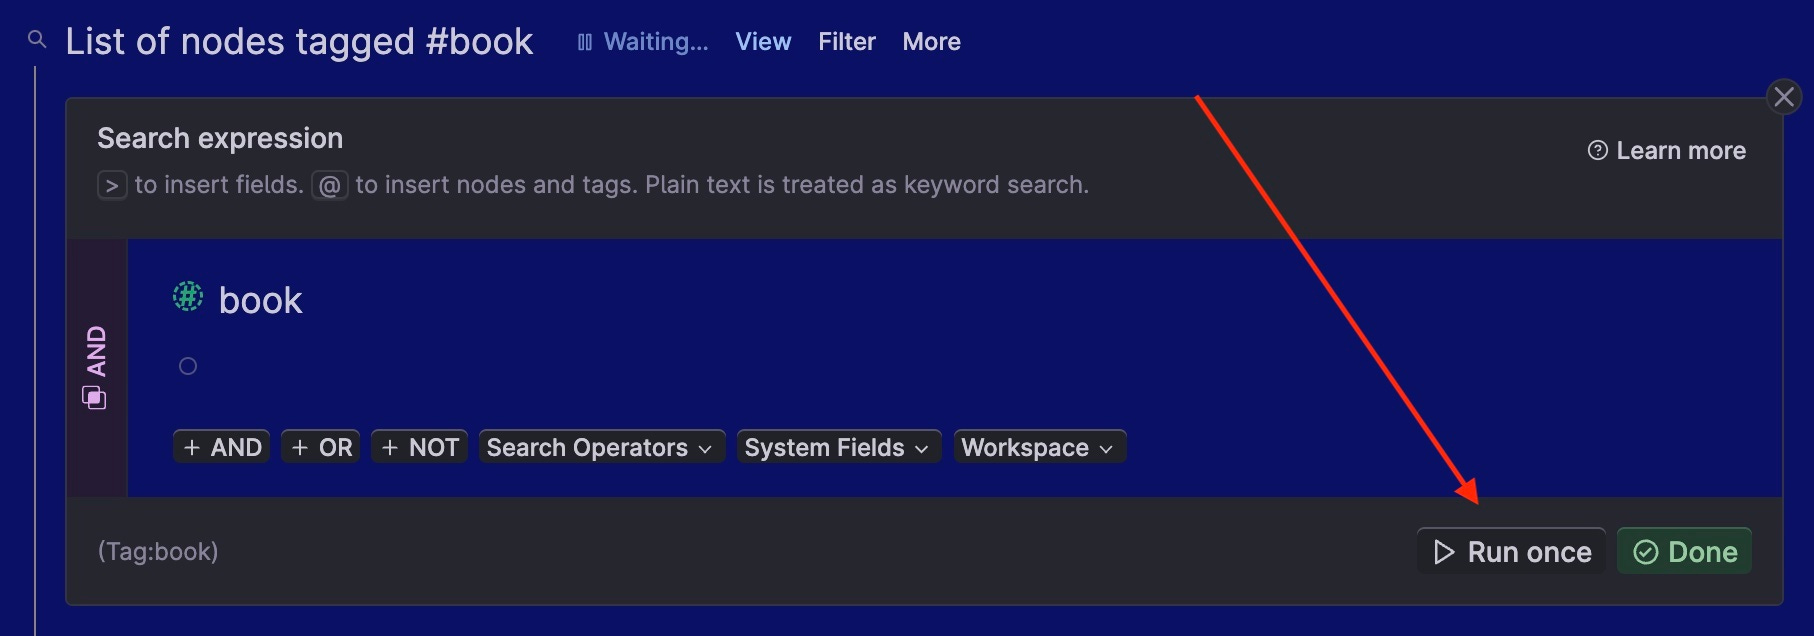
2. Search expression guidance
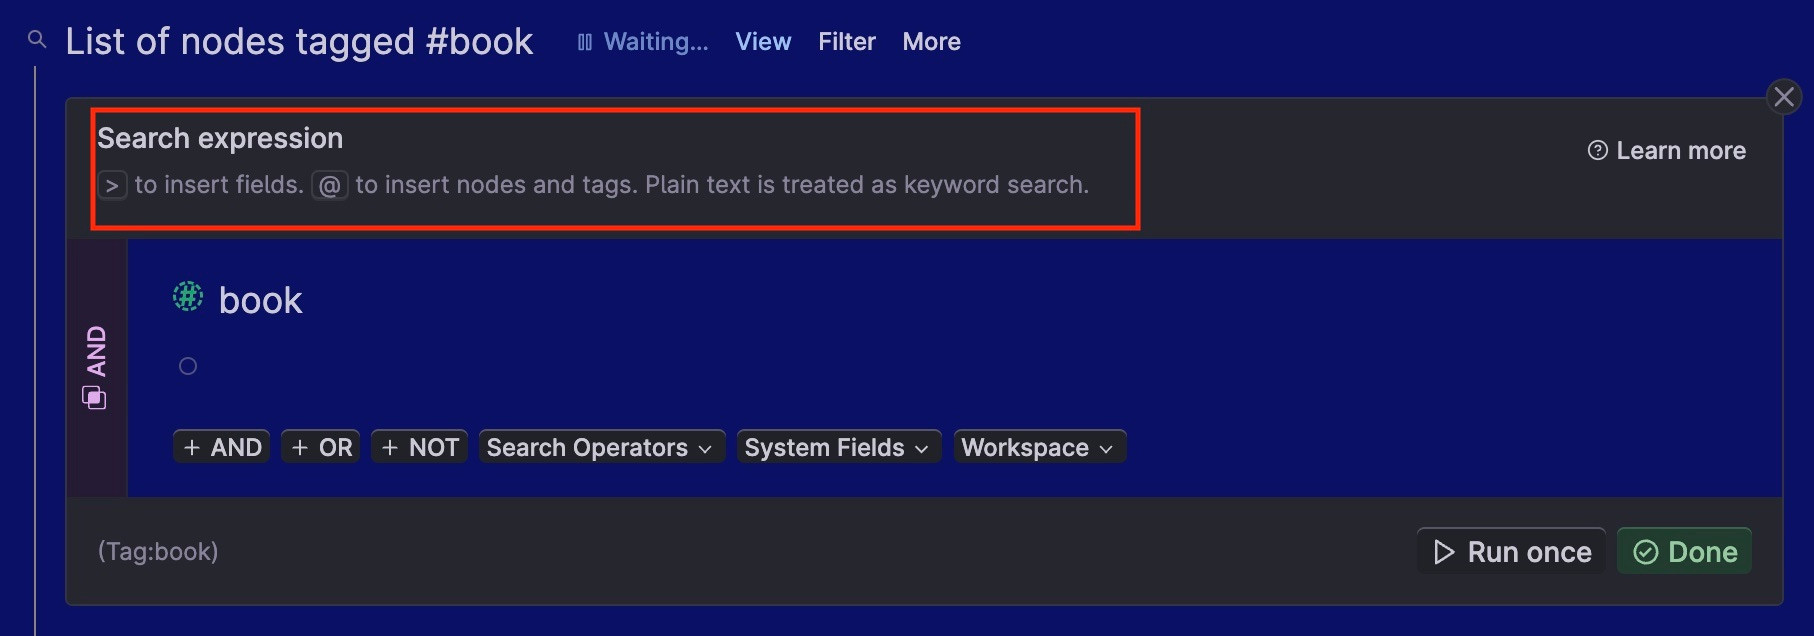
This guidance provides reminders about how to enter a field using the">" symbol and how to enter a node reference using the "@" symbol.
It also states, "to use the '@' symbol to enter a tag." Although technically correct, this is a remnant of an old version and is no longer required (but it won’t hurt if you use it). TANA has made it much more intuitive now. If you want to enter a tag— enter the tag, as usual, using the # plus the tag name.
Next, it says, "Plain text is treated as a keyword search."
The statement is correct but may get confusing when we discuss KEYWORD values for relational search expressions (think: PARENT, GRANDPARENT) in a future article in this series. These plain text KEYWORDS trigger a specific functionality. For example, if you had PARENT as a value for a search operator, Tana would not search for the word PARENT but trigger functionality that substitutes PARENT with the name of the PARENT node.
In the context of this general guidance, it's referring to the more literal meaning of 'Plain text'—where you're searching for a specific word or phrase.
Back to Table of Contents
3. Search Operator buttons
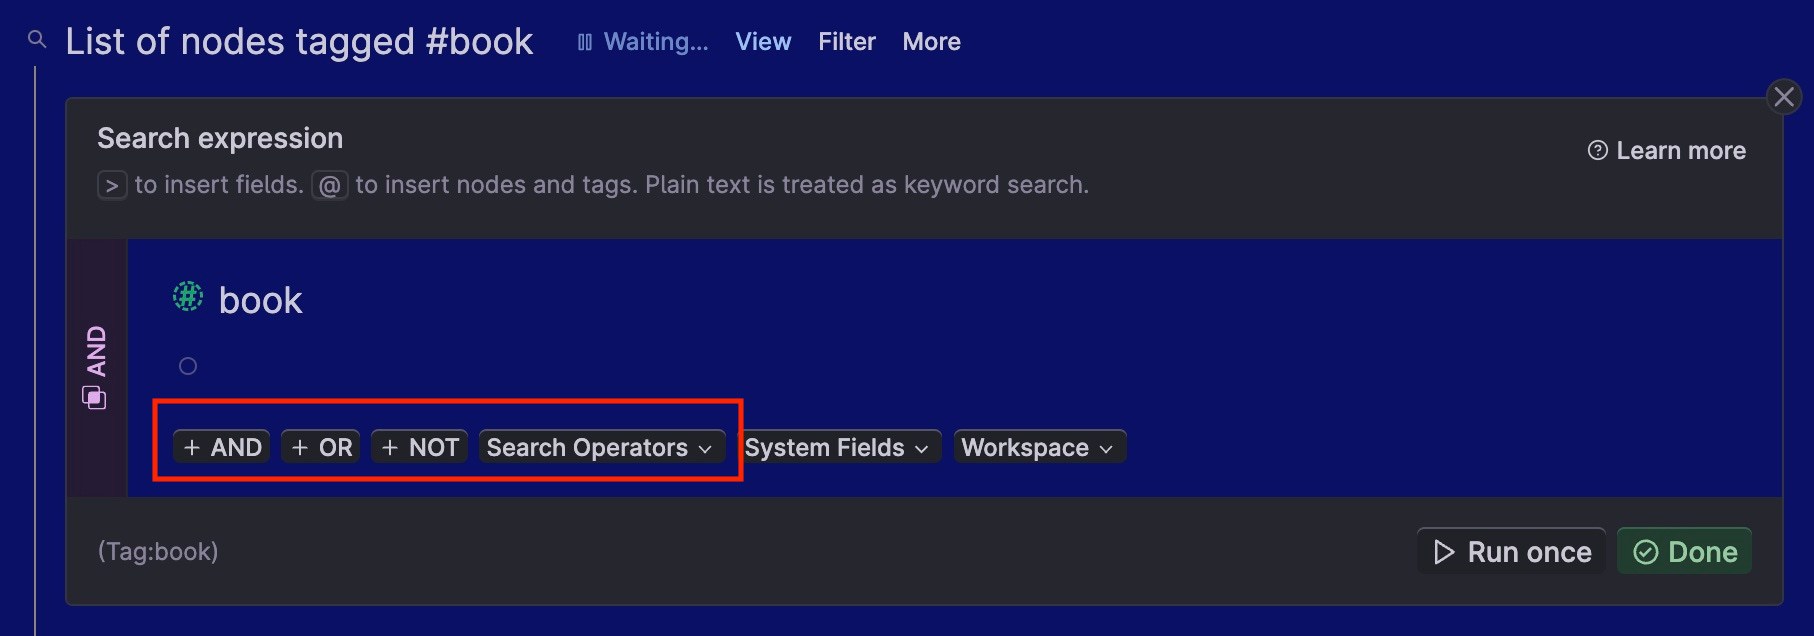
Search operator options include:
How to enter a search operator
Search operators are System-fields, and as such, you enter a search operator as a field using the">" symbol and select the search operator's System-field from the list.
System fields are TANA-created fields that trigger specific functionality. They are shown in the “SYSTEM FIELD” category of the reference pop-up box.
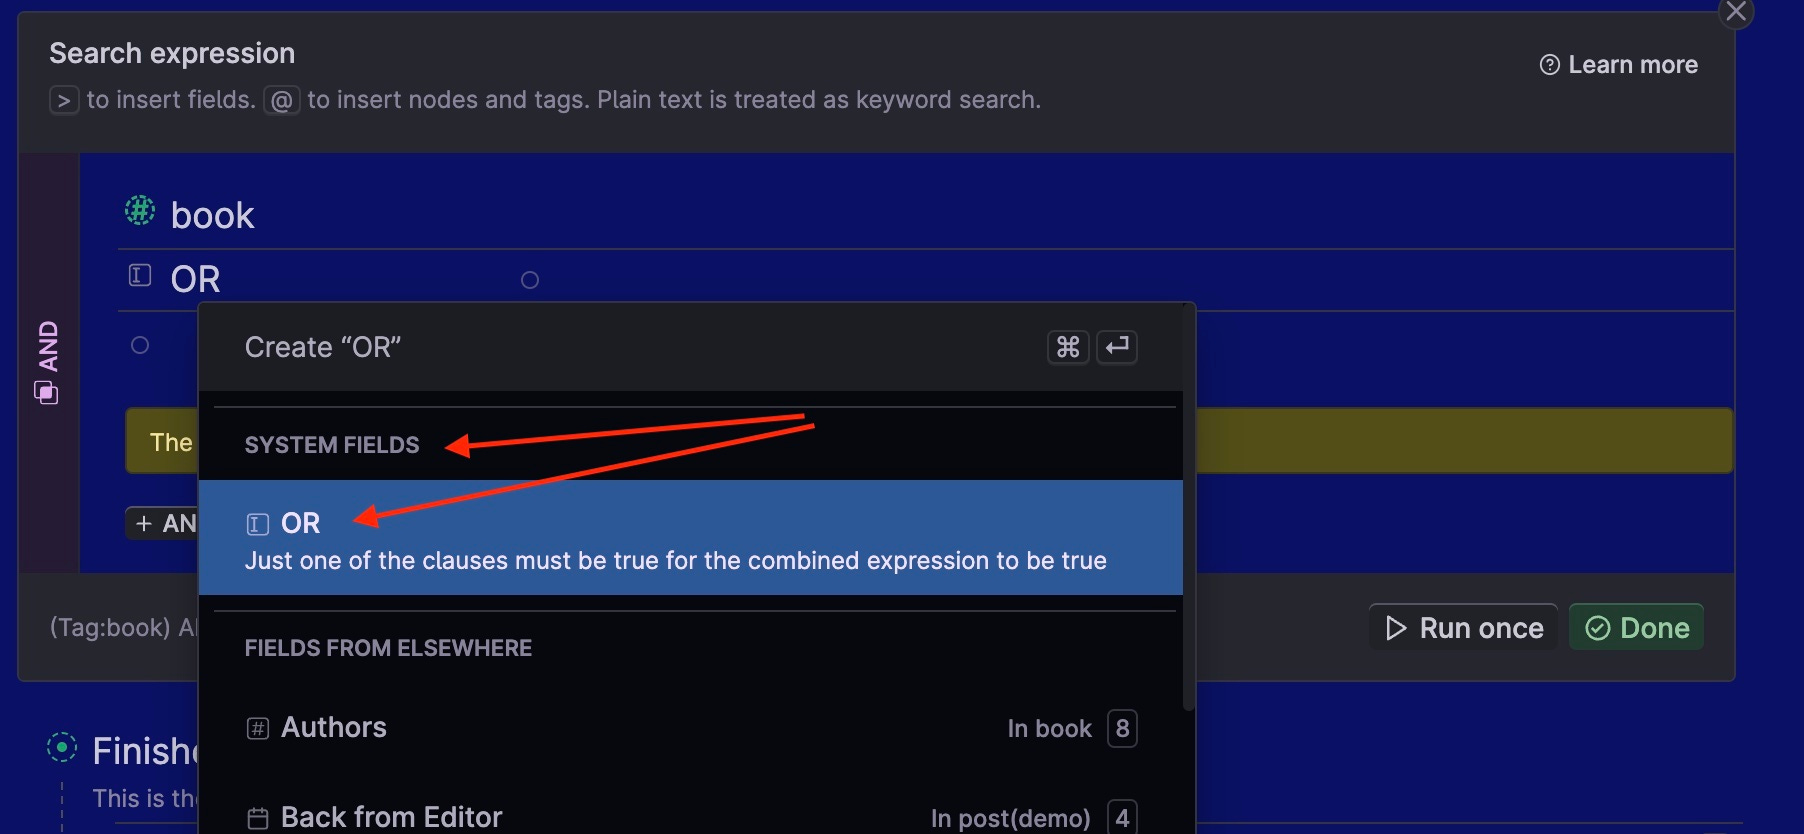
👀 As a Tana newcomer, not seeing the “SYSTEM FIELD” category can be easy, as shown above. Noticing this will help you pick the right field. Consider this 🤔 scenario: you could have created a user-defined field called “OR” (unlikely, but this example makes the point). Thus, when you type in “>OR,” you’ll get two options - a SYSTEM-FIELD and another one from “FIELDS FROM ELSEWHERE.” If you want the SEARCH OPERATOR, choose the “SYSTEM FIELD.”
🙌 If you forget to enter as a field - Tana will remind you 🙌
Each search operator is formatted in the same way:
The search operator is first
Followed by a value the operator will use to perform the operation (combine, negate, compare, etc.)
Let’s break down each search operator.
LT / GT
Search Operator button
LT (less than) and GT (greater than) operators are tools that compare two field values, such as numbers or dates. In this example, Tana searches for all book-tagged nodes but only those created after the date specified — 3/27.
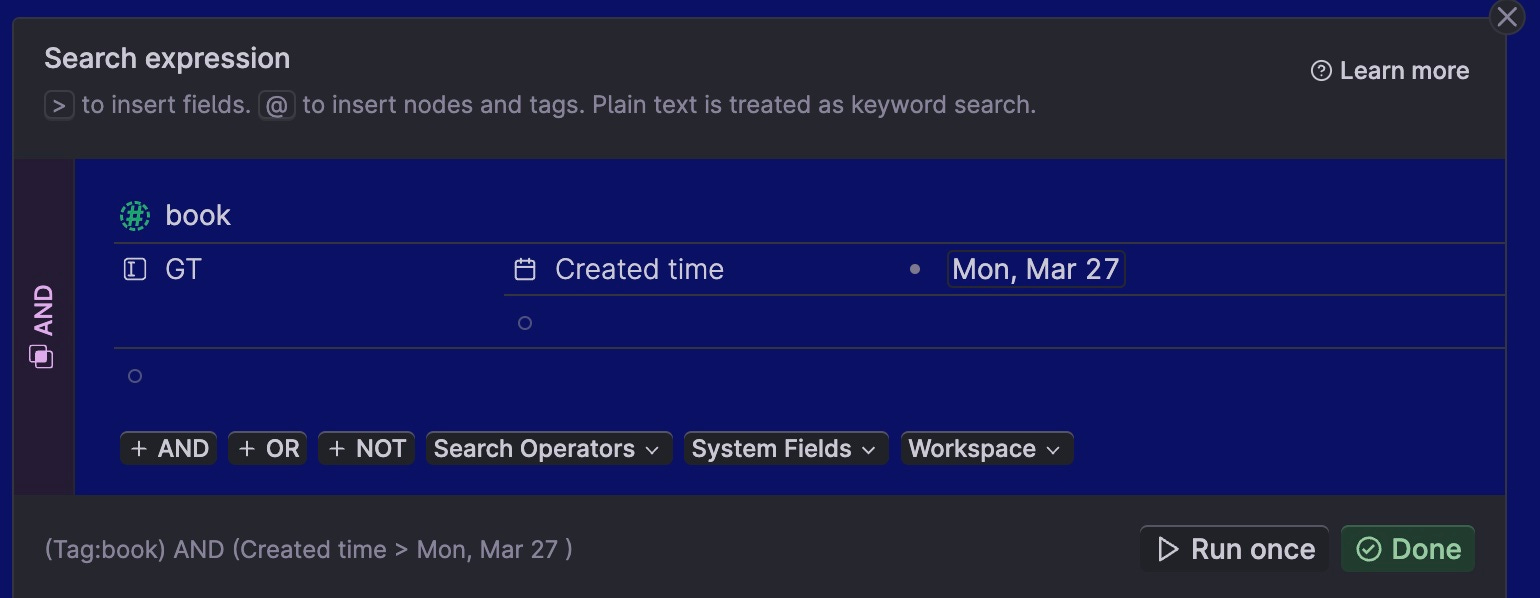
👀 Notice the order. As previously mentioned, the format for all Search Operators is as follows:
First: The Operator (GT or LT in this example) must come first
Second: The field that holds the value you’re comparing
Third: The value you want the field value to be compared to
👀 Many newcomers intuitively want to enter the field first and then the GT. If you do that by mistake, 🙌 Tana is smart enough to warn you that it might not be what you want and is friendly enough to ask if you want it fixed! 🙌
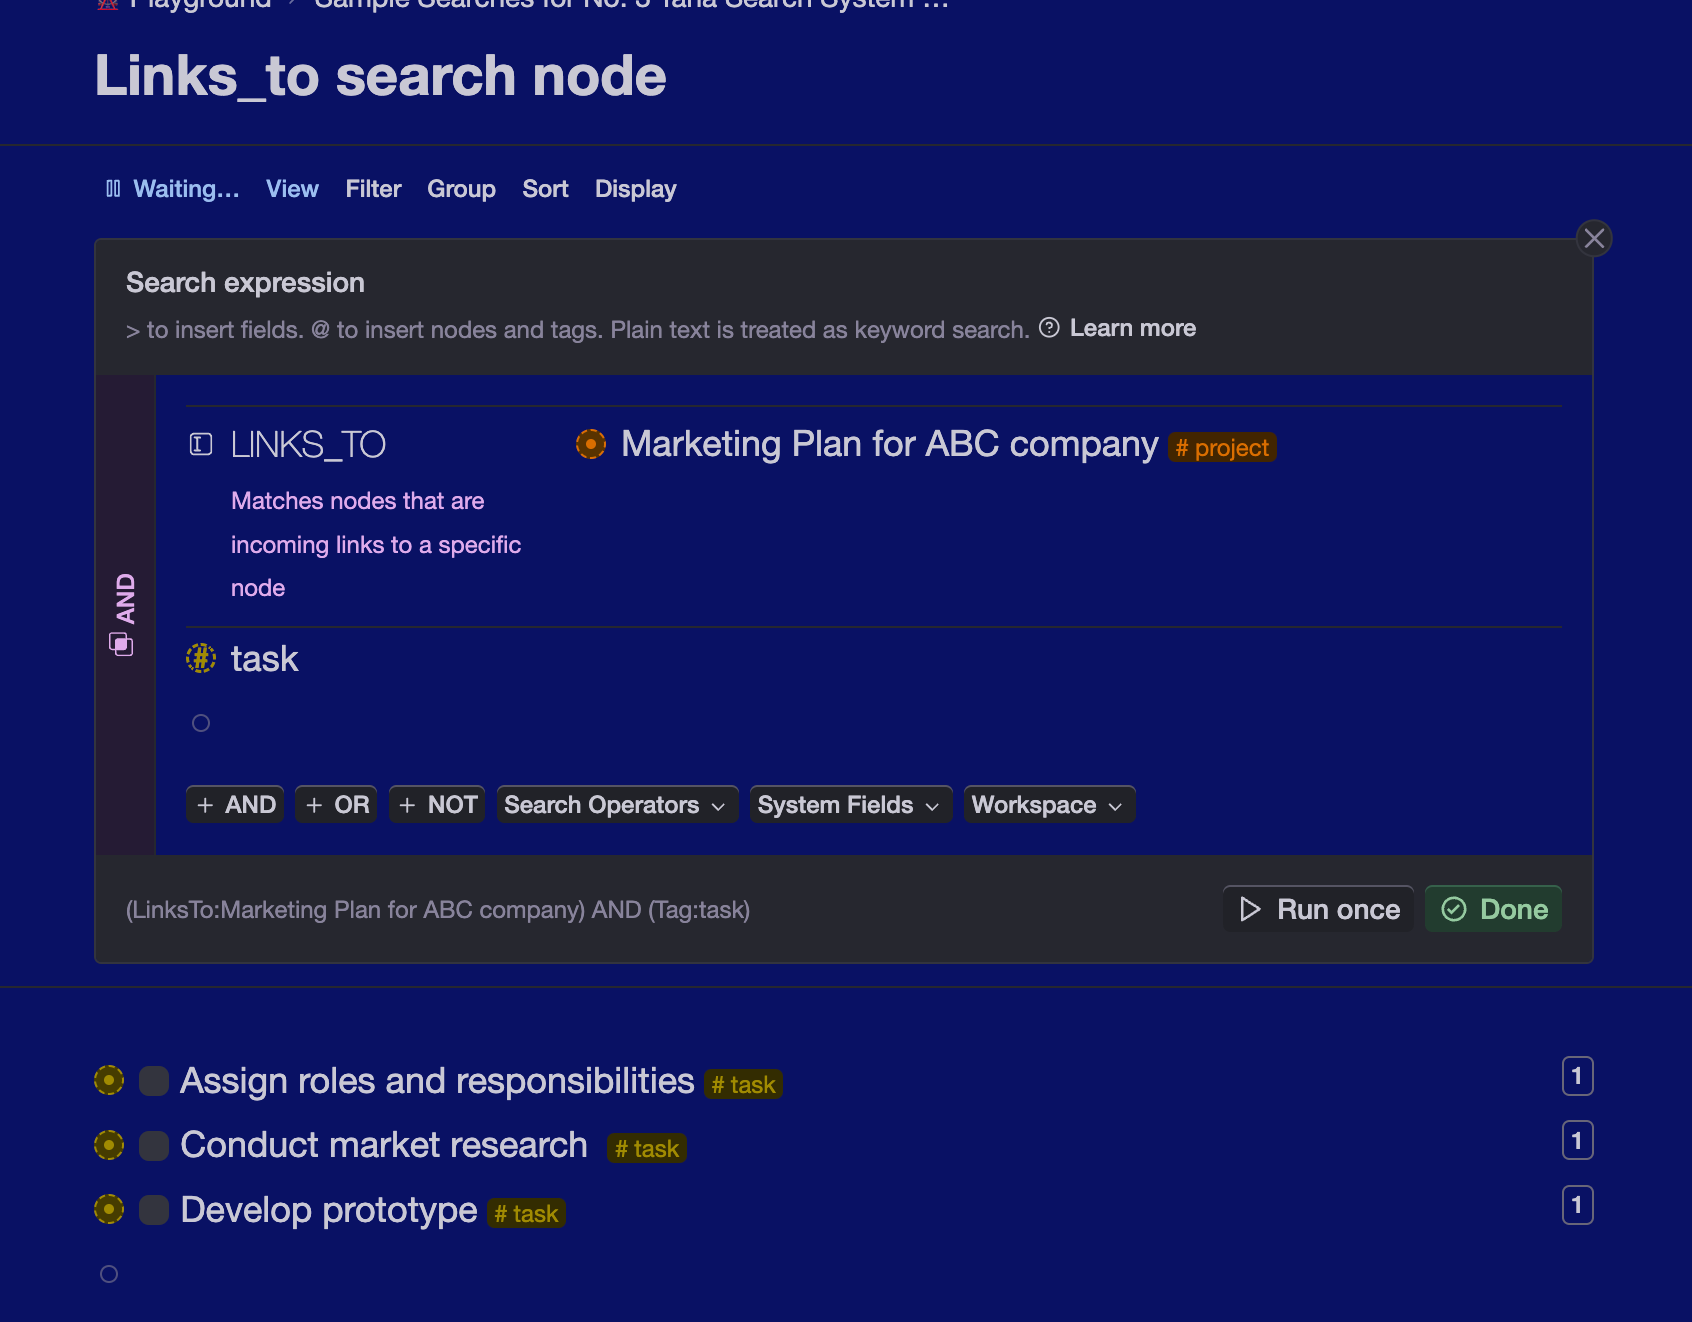
LINKS_TO
Search Operator button
The value you provide for the LINKS_TO operator is node reference (entered using the “@” symbol). This operator results in all nodes referencing the node you provided (inline or otherwise). It is analogous to the "Linked References" at the bottom of a node.
One typical use case for LINKS_TO is a search within a Supertag that results in all nodes that LINK_TO to the node mentioned in the PARENT Supertag node.
Example: This example comes from my Zettelkasten-like process. Within the highlights of a book, I write my notes. In my supertag #readwise, I have a search for all notes created from this book or all notes that Link_to the Parent (the book's name).
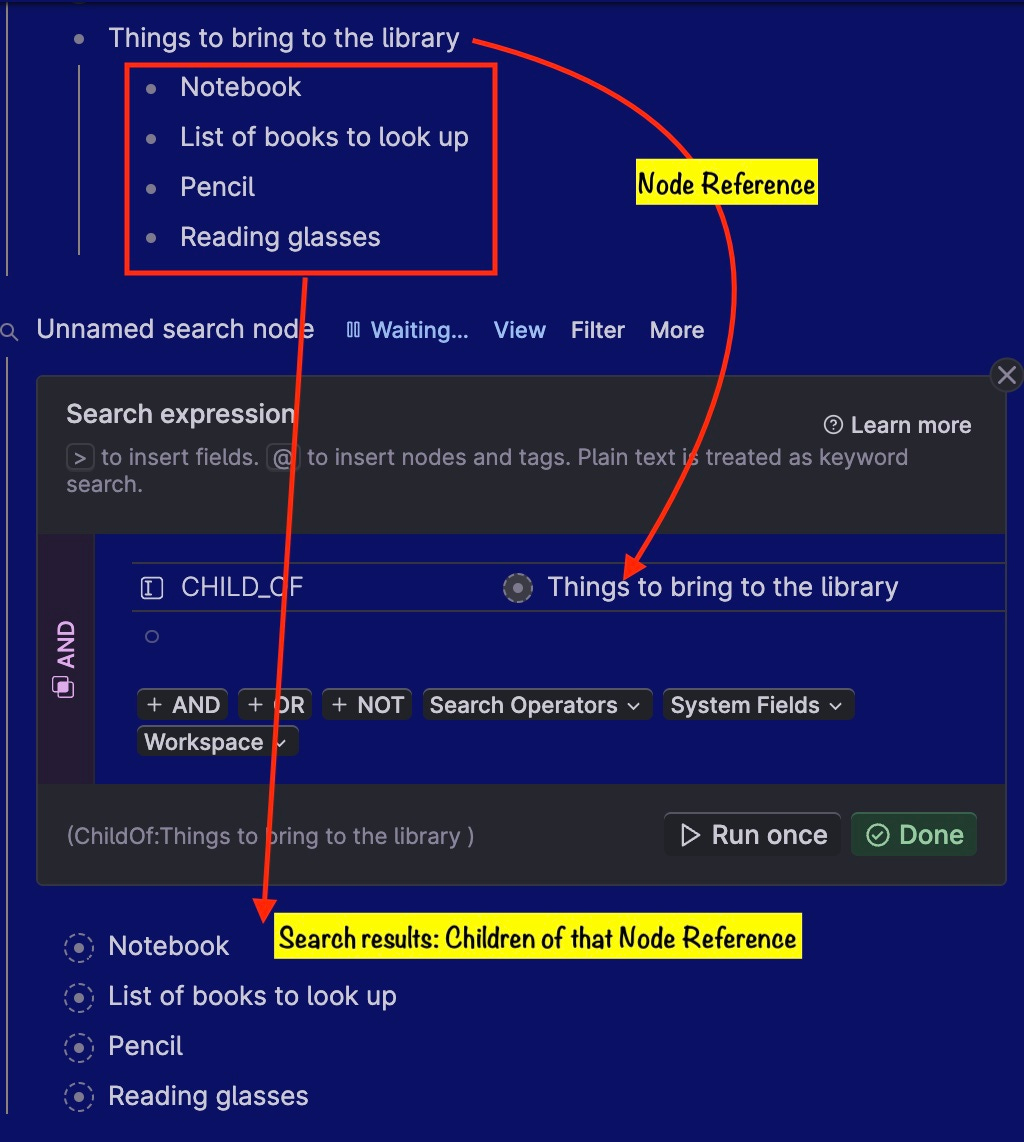
CHILD_OF
Search Operator button
The value you provide for the CHILD_OF operator is a reference node. This operator will result in all direct children of that node, even if they are a reference. It does NOT include any children of the children (descendants).
OR and NOT
Search Operator button
Use the OR and NOT operators to compare two nodes. You may want to see nodes-tagged books OR nodes-tagged videos. Or you might want to see all nodes tagged book but NOT those authored by "Charles Gilkey" as shown below:
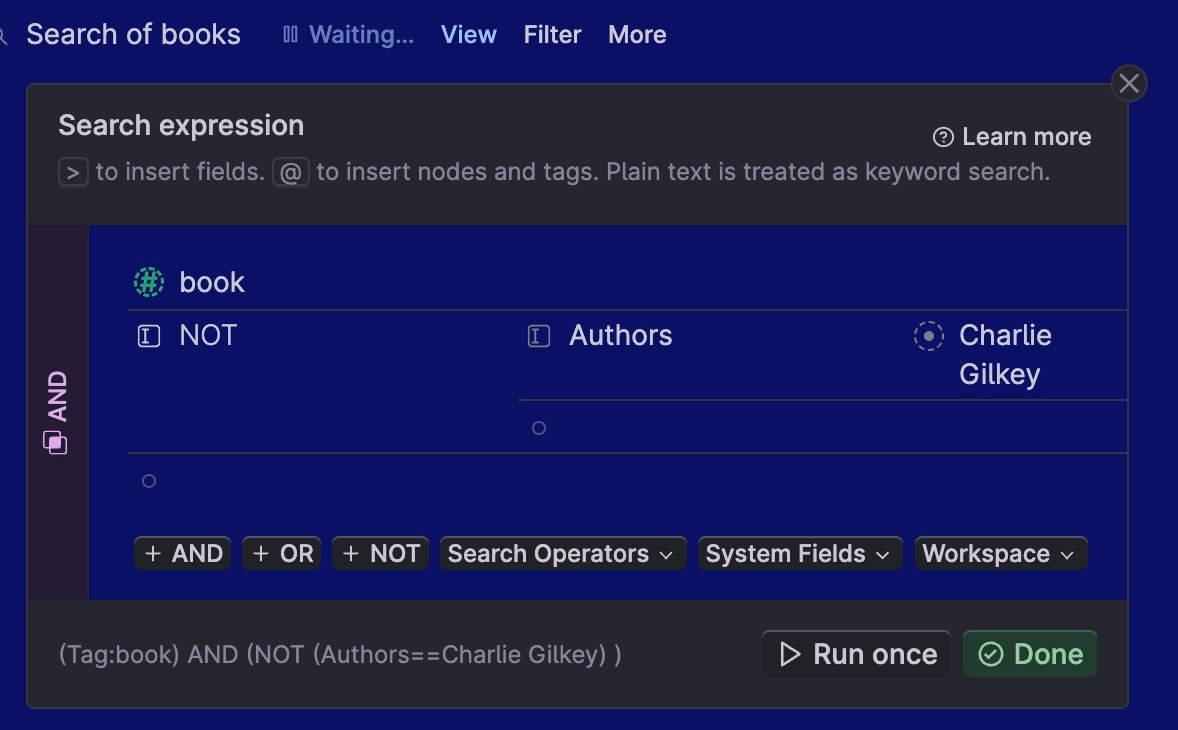
Not operator
Search Operator button
As in GT and LT, the order is essential. Enter the NOT first.
👀 At first glance, it may appear that the NOT operator does not take multiple values, but it does. As a beginner, you may want to enter one value then press enter, and expect to enter the next value but it doesn’t work that way. You need to use the space bar to bring up the available options, then SHIFT CLICK each option you want to exclude.
Note: This behavior when selecting multiple values works like this on most multi-valued fields.
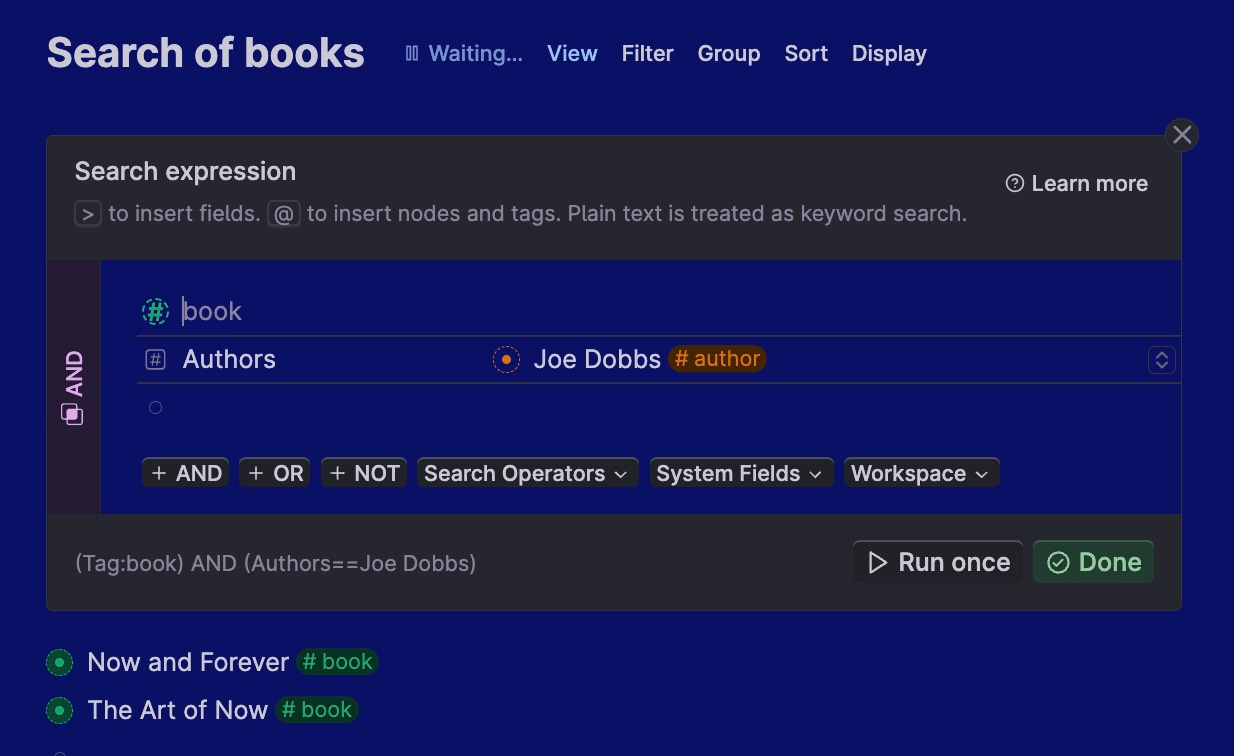
AND
Search Operator button
Finally, we have Search Operator AND. This operator does what you'd expect. The resulting nodes must meet each of the "AND" criteria. There is one thing unique about the "AND" Operator. See the next section for more.
Back to Table of Contents
4. Default operator "AND"
Search Operator button
Unlike the other Search Operators, the AND operator is shown in two places, as illustrated below:
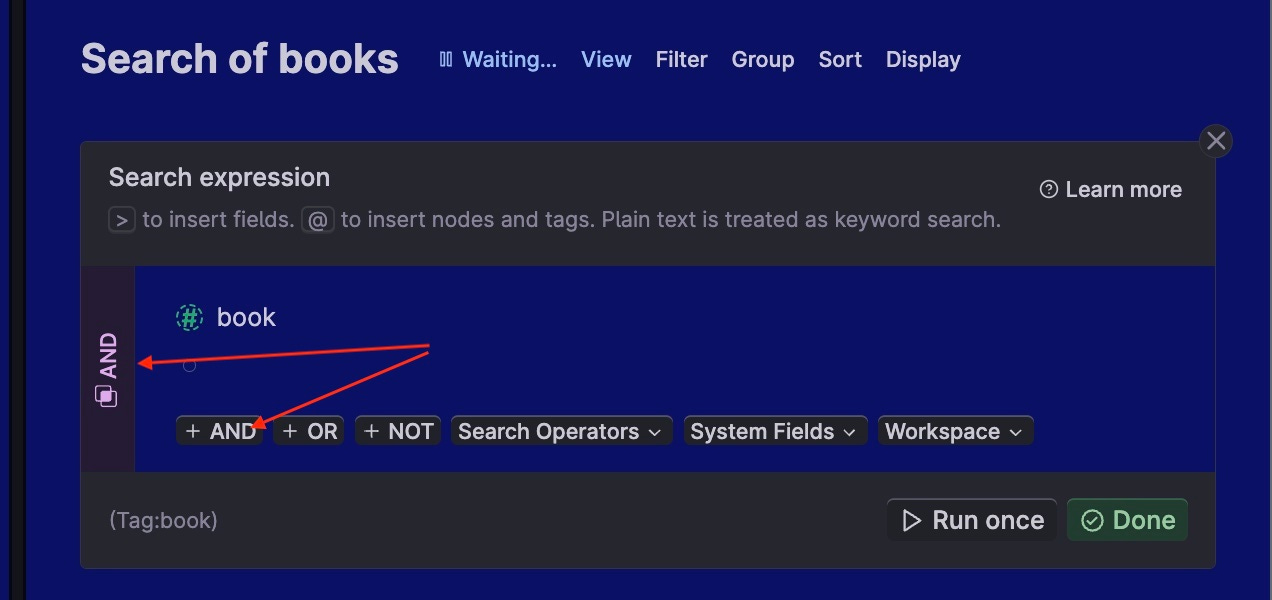
⚠️ This can confuse Tana newcomers. This vertical, pink "AND" is there to remind you that everything left aligned (stacked one after the other) is an assumed "AND."
So, each criterion stacked and left aligned must be met for Tana to include the node in the search results.
It also means that you never use the AND operator as your first criterion in any row because it is assumed (if you try to, 🙌Tana is smart enough to correct you 🙌).
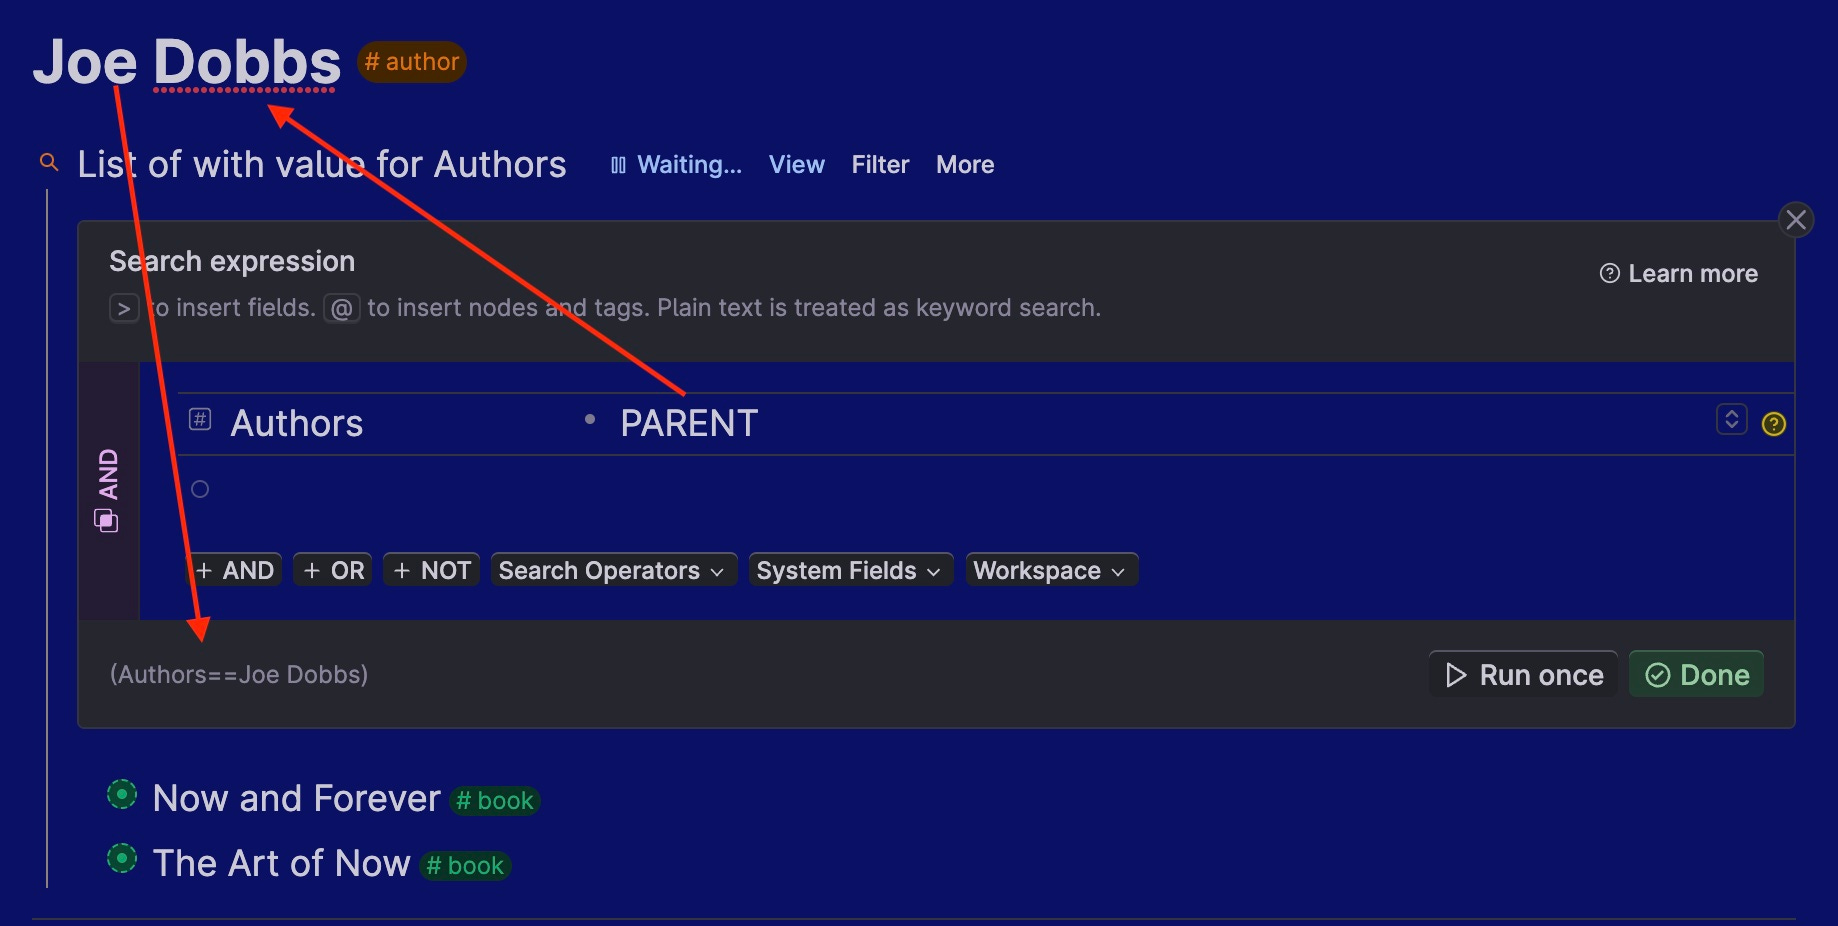
In the example below, "#book" and "Authors" are left aligned and stacked; thus, both criteria must be met. Specifically, the node has to be tagged book, and the book must have the author field completed with Joe Dobbs.
You can add the "AND" operator after as the second entry in more complex searches, as shown in the two examples below:
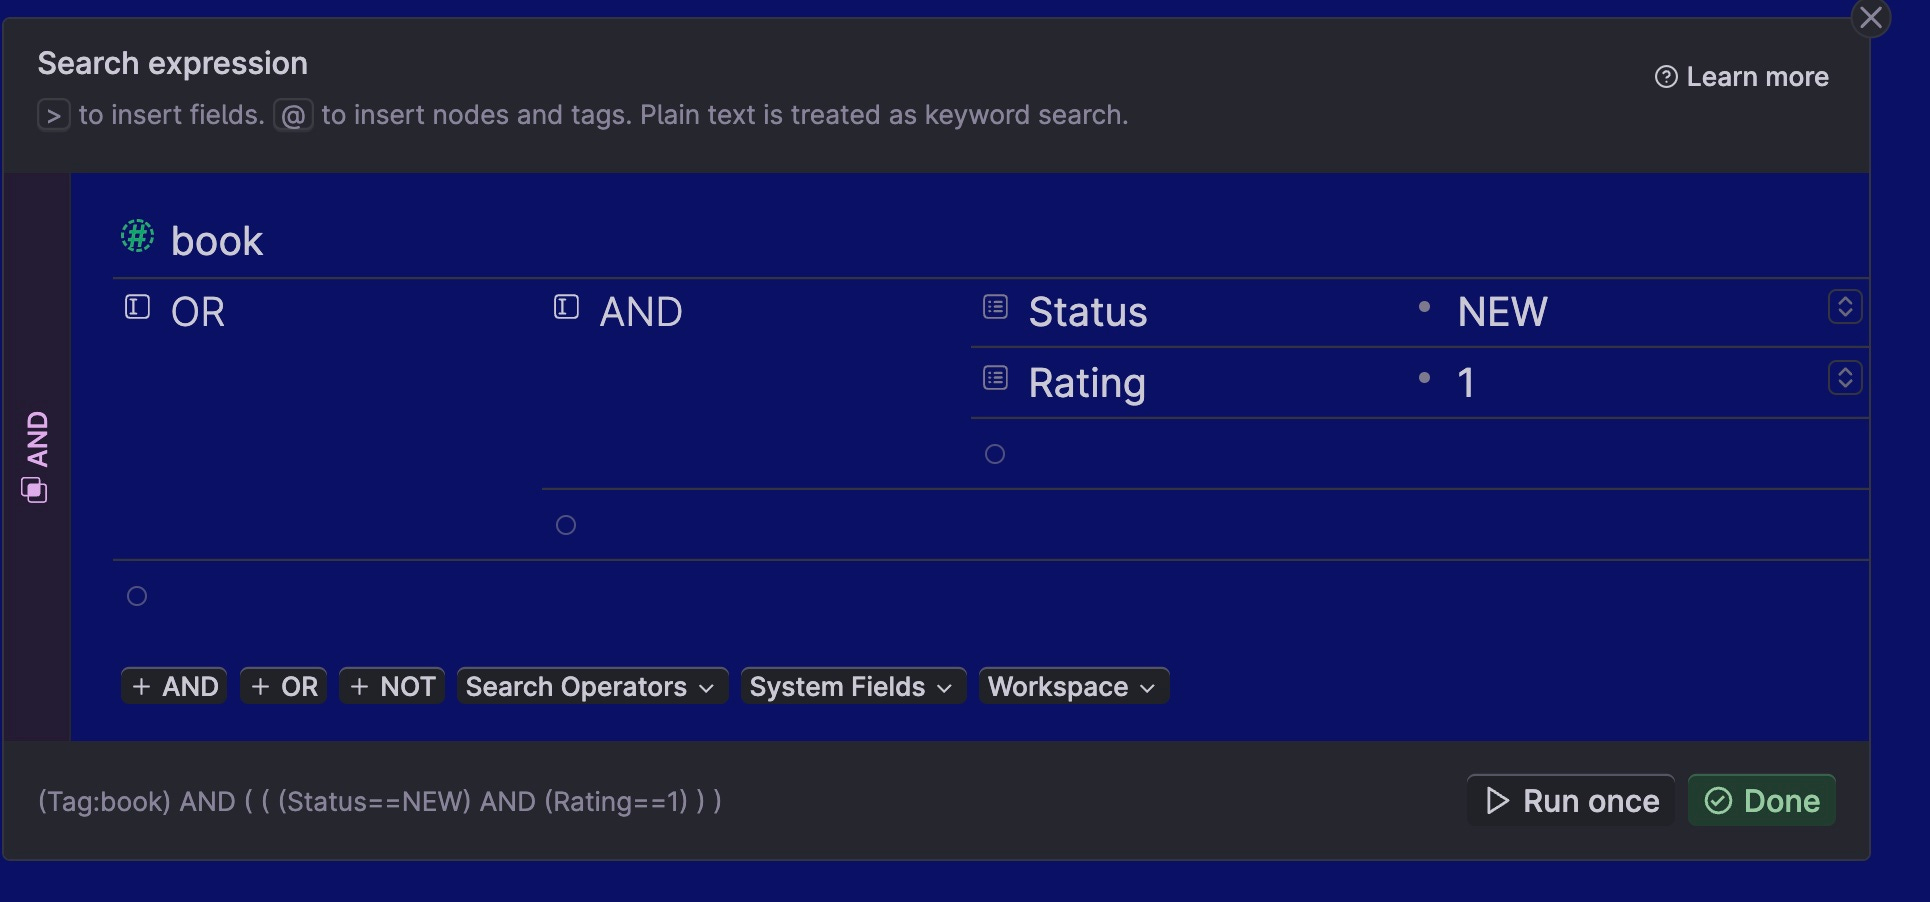
The results of the last example are
nodes tagged book AND are
either (books by Charles Gilkey AND that have a rating of 2
OR any book with a rating of 3
Back to Table of Contents
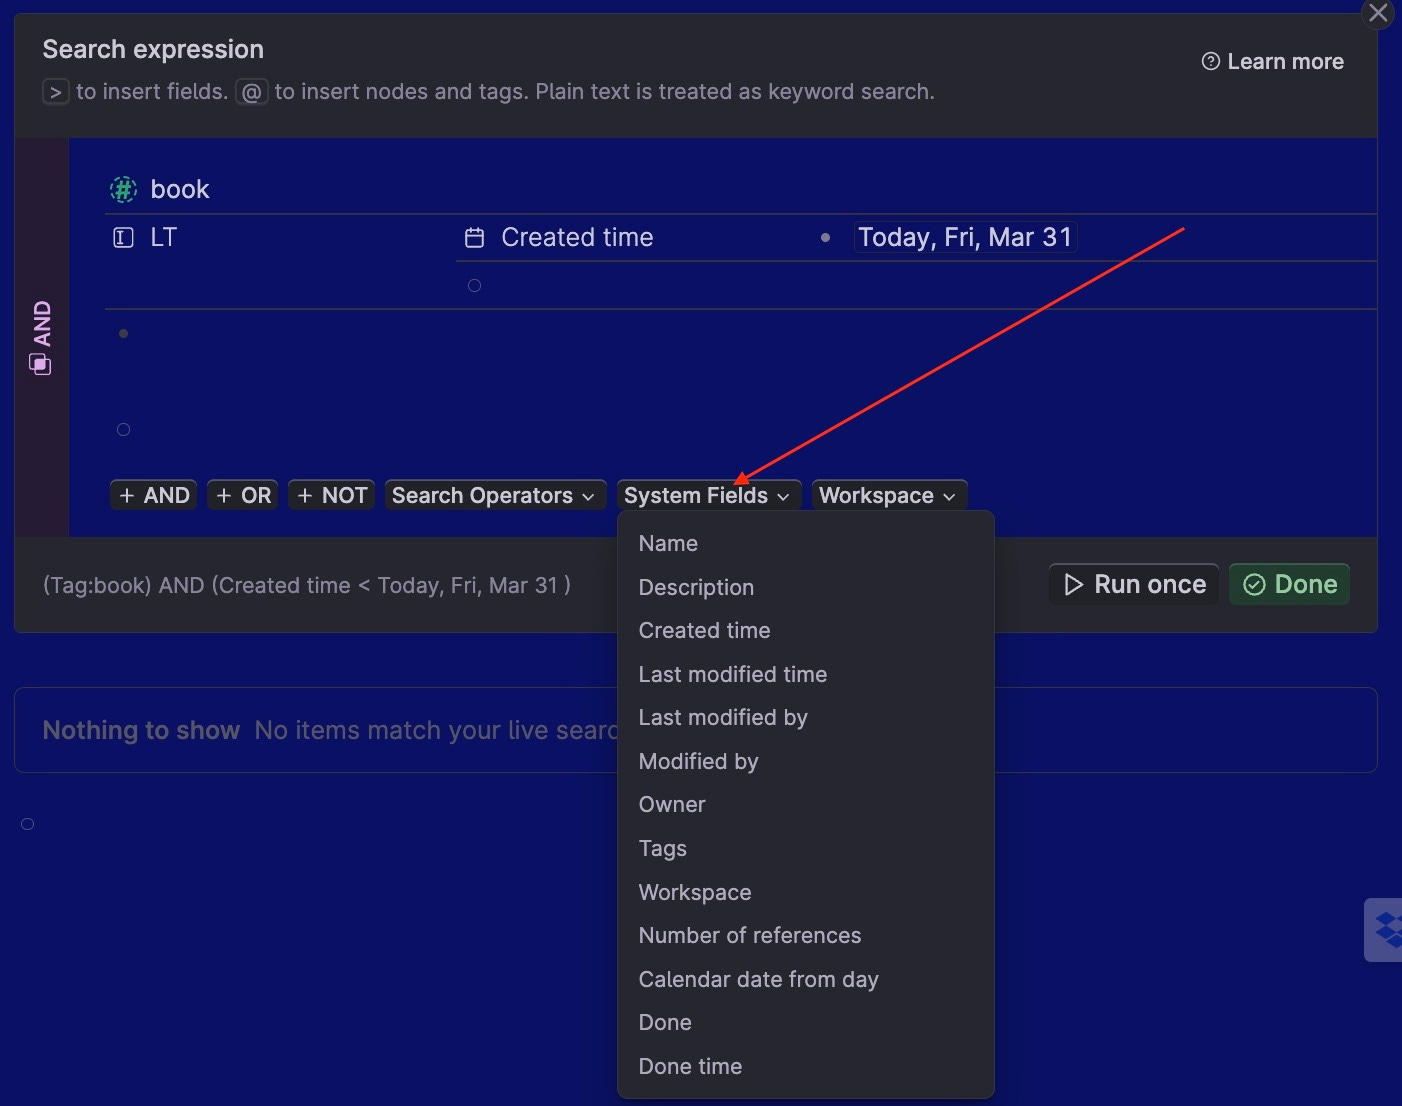
5. System Fields
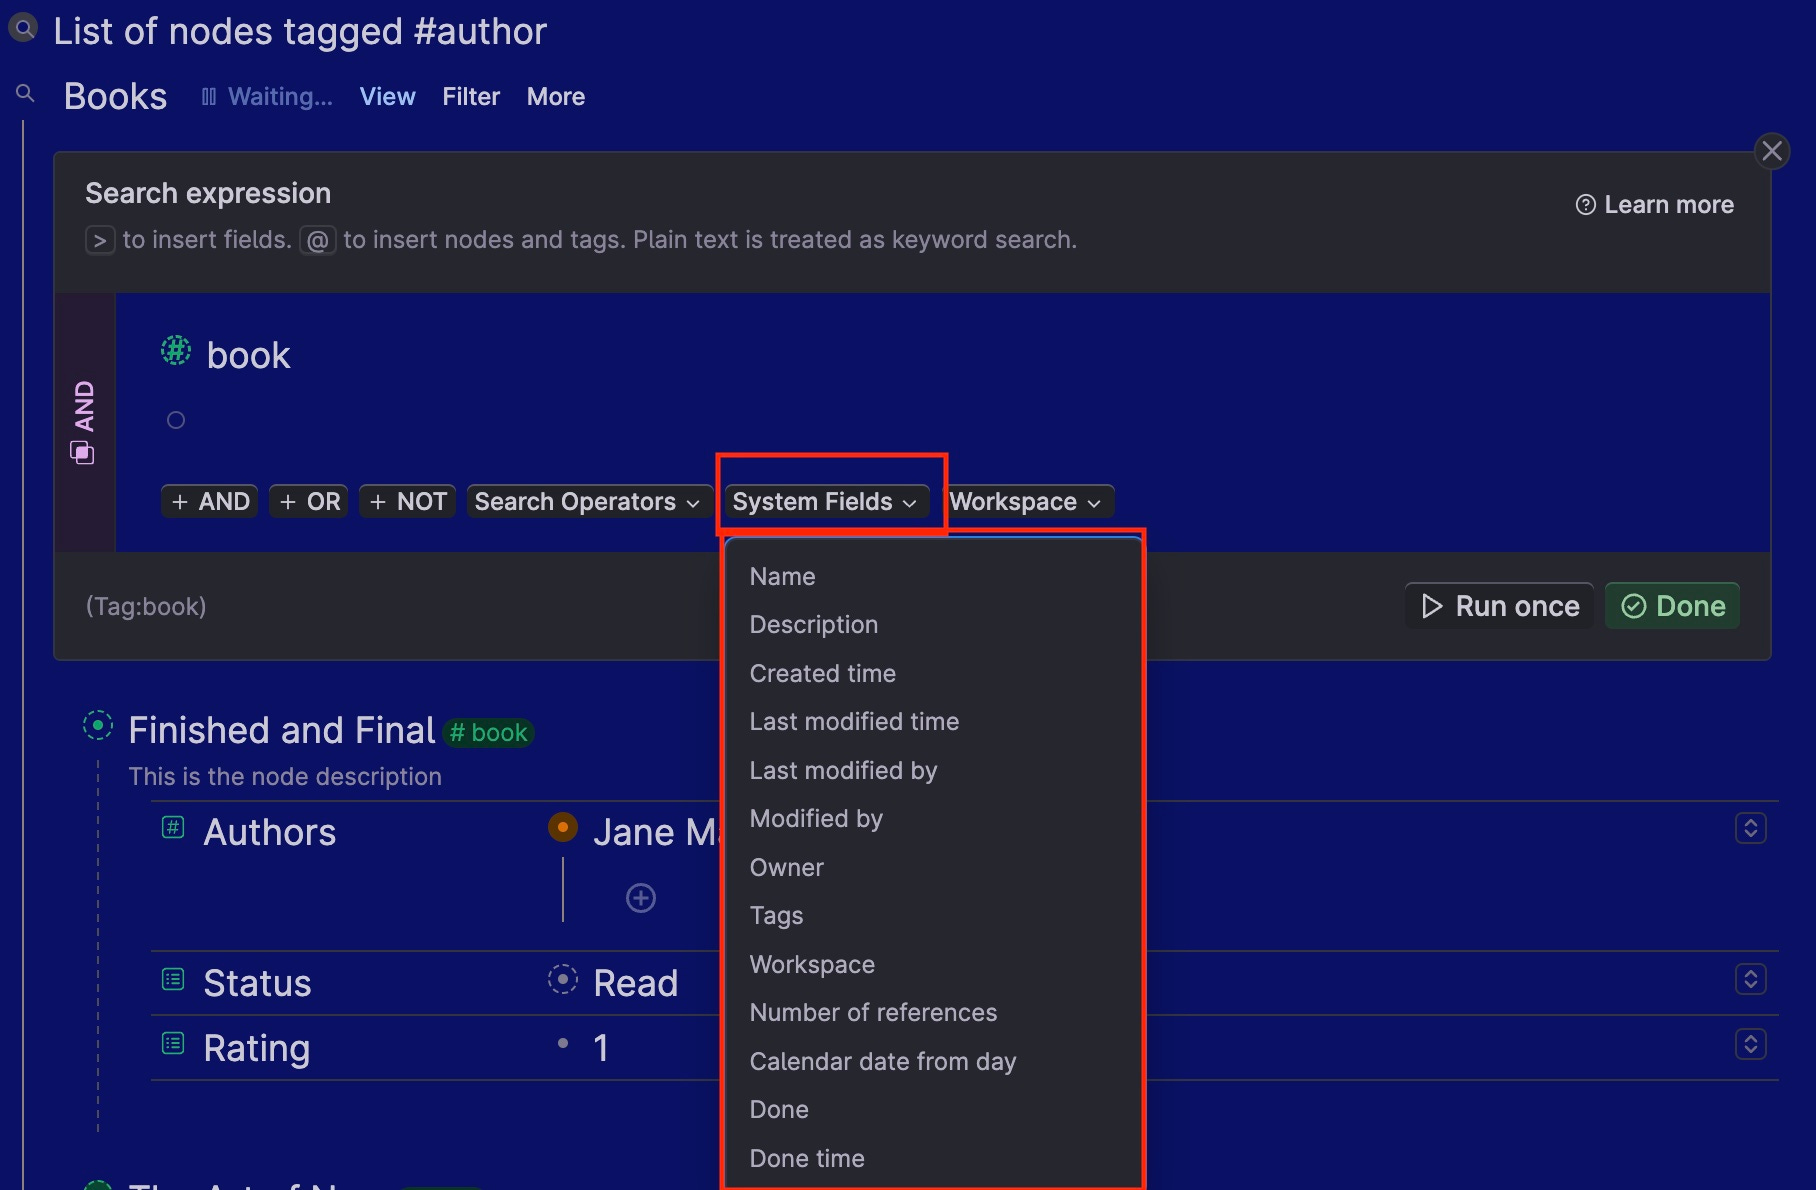
System fields are fields automatically created by Tana in the background.
You can use these fields in searches or as fields in a supertag. We have already used several system-fields when we referenced AND, OR, and NOT system operators as they are system-fields.
You can select the system field from the "System Field" button or by typing the">" and selecting the field name from the pop-up box. Be sure to select the "System Field" as shown below:

In addition to search expressions, many Tana users often add System Fields to a TABLE view for sorting and reference.
Here is a brief description of each of the system fields:
NAME
System Fields
The name system-field is the node's name (same as what you might reference using the ‘@’ symbol to reference a node). In the example below, “Finished and Final” is the node NAME.

DESCRIPTION
System Fields
The description system-field is the node’s “Description” as entered via CMD/CTRL i, or by using the command line (CMD/CTRL + K) and selecting “ADD DESCRIPTION. Using the same example, the words below the name, “This is a node description,” is the DESCRIPTION

However, using this DESCRIPTION field in a search is not working, and a bug has been reported (as of 4/6.23). As of summer 2023, this has been fixed
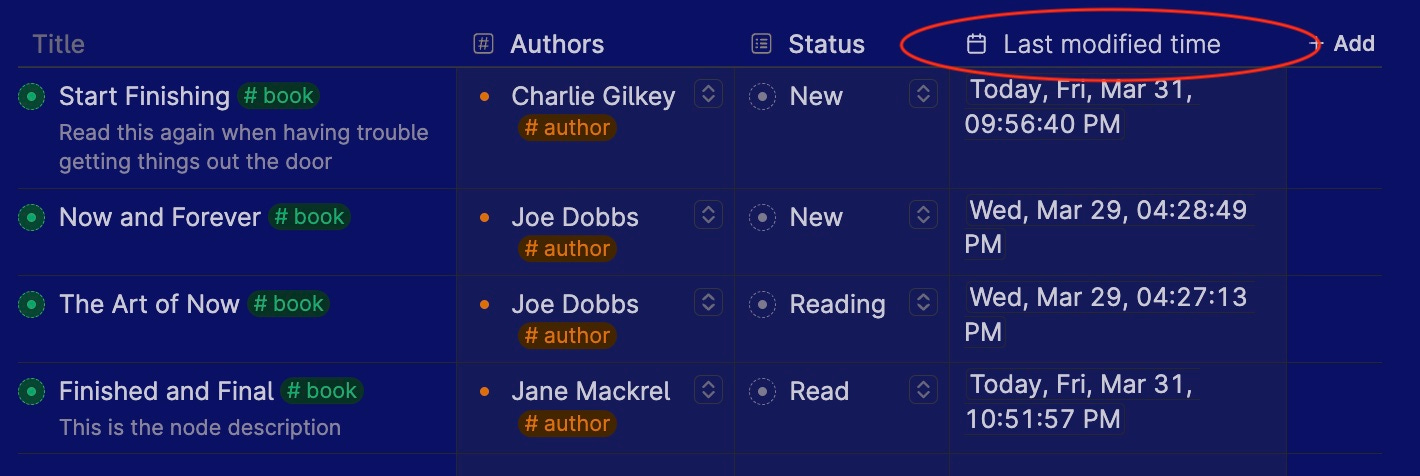
Created by / Modified by date & time fields
System Fields
Created date system-field is the date and time you enter the node into TANA.
Modified time system-field is the date and time the node was last modified
You can use these system fields in your search:
In the example below, we used the +ADD button to include the system-field “Last Modified TIME” in the TABLE view of the search results.

⚠️ The person who created the node and the “OWNER” of the node (as discussed below are NOT the same. The CREATED BY is a person, and the OWNER is a place in the system.
OWNER
System Fields
The OWNER is the node's home in the system. A node's default home is the PARENT where you originated the node. (More on Nodes—What They Are and Where They Live in a future article).
For example, if you created a node on the Day page - the Day page is its OWNER.
However, if you created a node under another node on your Day page, its OWNER is its PARENT node.
👀 Note, that when a node is referenced under another node, the referenced node’s PARENT is the parent to the referenced node, but its OWNER is still wherever the original node was created. More on this in a future deconstruction when we discuss Nodes - What are they and Why You Care.
If you created a node within a Supertag - then that Supertag is the node's OWNER.
⚠️ OWNER is not a person but a place in your WORKSPACE.
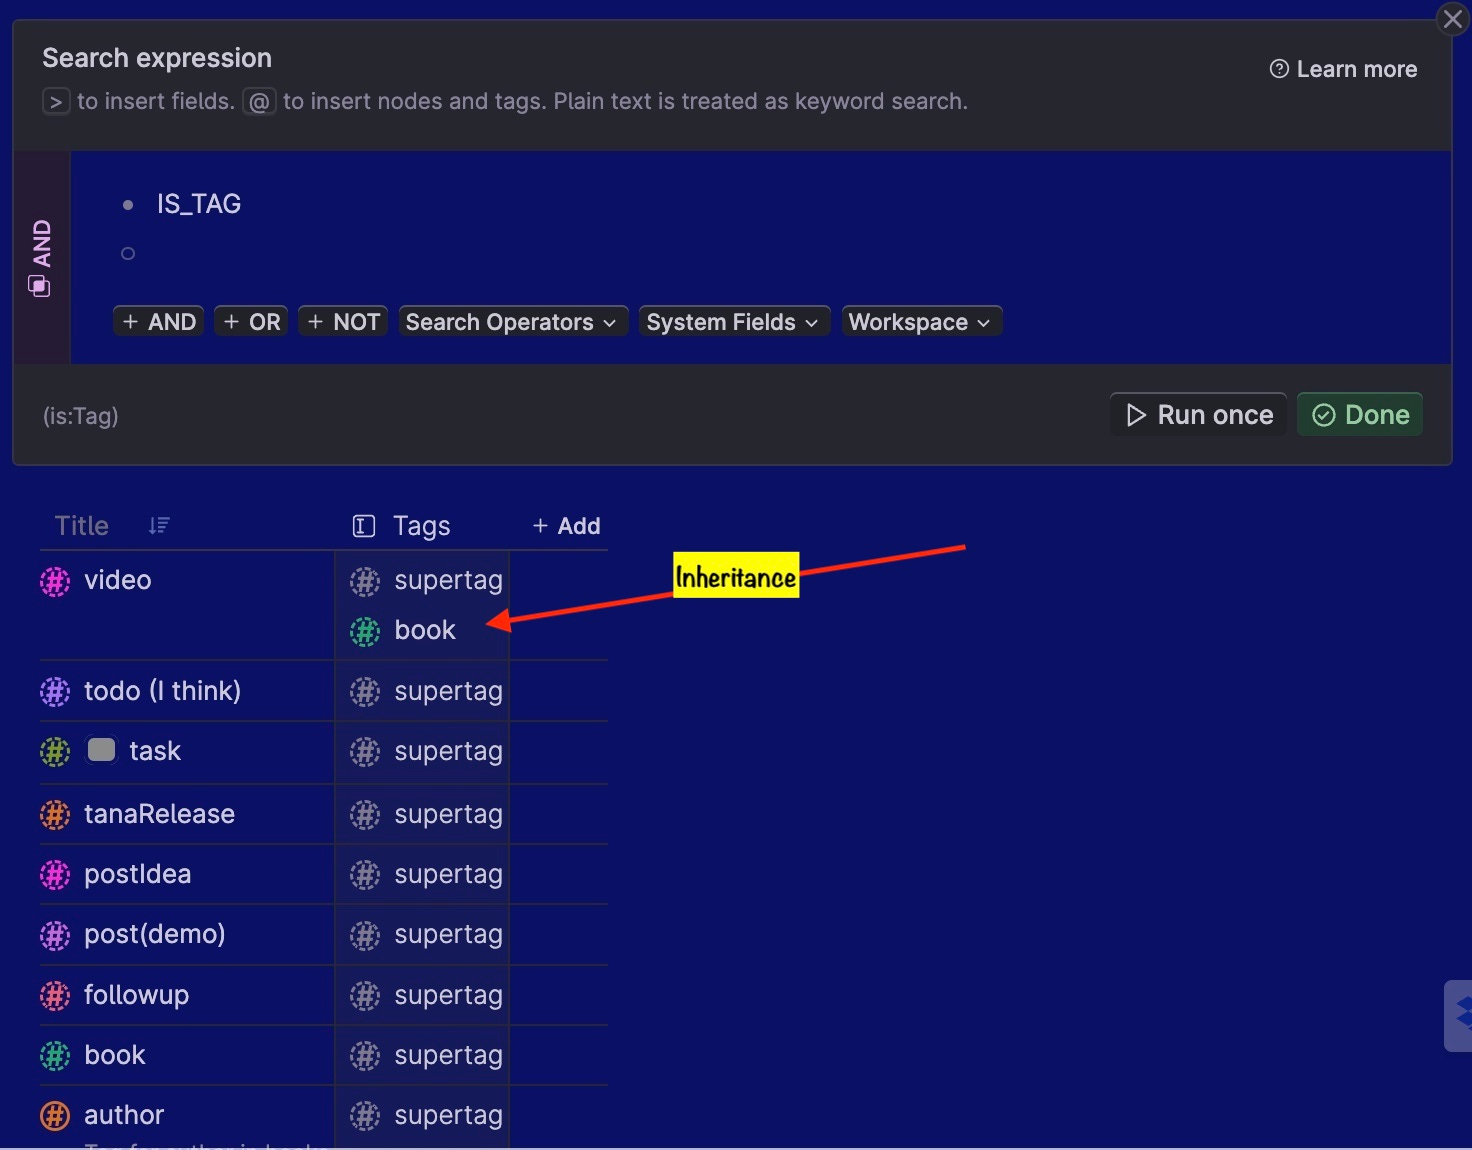
TAGS
System Fields
The TAGS system-field shows the tags on each node - including any extended tags. This field is most often used in a table view.
We added the system field TAG to the results in the example below. This enables us to see the inheritances of other tags.
WORKSPACE
System Fields
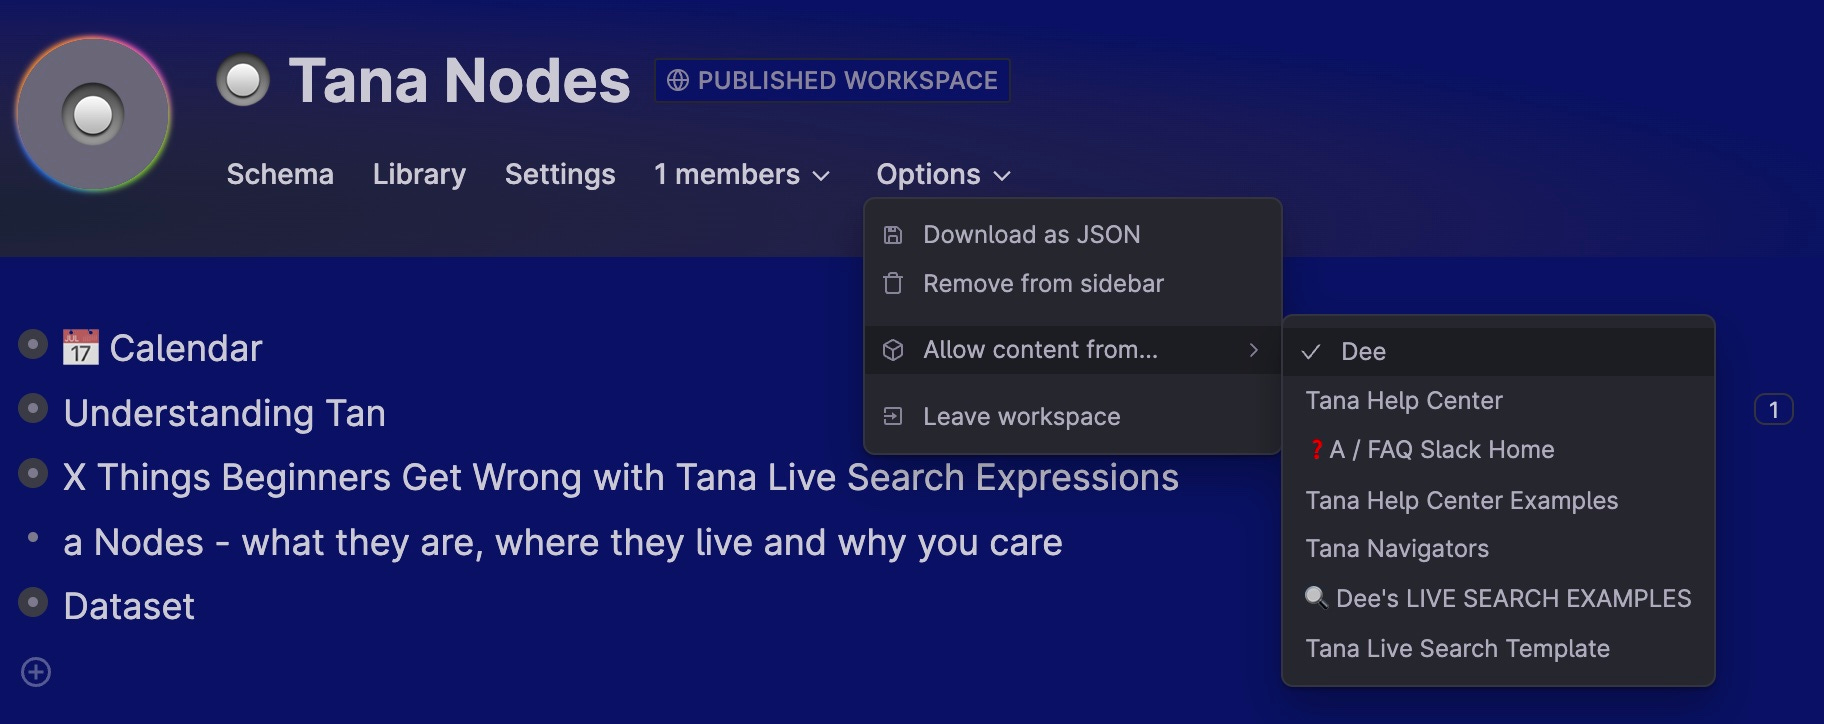
The use of this operator depends on how you have your SYSTEM SETTING>ALLOW CONTENT FROM set.
This WORKSPACE operator limits your search results to the referenced Workspace, but only among those selected for ALLOW CONTENT FROM in your system settings. If the Workspace is not selected in the SETTINGs, this WORKSPACE operator will not force it to select from that Workspace.
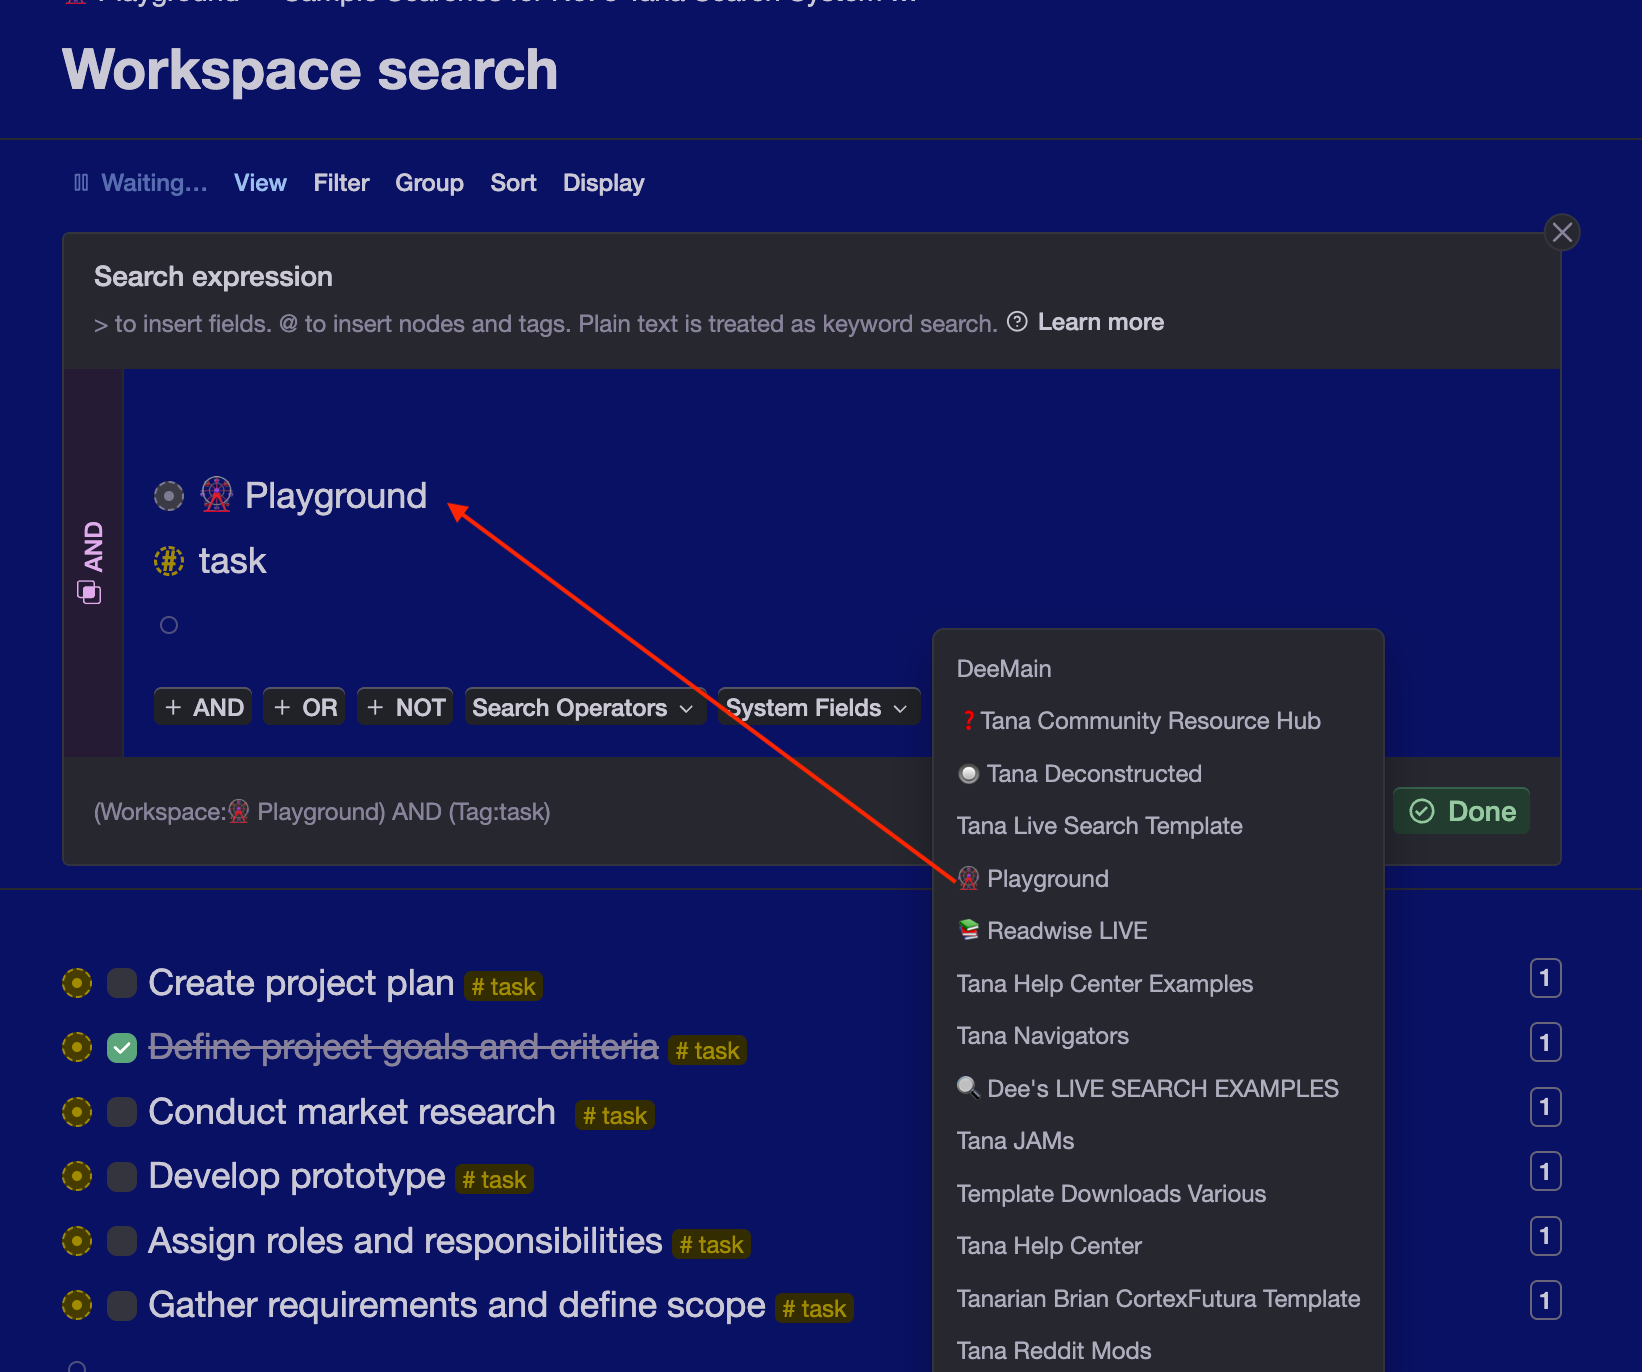
You select which WORKSPACE using the WORKSPACE button next to the System Field button
⚠️ Just because you note a workspace name using this feature - doesn't mean it will actually be included. You must also have the Workspace selected in the settings option "Allow Content From."
NUMBER OF REFERENCES
System Fields
Limits your search based on the number of references a node has.
⚠️ I have not found the reference counts to be very helpful as they are skewed by search nodes (if a node is a result of a search node, Tana counts it as a reference).
CALENDAR DATE FROM DAY
System Fields
If you originated the node on a DAY node (daily page), this field results in that DAY node. In many cases, this will be the same as the created date.
If you originated the node on any node other than the Day node, this field would be blank, whereas the created-date field is never blank.
👀 If you primarily work from your DAY page AND you go back or forth in time to enter a node on a future or past DAY page, then this field can be very helpful as it will always show the day node upon which it was entered.
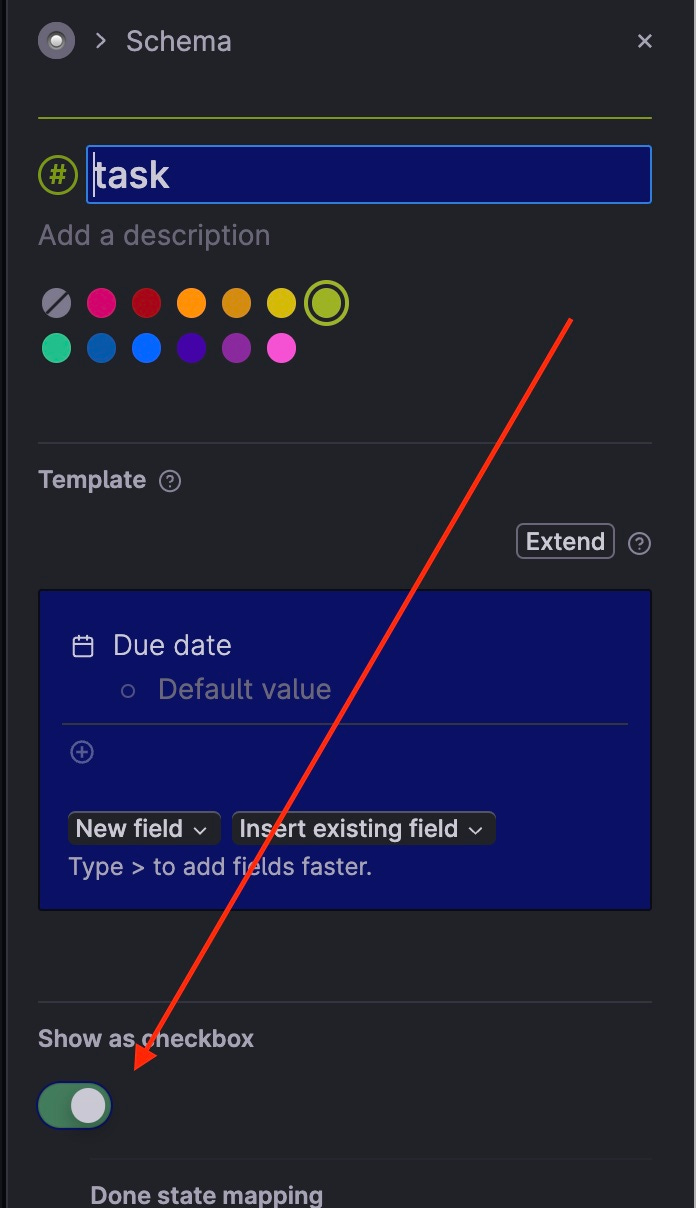
DONE AND DONE TIME
System Fields
Both of these system fields relate to checkbox nodes.
You can create a check box node in one of two ways:
1) Using the shortcut CMD/CTRL Enter; or
2) Selecting the "Show as Checkbox" option in the supertag configuration.
⚠️ Checkbox nodes are not related to any specific Supertag. You may have a Supertag called #todo or #task, but if you hadn't designated those Supertags as checkbox nodes, this system-field would not return those nodes in the search results.
👀 It's a good idea for tags like todo or task to have the "SHOW AS CHECKBOX" selected in the Supertag configuration to be included in your search results when using the DONE and DONE TIME.
👀 You can use most of these same system fields in the "Build Title from Fields" option, but you reference them differently. For a list of syntax to reference these system fields on your title, see Tana Help Center "Title Expressions."
Back to Table of Contents
6. Workspace
System Fields
In the WORKSPACE dropdown is a list of all available workspaces. Select one of these for the value of your WORKSPACE field used above.
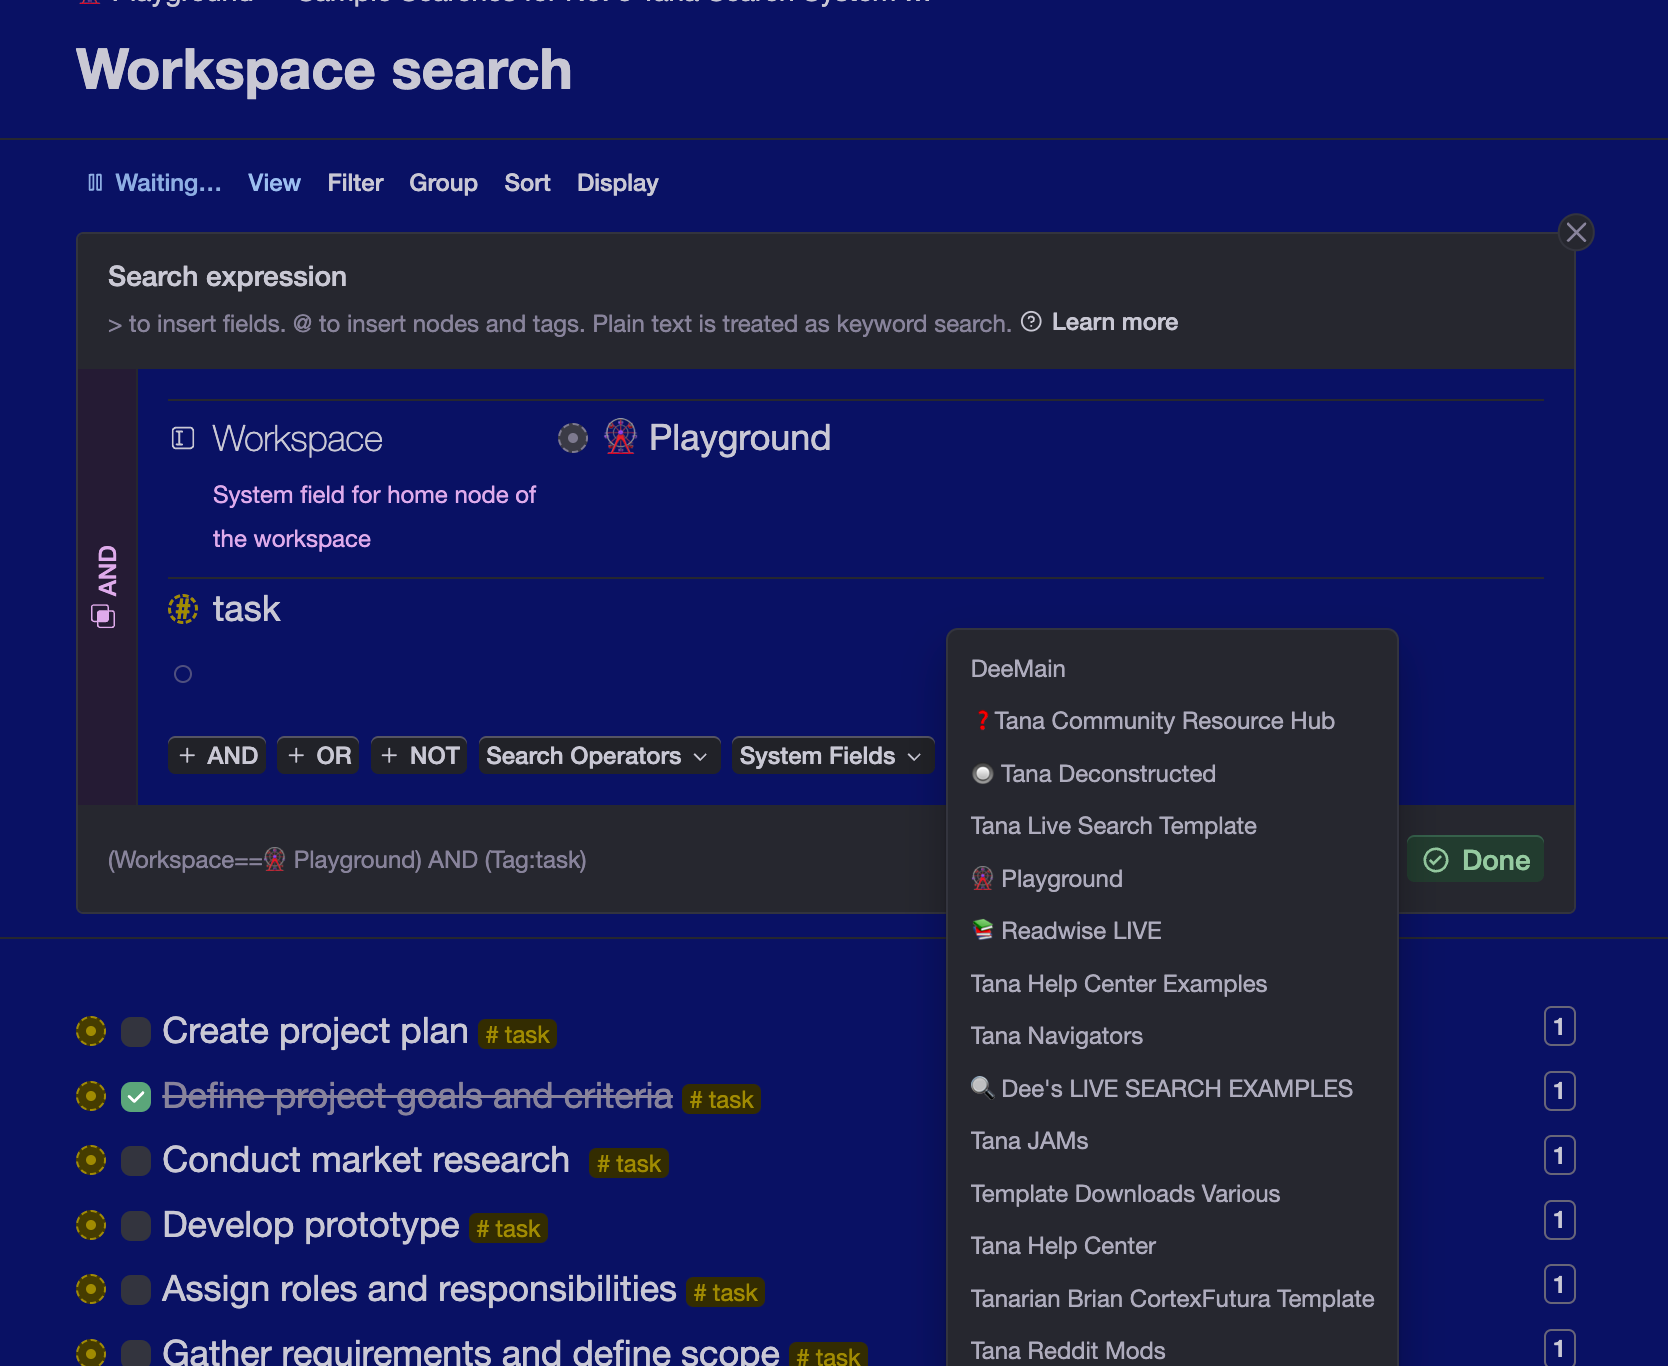
👀 Although you can't force Tana to search a workspace you have not selected in your SETTINGS>Options, you can limit your results to one or more WORKSPACEs you have turned on in Options.
Back to Table of Contents
Which system field do you use most and how?
7. Learn more
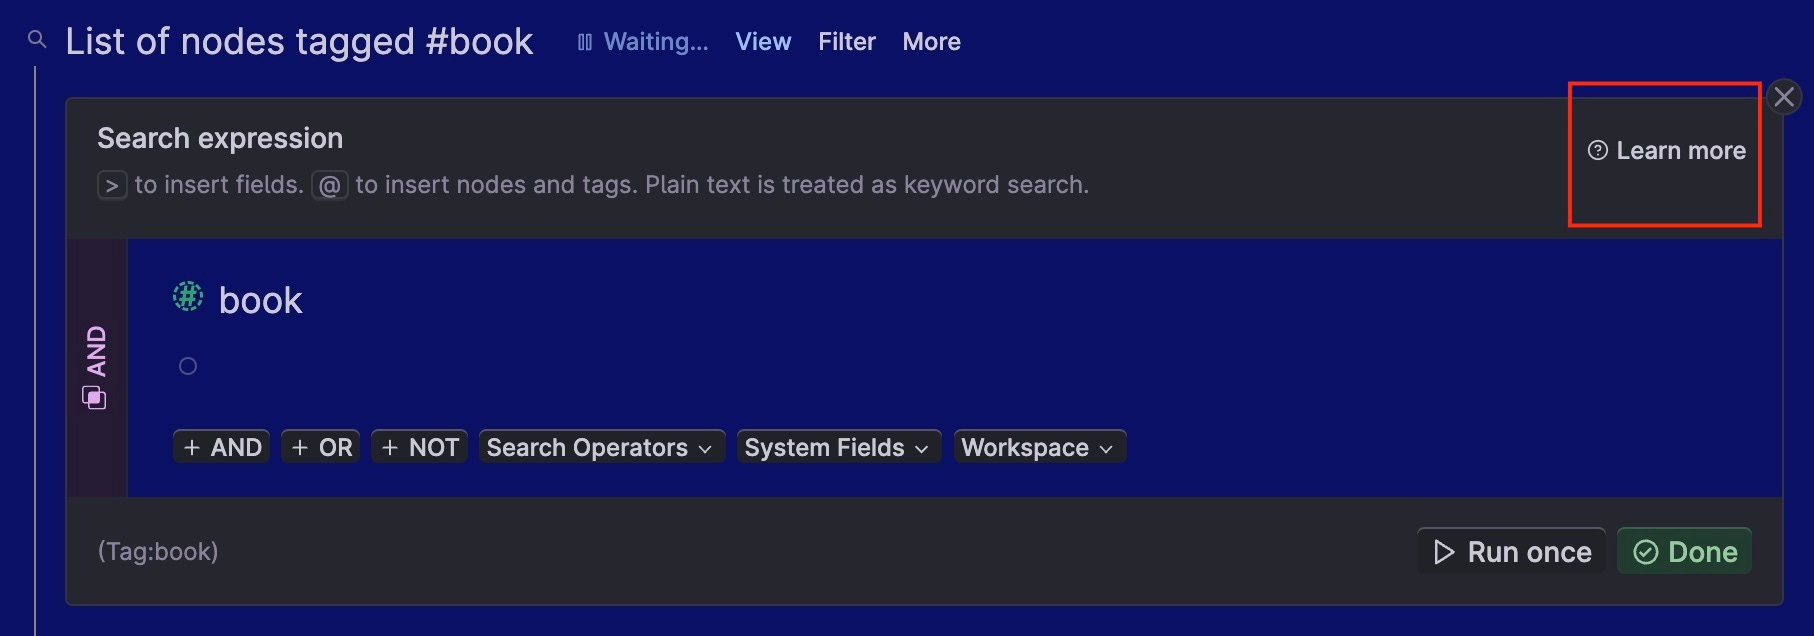
The "learn more" button is a handy Tana Help Center Live Search page link. It's a great quick reference guide.
👀 This Help Center page, LIVE SEARCH, is chock-full of helpful information. It's well worth your time to review it in detail.
Back to Table of Contents
8. Run Once
Run Once does not technically perform a live search. It's a preview of sorts, so you can 'test' your search parameters. You know it's not "live" because the search box will remain open with RUN ONCE.
Back to Table of Contents
9. Linter
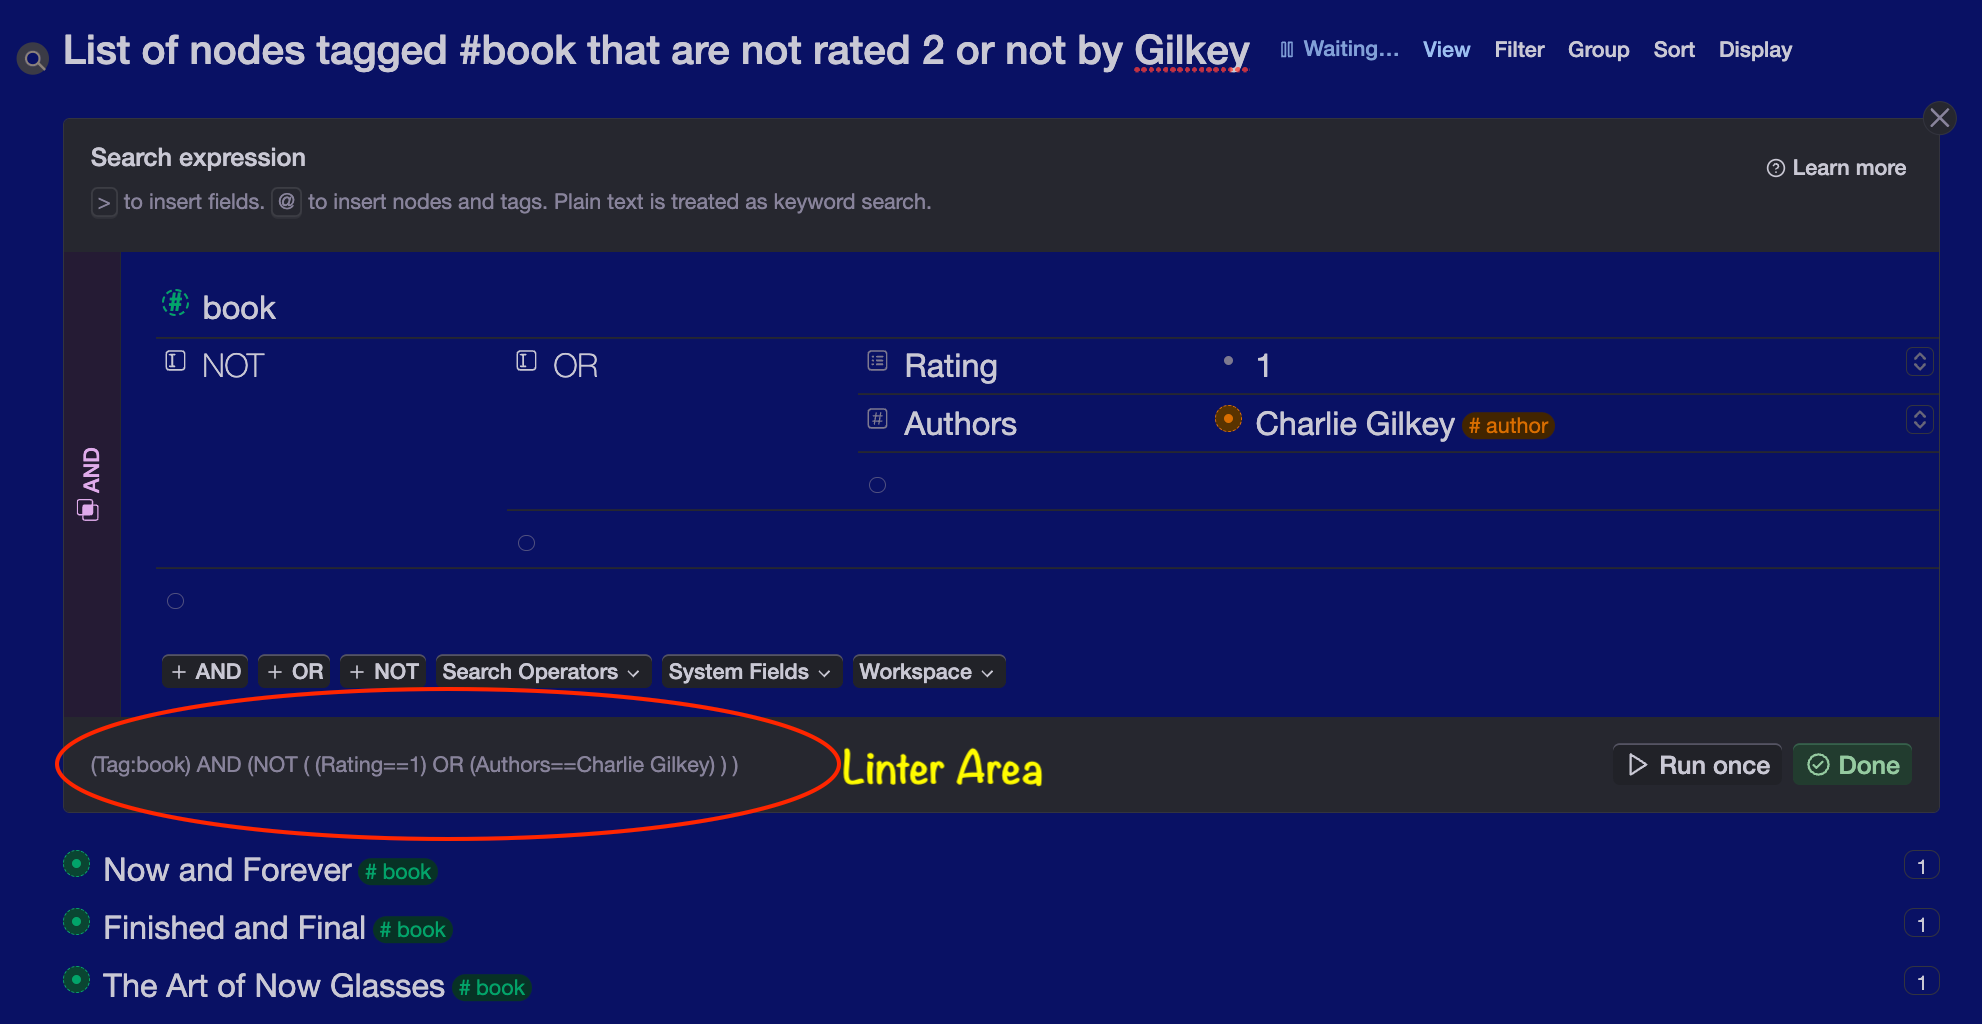
Linter is a programming word for a tool that finds logical errors in your search.
In this LINTER area, TANA translates your search parameters into a language/format you might better understand (and resembles a Boolean search expression).
It can be beneficial to see if what you asked Tana to do, is actually what Tana heard.
It's especially helpful when using keywords such as PARENT or GRANDPARENT. As the example below shows, the LINTER precisely shows what the PARENT keyword looks at:
Back to Table of Contents
10. Results
Not surprisingly, this area is for your results.
If you select RUN ONCE, this area is below the open QUERY box. If you select DONE, the QUERY box is closed, and the results show below the search node.
Results when Query Box is open:

Results when Query Box is closed:
Back to Table of Contents
11. Done
Selecting DONE initiates the search in LIVE mode. And, as previously noted, it closes the Query box.
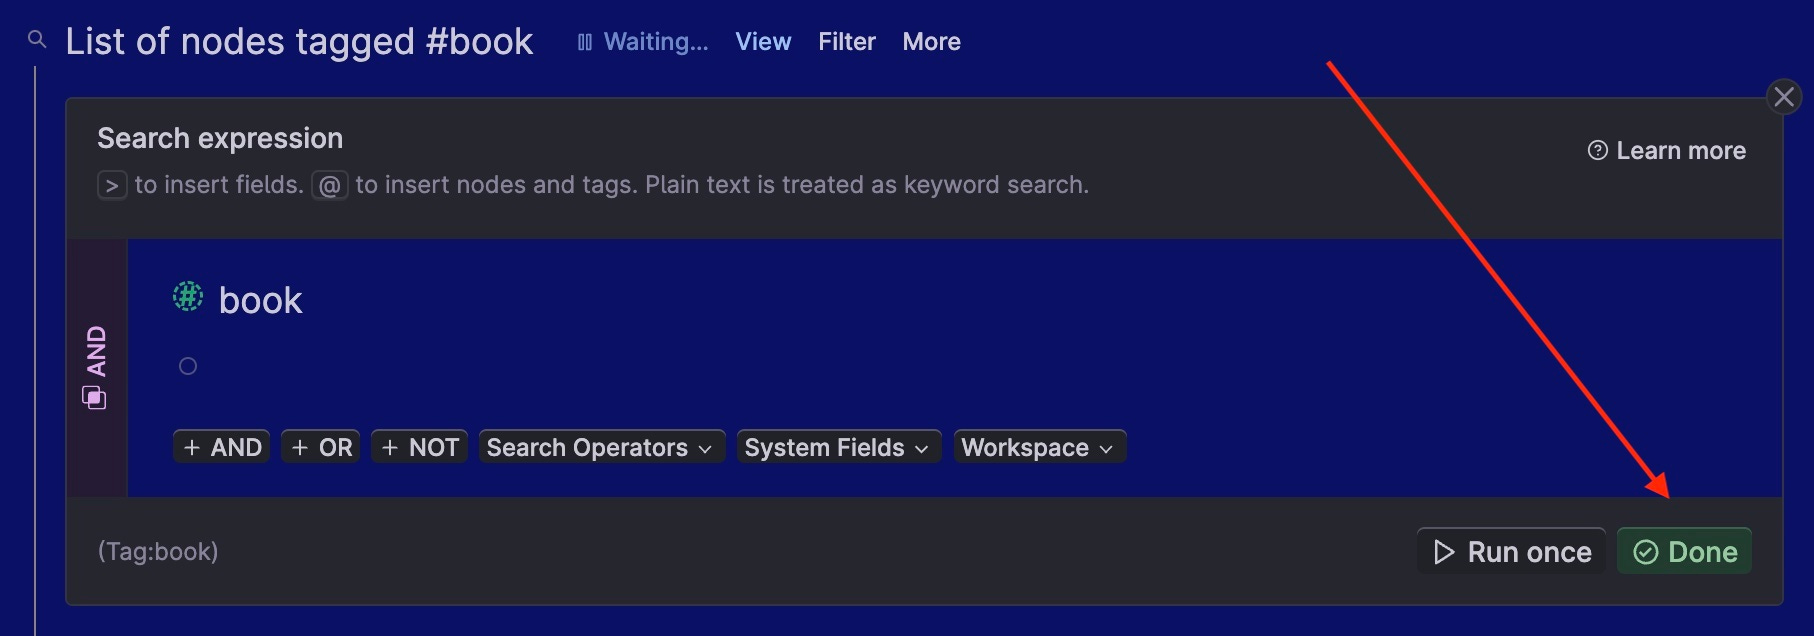
Back to Table of Contents
12. Conclusion
Congratulations! You have deconstructed the entire Tana Live Search Expression box! You might want to bookmark this article to use as a reference in the future. At the very end (after the acknowledgments), you’ll find a detailed index to help you find whatever you need whenever you want it.
In the next monthly deconstruction, we will continue with Live Search and cover:
Search structure and order
The difference between plain text values, search operators, system nodes, and system fields.
The search node itself and its relation to other nodes
Between now and then, you’ll receive a shorter, less intense deconstruction called “T5 Decon,” where we discuss Tana tips, tricks, treats, template reviews, and tantalizing talk about new features.
I’m not an expert at Tana, nor do I work for them. As a passionate volunteer and avid user, I research these deconstructions to help me learn, but I write them to help you avoid the mistakes I’ve made as a beginner. I’ve done my utmost to ensure the accuracy of this information including extensive testing and review by other Tana users more experienced than I am. That said, I’m human. I make mistakes. If you find an error - please comment here, DM me on SLACK @Dee Todd, or DM me on Twitter @denisehtodd
ACKNOWLEDGEMENTS
Special thanks to the following Tana users for their support:
@Kamara S. on Slack for her excellent suggestions and corrections to the original draft; Twitter
@David Delgado Vendrell on Slack for his review of the original draft; Twitter;
@Andrew Altshuler on Slack for his Tana Jam sessions and review of the original draft; Twitter; Tools for Thought on Substack
Shande Niemann for the creation of the fabulous Tana Deconstruction logo; @ShandeN on Slack;
@TfTHacker on Twitter and Slack;
on Substack for his support and teachings since I was a true beginner -- starting with Roam, then Obsidian, Napkin, and Tana.All the other Tana Navigators (not mentioned already) who put up with my constant questions and suggestions.
Matt McKinlay, Fei-Leng Tseng, and the rest of the awesome Tana Team for their constant support, and for creating the next-generation Tool for Thought. Twitter
INDEX
⚠️ Beginner’s warning on guidance “Plain Text is treated as keyword search - it’s accurate but can be confusing when we start to take about Tana Keywords.
⚠️ Beginners’ warning: The two locations of the AND operator can confuse Tana newcomers. One is implied while the other is specifically included in the search expression.
⚠️ Searching on a node description does not appear to be working as of the publication date
CREATED BY / MODIFIED BY (dates and times)
⚠️ The person who created the node and the “OWNER” of the node are NOT the same. The CREATED BY is a person, and the OWNER is a place in the system.
⚠️ Owner is not a person, but a place in your workspace.
⚠️ For a reference node, its parent and owner will be different.
⚠️ will limit the search to WORKSPACES selected but they must also be enabled in your workspace options.
⚠️ I have not found the reference counts to be very helpful yet as they are skewed by search nodes (if a node is a result in a search node it is counted as a reference).
👀 If you skip ahead or back in time to enter nodes on a future or past day node, this field can be very helpful as it will always show the day node upon which it was entered, and will be different from the date created.
⚠️ These are not related to any specific supertag. It’s a good idea for tags you create that represent things like a todo or task to have the "SHOW AS CHECKBOX" selected.
👀 You can't make TANA search a workspace that is not turned on in options; you can, however, limit your results to one or more workspaces that ARE turned on in Options.
👀 This Tana documentation help page, LIVE SEARCH, is well worth your time to review in detail.
Dee, this is so in-depth. I'm pinned this because I know I'm going to have to keep coming back to it. Thanks for sharing!